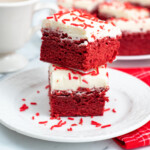
Red Velvet Brownies Recipe
This amazing Red Velvet Brownie recipe makes the best, perfectly dense and chewy chocolatey brownies! Topped with a rich and tangy cream cheese frosting, they make a delicious Valentine’s Day treat!
Servings 9
Calories 470kcal
Equipment
Ingredients
For The Brownies
- 1/2 cup butter softened
- 1/3 cup semi-sweet chocolate chips
- 1 cup granulated sugar
- 3 eggs
- 1 teaspoon vanilla extract
- 1 teaspoon apple cider vinegar
- 1/4 teaspoon salt
- 1/2 teaspoon baking powder
- 1 cup flour
- 1-2 teaspoons red gel food coloring
For The Frosting
- 4 ounces cream cheese
- 1/4 cup butter softened
- 1/4 teaspoon vanilla extract
- 2 cups powdered sugar
- Pinch of salt
- Red sprinkles optional
Instructions
For The Brownies
- Preheat the oven to 325 degrees. Line an 8×8 or 9×9 inch pan with parchment paper. Butter the bottom and sides of parchment paper and set it aside.
- Add the chocolate chips and butter to a medium size saucepan.
- Melt over low heat, stirring frequently until completely melted and smooth. Remove from heat.
- Add the sugar to the chocolate mixture and whisk in sugar until well incorporated.
- Add eggs one at a time mixing thoroughly between each addition. Stir in vanilla extract, salt, and vinegar.
- In a separate mixing bowl, whisk together flour, baking powder and salt until well mixed.
- Gradually add the flour mixture to the chocolate mixture, mixing well between each addition.
- Add 1 teaspoon of the red food coloring and mix well. For a deeper shade of red, add more food coloring and continue mixing until well blended.
- Pour the red velvet brownie batter into your prepared baking pan, and smooth evenly. Place in oven and bake for approximately 45-55 minutes, until a toothpick inserted in the center of the brownies comes out clean.
- Remove from the oven and place pan of brownies on a cooling rack to cool completely.
For The Frosting
- In a medium size bowl, cream together the cream cheese and butter with an electric mixer until light and fluffy. Add vanilla and mix again.
- Add powdered sugar a little at a time, stirring between each addition until the powdered sugar is completely incorporated.
- Spread the cream cheese mixture evenly across the top of the brownies.
- Top with sprinkles if desired. Remove the brownies from the pan and cut them into 9 squares. Enjoy!
Notes
- The time will vary depending on if you’re using a metal or glass pan. Set a timer for 35 minutes and start checking to see if they are done. After that, check them every 5 minutes until they are completely done.
- Be sure to use no-taste red food coloring. Regular liquid or gel food coloring can sometimes leave a bitter taste when used in large quantities.
Nutrition
Serving: 1g | Calories: 470kcal | Carbohydrates: 63g | Protein: 5g | Fat: 23g | Saturated Fat: 14g | Polyunsaturated Fat: 8g | Trans Fat: 1g | Cholesterol: 115mg | Sodium: 287mg | Fiber: 1g | Sugar: 50g