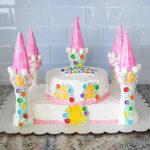
Princess Castle Cake
This magical Princess Castle Cake might look fancy but it's easier to make than you'd think. It's a beautiful cake that makes the perfect addition to any princess themed birthday party!
Servings 32
Calories 220kcal
Equipment
- piping tips
Ingredients
- 3 boxes yellow cake mix and ingredients on box
- 4 containers white frosting *see notes
- 9 ice cream cones (flat bottom)
- 5 sugar cones
- pink sugar sprinkles
- pink food coloring
- yellow food coloring
- green food coloring
- 32 candy flowers
- 4 ounces white fondant *see notes
- 35 mini marshmallows
- 2 cups shredded coconut optional
Instructions
- Using boxed cake mixes, you will bake four cakes in all: two 8" rounds and two 9x13 rectangular.3 boxes yellow cake mix
- To start the design, frost nine regular ice cream cones, but leave the bottom unfrosted.4 containers white frosting, 9 ice cream cones (flat bottom)
- Next, frost the five sugar cones.5 sugar cones
- Once the cones are frosted, sprinkle them with pink sugar sprinkles.pink sugar sprinkles
- Store cones in the refrigerator until you're ready to assemble the cake.
- Before you put your cakes together, you'll need to level them. I highly recommend an inexpensive cake leveler, just because it's so much easier to use than a serrated knife. Don't worry if the corners are a little uneven, because you'll be cutting them off to add the towers anyway.
- Place one 9x13 cake, leveled side down, on a large platter. If you don't have a platter big enough, you can use a cardboard cake board (which was what I did).
- Frost the top of the cake with white frosting and place the second 9x13 cake on top, leveled side down again. Now, frost the entire cake.4 containers white frosting
- Level the round cakes. You may want to use a cardboard round (it makes serving much easier), but you don't have to. Place the first round cake in the center, leveled side down, and then frost the top.4 containers white frosting
- Add the second round cake on top of it, also leveled side down. Now you are ready to frost. Don't worry if it's not perfect, because you can always go back later and add more frosting.
- Cut off a small part of each corner, just large enough to fit the cones.
- Since the bottom of the cone is wider, you'll want to cut a little deeper into the bottom of the cake. Add some extra frosting to the corner of the cake, then push the tower into it. You may have to make a few more small cuts to get it just right. If you have a little gap, don't worry about it. You can use frosting to fill it in.
- Frost the flat top of the cone and place another one on top. Smooth out the frosting on the sides.
- Now frost the inside of the top cone and place the sugar cone upside down inside it.
- Cut a hole in the top of the round cake to hold your last tower. It doesn't matter if you don't cut it to the exact size. Don't forget to ice the inside of the regular cone to hold the pink sugar cone in place. I cut my hole towards the back of the cake so I'd have room for a happy birthday message but you can put it in the middle if you're not adding a message.
- Insert a frosted cone in the hole, then add the pink sugar cone.
- Now it's time to have some fun decorating! Mix up some pink frosting and pipe it around the base of each of the cakes. You can also use it to decorate the turrets. Add mini marshmallows to the turrets as well, then add your Happy Birthday message.pink food coloring, 35 mini marshmallows
- Originally, I rolled out the fondant and brushed yellow food coloring over the top. If I were to make this again, I would mix the food coloring right into the fondant, then roll it out (but either option works).yellow food coloring, 4 ounces white fondant
- Cut four windows and a door from the fondant. Use pink frosting to make the windowpanes and add a small dot of pink to the door to make the doorknob.
- Mix up some green frosting and add it to a piping bag. Pipe vines on the turrets and around the windows, then add candy flowers.green food coloring
- Add vines and flowers around the front door.32 candy flowers
- To add the finishing touch, place shredded coconut in a freezer bag, along with a few drops of green food coloring. Seal the bag and shake until the coconut is evenly covered. Sprinkle the "grass" around the edges of the cake, add your princess figurines and enjoy!2 cups shredded coconut
Notes
- Some ingredient amounts, the frosting and fondant for example, are estimates. The first version of this tutorial didn't include ingredient amounts (it was one of the first posts on the blog). I've since updated the post and am adding the ingredient amounts based on my best estimates. You may want to have a little extra frosting or fondant on hand, just in case you need it.
- You may want to bake your cakes the day before you plan to decorate it, since building this cake takes a good bit of time.
Nutrition
Serving: 1g | Calories: 220kcal | Carbohydrates: 46g | Protein: 2g | Fat: 4g | Saturated Fat: 3g | Polyunsaturated Fat: 0.2g | Monounsaturated Fat: 0.5g | Trans Fat: 0.1g | Sodium: 376mg | Potassium: 45mg | Fiber: 1g | Sugar: 24g | Vitamin C: 0.04mg | Calcium: 104mg | Iron: 1mg