Easy Fruit Popsicles
This post may contain affiliate links. As an Amazon Associate, I earn from qualifying purchases.

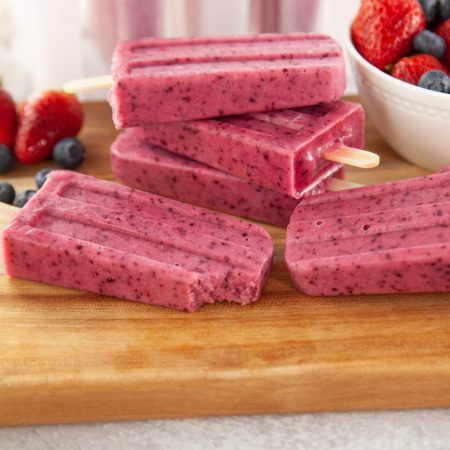
If these deliciously easy fruit popsicles don’t cool you down on a hot summer day, nothing will. With just four simple ingredients, you’ll have a freezer full of creamy, refreshing treats in no time.

Easy Homemade Fruit Popsicles Recipe
I don’t know about you, but at my house, summer fun and popsicles go hand in hand. The only catch is I want them made with real fruit, not artificial flavors or weird ingredients I can’t pronounce. These Easy Fruit Popsicles check all the boxes.
They’re cold, creamy, and taste like actual fruit instead of fake, sugary syrup. And the best part is blended, fresh berries, yogurt, and a little juice are all you need to make them. Pour the mixture into molds, pop them in the freezer, and you’ve got a healthy frozen treat ready in no time.
When you love these homemade frozen treats, you’ll also want to check out my fun Rainbow Popsicles too!

Why We Love This Recipe
- Simple ingredients: Uses just four real ingredients you probably already have.
- Perfect texture: Freezes into smooth, creamy pops with no icy pockets.
- Healthy treat: A fun way to cool off without added sugar or artificial flavors.
Ingredients

- Orange juice: Adds bright citrus flavor and helps everything blend smoothly.
- Vanilla Greek yogurt: Makes the popsicles creamy and adds a little sweetness.
- Strawberries: Fresh or frozen, they add to the berry flavor and pretty color.
- Blueberries: Adds a deeper berry flavor and a little tang.
Find the full printable recipe with measurements and directions in the recipe card below.
How to Make Fruit Popsicles
Step 1. These healthy fruit popsicles are super easy to make! Start by adding the orange juice, vanilla Greek yogurt, strawberries and blueberries to your blender.

Step 2. Blend until smooth, about 30 seconds to a minute.

Step 3. Carefully pour the fruit mixture into popsicle molds.

Step 4. Place the filled mold in the freezer for 3-4 hours of until firm. Enjoy!
How To Store Homemade Popsicles
Homemade popsicles can be stored up to 6 months in your freezer. Of course, you’ll need to be sure that they’re frozen at a constant temperature. While they’ll last for up to six months, they’re best eaten within the first two months because that’s when they’ll taste the freshest.
You just don’t want to defrost then refreeze your popsicles because then you may run the risk of them spoiling.

Variations And Add-Ins
This fruit popsicles recipe is easy to switch up with different flavors, juices, or frozen fruit. Make your own homemade popsicles your way.
- Fruit juice: Swap orange juice for apple juice, coconut water, coconut milk or a splash of lime juice for a different flavor.
- Tropical twist: Add mango or pineapple for a tropical twist on the fruit popsicle recipe.
- Other fresh fruit: Try strawberries and peaches together for a sweeter popsicle flavor combo. Watermelon, grapefruit, peaches, coconut, blackberries, cranberries, kiwi and even bananas are some other great options.
- Yogurt: Use plain yogurt with a touch of honey or maple syrup if you don’t have vanilla flavored yogurt. Or, for an ice pop texture, skip the yogurt and use only fruit and juice
- Fruit pieces: Add finely chopped frozen fruit or berries for texture. Blueberries work especially well.
- Mold option: Pour the mixture into small paper cups if you don’t have a mold, then poke a popsicle stick in once partially frozen.

Tips And Tricks
Making homemade fruit popsicles is super easy, but a few simple tricks can help you get the best texture and flavor.
- For the best texture, stick with Greek yogurt. It helps create creamy popsicles without making them icy.
- If your fruit is frozen solid, let it thaw for a few minutes so it blends easily.
- Pour slowly into the popsicle mold to avoid air bubbles. You can also tap the mold lightly on the counter once they are filled.
- When ready to enjoy, run warm water over the mold for a few seconds, then gently pull to remove the popsicle.
- Reusable popsicle molds work best and make cleanup easy.

FAQS
Most homemade fruit popsicles need at least 4 hours but sometimes up 6 to 8 hours in the freezer. For the firmest texture, let them sit overnight before serving.
Too much fruit juice and not enough yogurt can make your popsicles icy. For creamy popsicles, stick with Greek yogurt and blend the fruit until very smooth.
If your fruit isn’t very sweet, try adding a splash of apple juice or a bit of natural sweetener like honey. Taste the fruit and yogurt mixture before freezing.
Depending on the ingredients you use in your popsicle recipe, the freezing time can range between 6 hours to 12 hours, maybe even more. Be sure the temperature in your freezer is at the lowest possible setting. This will help the popsicles freeze quicker…which means you don’t have to wait as long to enjoy them!
They are! This recipe for homemade popsicles is made with wholesome ingredients and no high fructose corn syrup, making them a healthy and refreshing treat for kids and adults alike.
More Cool and Delicious Recipes
Fruit Popsicles Recipe
Equipment
Ingredients
- 1 1/2 cups orange juice
- 3/4 cups vanilla greek yogurt
- 1 1/4 cups strawberries
- 1 cup blueberries
Instructions
- Place orange juice, yogurt, strawberries and blueberries in a high speed blender.1 1/2 cups orange juice, 3/4 cups vanilla greek yogurt, 1 1/4 cups strawberries, 1 cup blueberries
- Blend until smooth, about 30 seconds to a minute.
- Pour into popsicle molds and freeze until firm.
Video
Notes
- You can make this recipe with fresh or frozen strawberries and blueberries.
- For a sweeter popsicle, use apple juice instead of orange juice.
Nutrition
Did You Make This Recipe?
Share it with me on Instagram @funmoneymom and follow on Pinterest @funmoneymom for more!
Let’s be friends!
Did you love this post? Make sure to comment below and let me know your thoughts! And don’t forget to follow on your favorite social network below!

About Lisa O’Driscoll
Lisa O’Driscoll is a lifestyle and parenting expert, cookbook author, and the creative force behind Fun Money Mom, a popular blog she’s run since 2014. She’s the author of the children’s cookbook Roll It, Slice It, Mash It, Dice It, designed to get kids excited about cooking. With multiple TV appearances under her belt, she loves sharing her expertise on family-friendly recipes, creative DIYs, and party planning and is always on a mission to inspire and entertain!