
Princess Castle Cake
This post may contain affiliate links. As an Amazon Associate, I earn from qualifying purchases.
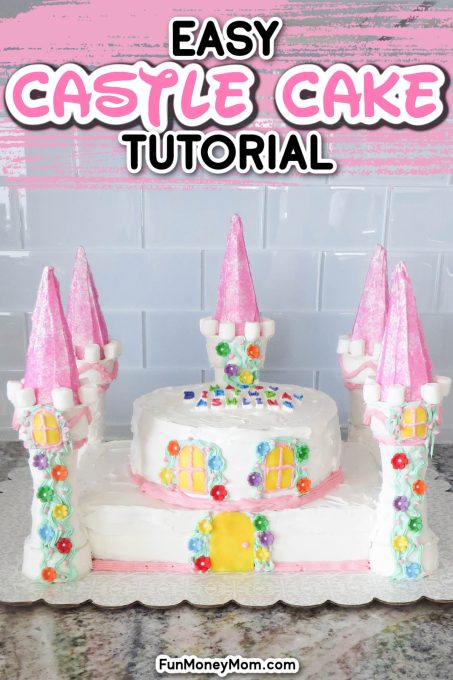
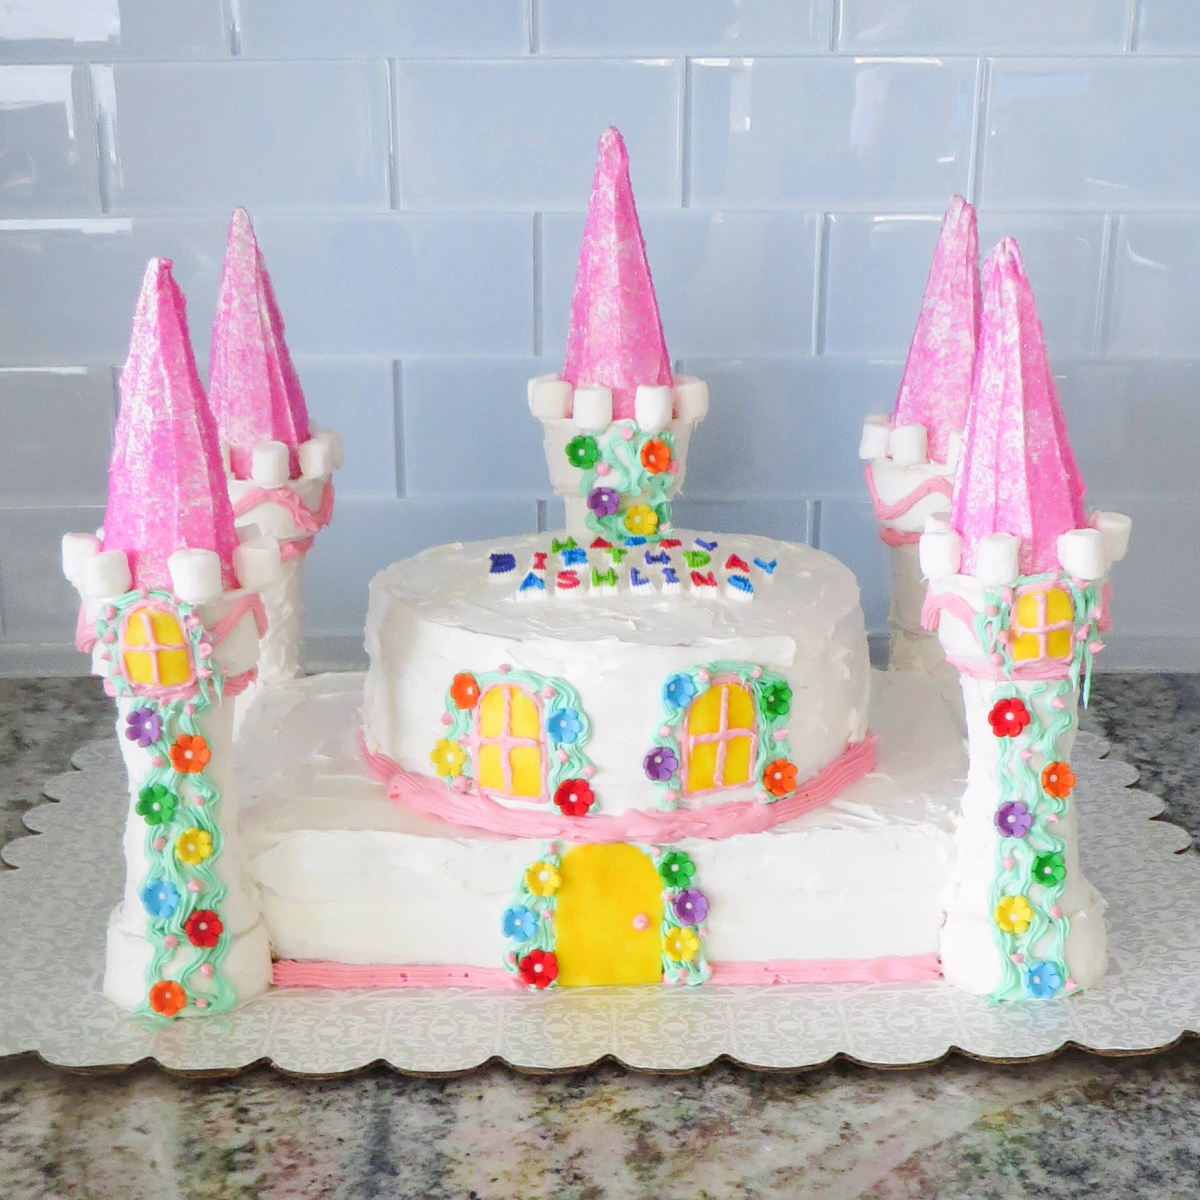
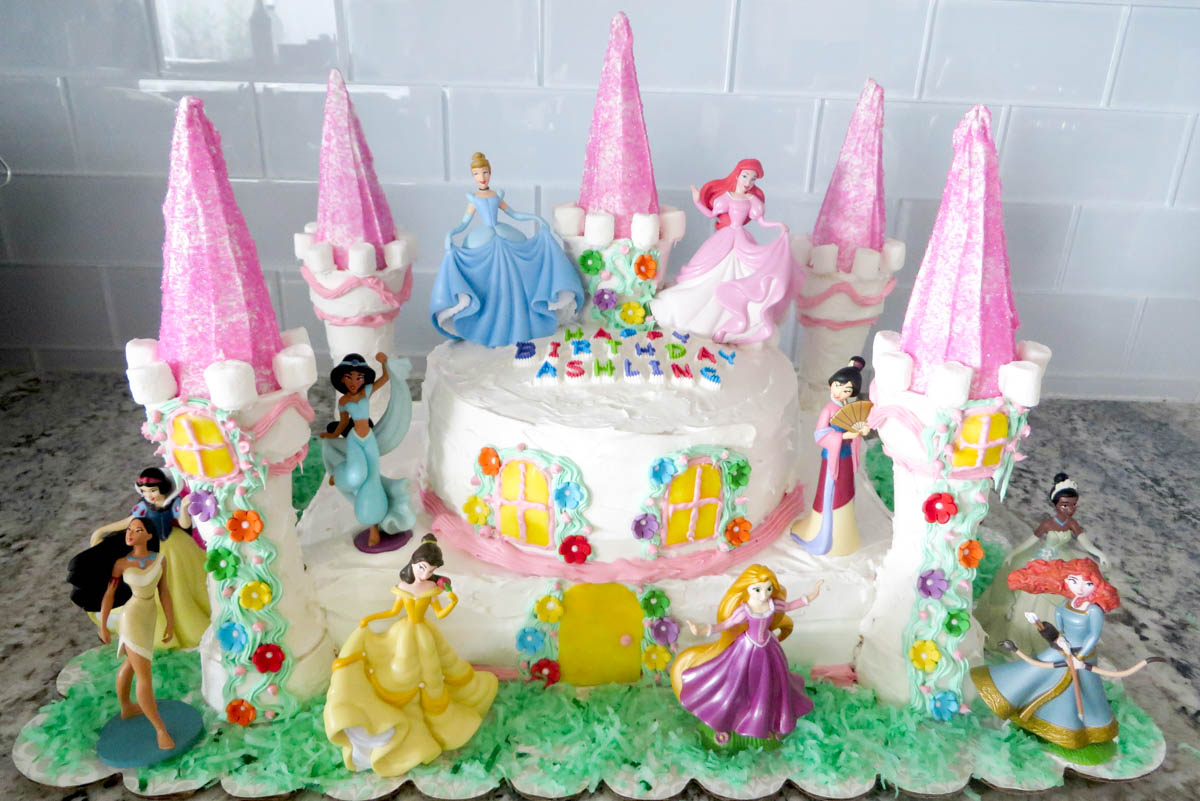
This magical Castle Cake will be the hit of your princess themed birthday party. Complete with pink turrets, cascading vines and Disney princesses, it’ll make any little girl feel like royalty!
Easy Castle Cake Recipe
One of my favorite things about having little girls is they love all things princess. So when it came time to throw a princess party for my oldest, I knew that not just any cake would do. My plan was to create a castle cake that would make any Disney princess proud.
While I am pretty crafty, I’m no professional baker. I looked on Pinterest but most of the cakes I liked were made by professionals and a little to extravagant for my DIY skills. So I took ideas from a variety of different cakes and decided to do my own thing…and I have to say, I love the way it turned out!
What makes this recipe better than most is that, not only is it delicious, it is truly beginner-friendly. It may take a little time, but this easy tutorial takes you through each step, from frosting the cake to creating towers and adding all the cute details like vines and flowers. Once you’re finished, you’ll have a show-stopping castle cake that’s perfect for any princess party.
If Rapunzel is a favorite in your house, you might also like my Rapunzel cake. If you’re looking for more princess party ideas, be sure to check out these Disney Princess Dress Up Ideas, these Princess Coloring Pages and Princess Party Favors.
Why We Love This Recipe
- Easy castle cake tutorial: Though there are quite a few steps, this cake is easy to make and you don’t have to be a professional baker to do it.
- Beautiful design: This colorful, two tier cake decorated with a beautiful castle design is any little girl’s dream cake.
- Budget-friendly: A homemade cake costs a fraction of what you’ll pay at a bakery. Plus, it’s super fun to make!
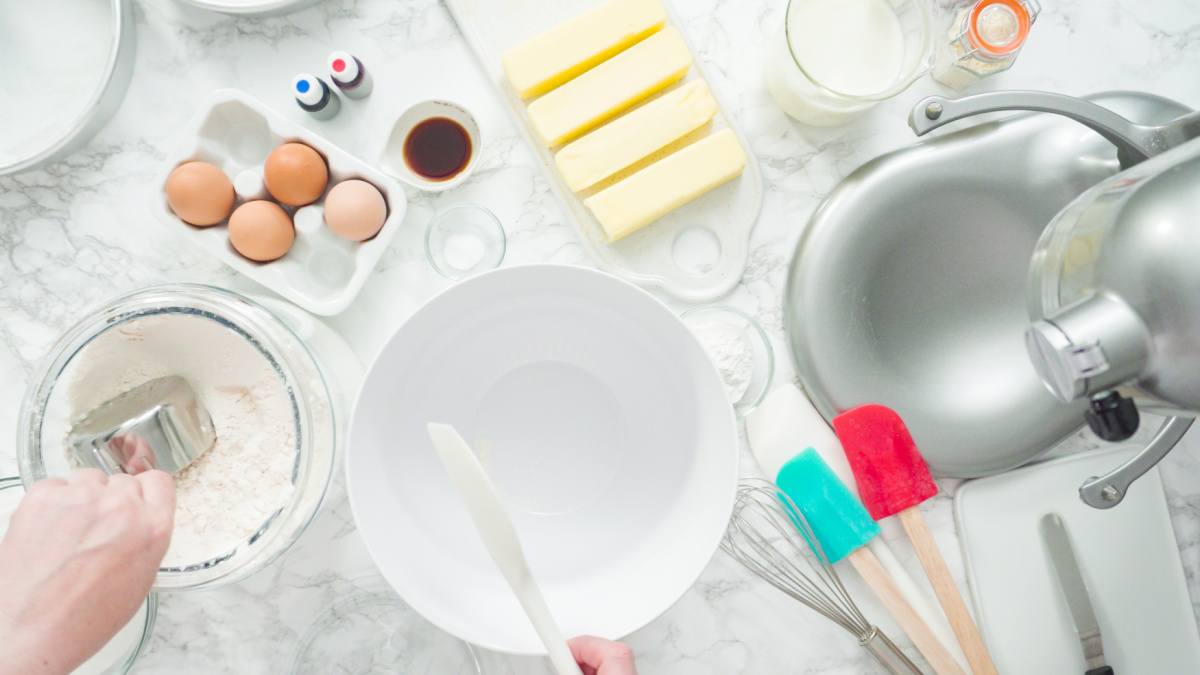
Ingredients
- Cake mix (plus the ingredients needed to make them)
- White frosting
- Ice cream cones (with flat bottoms)
- Sugar cones
- Pink sugar sprinkles
- Mini marshmallows
- White fondant
- Yellow, pink and green gel food coloring
- Candy flowers
- Shredded coconut
See recipe card below for ingredient amounts.
Important: Certain ingredient amounts, the frosting and fondant for example, are estimates. This is a very old recipe (and actually the first recipe that I added to my blog). It was more of a tutorial for putting the cake together so I didn’t add ingredient amounts at the time. I’ve since updated the recipe and am adding the ingredient amounts based on my best estimates. You may want to have a little extra frosting on hand, just in case you need it.
How to Make a Disney Princess Cake
Step 1. Using boxed cake mixes, you will bake four cakes in all: two 8″ rounds and two 9×13 rectangular.
Tip: Bake your cakes the day before the party since building a castle birthday cake takes some time.
Step 2. To start the design, frost nine regular ice cream cones, but leave the bottom unfrosted for now.
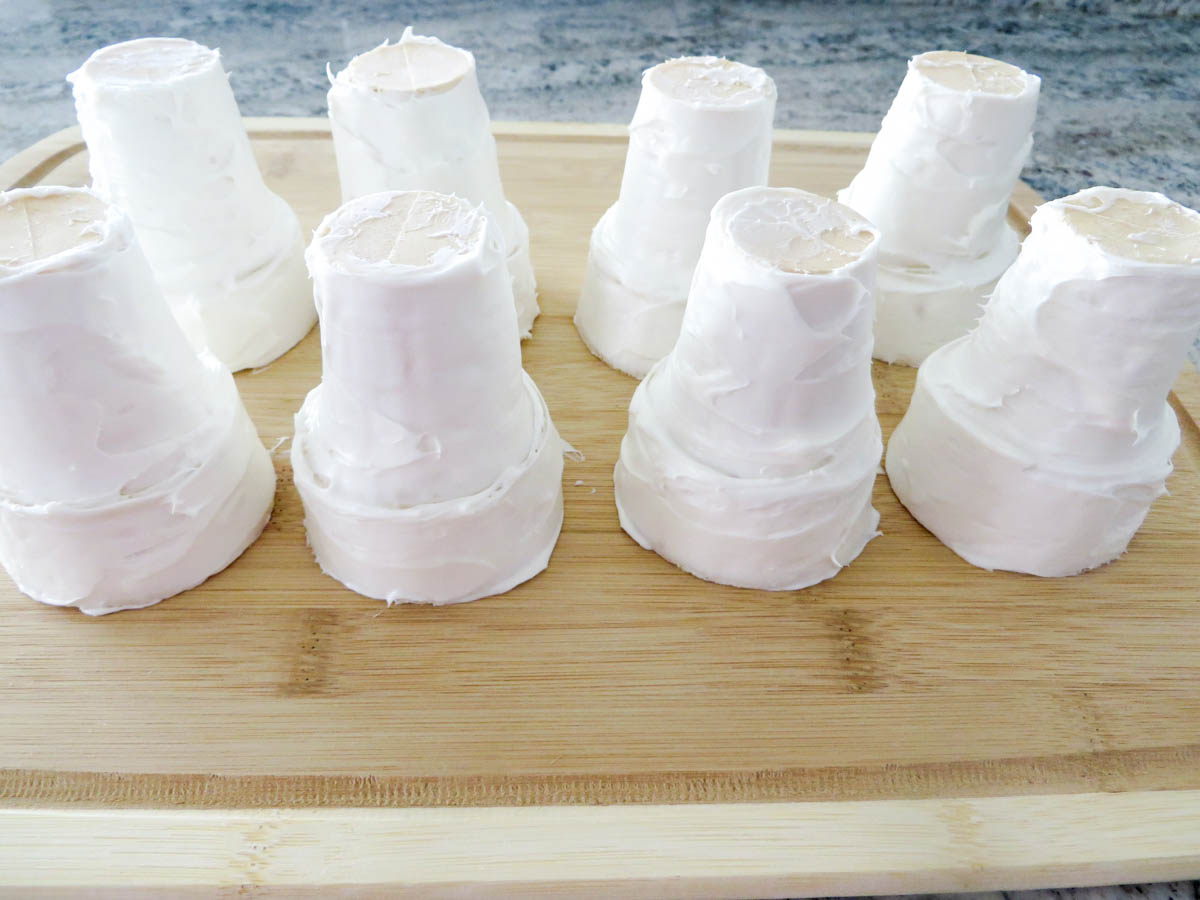
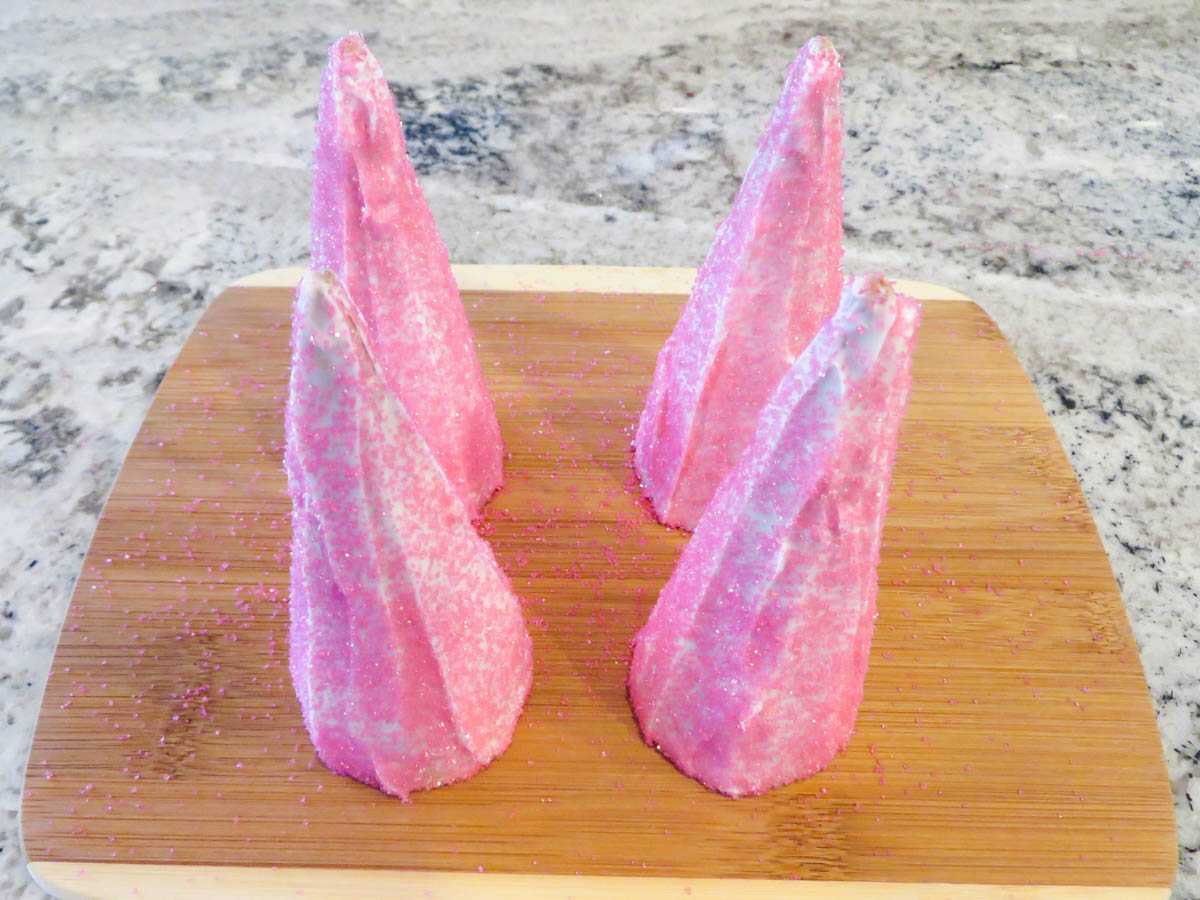
Step 3. Next, frost the five sugar cones.
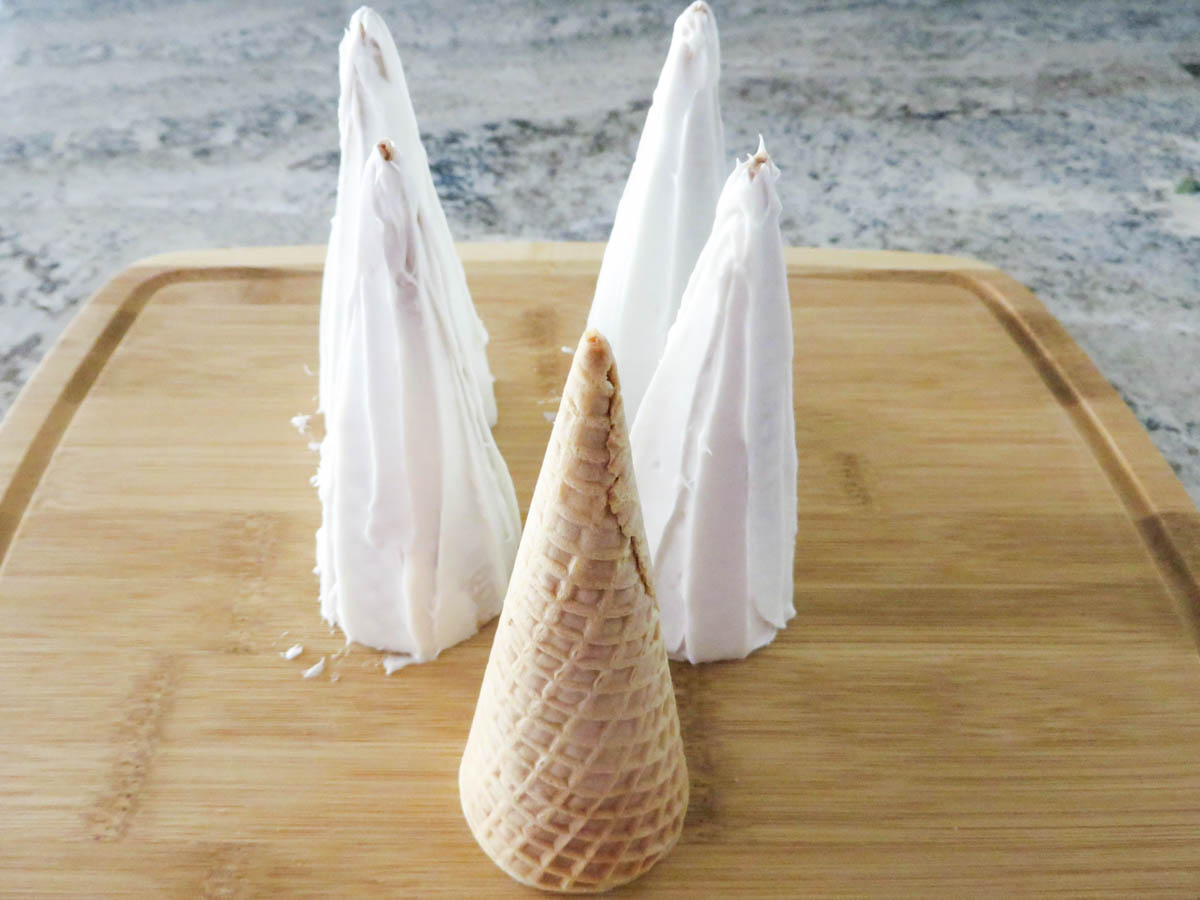
Step 4. Once the cones are frosted, sprinkle them with pink sugar sprinkles.
Step 5. Store cones in the refrigerator until you’re ready to assemble the cake.
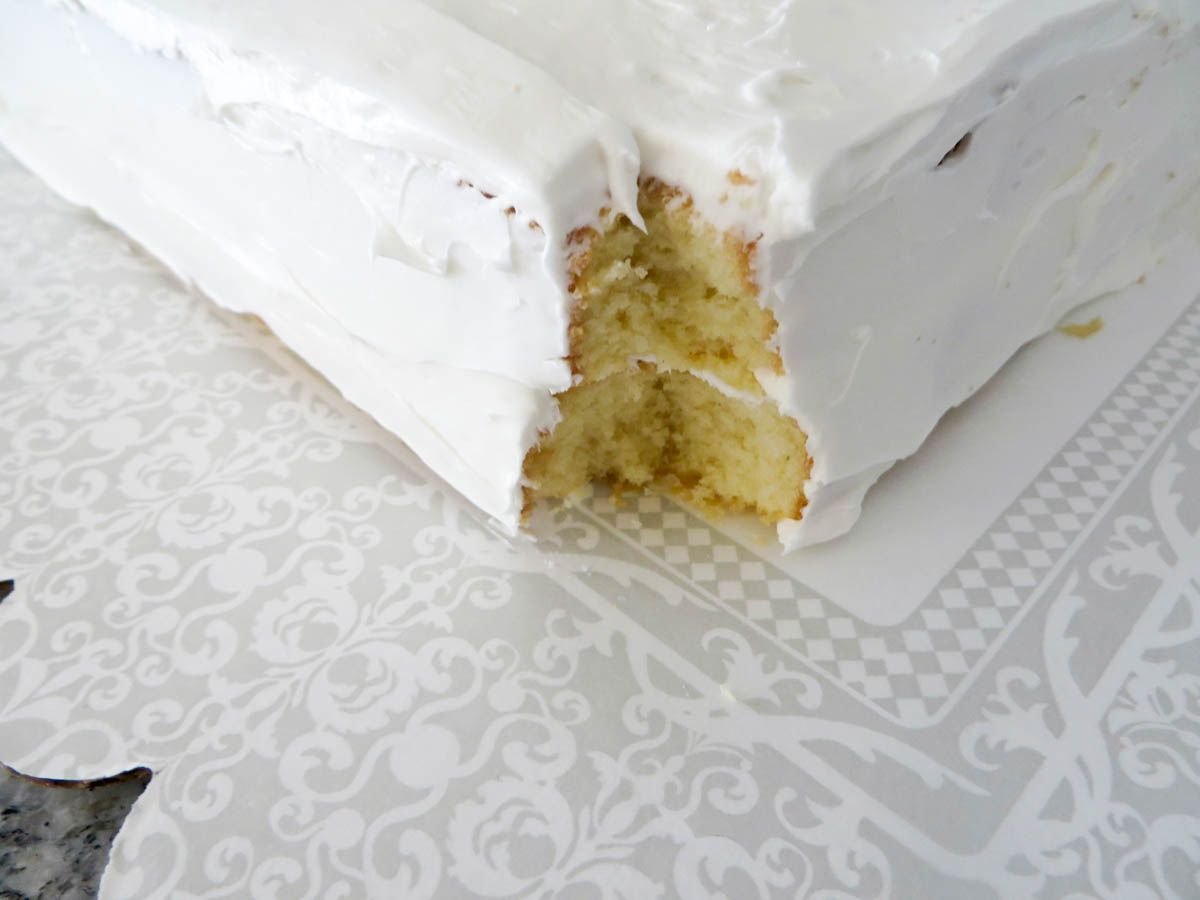
Step 6. Before you put your cakes together, you’ll need to level them. I highly recommend an inexpensive cake leveler, just because it’s so much easier to use than a serrated knife. Don’t worry if the corners are a little uneven, because you’ll be cutting them off to add the towers anyway.
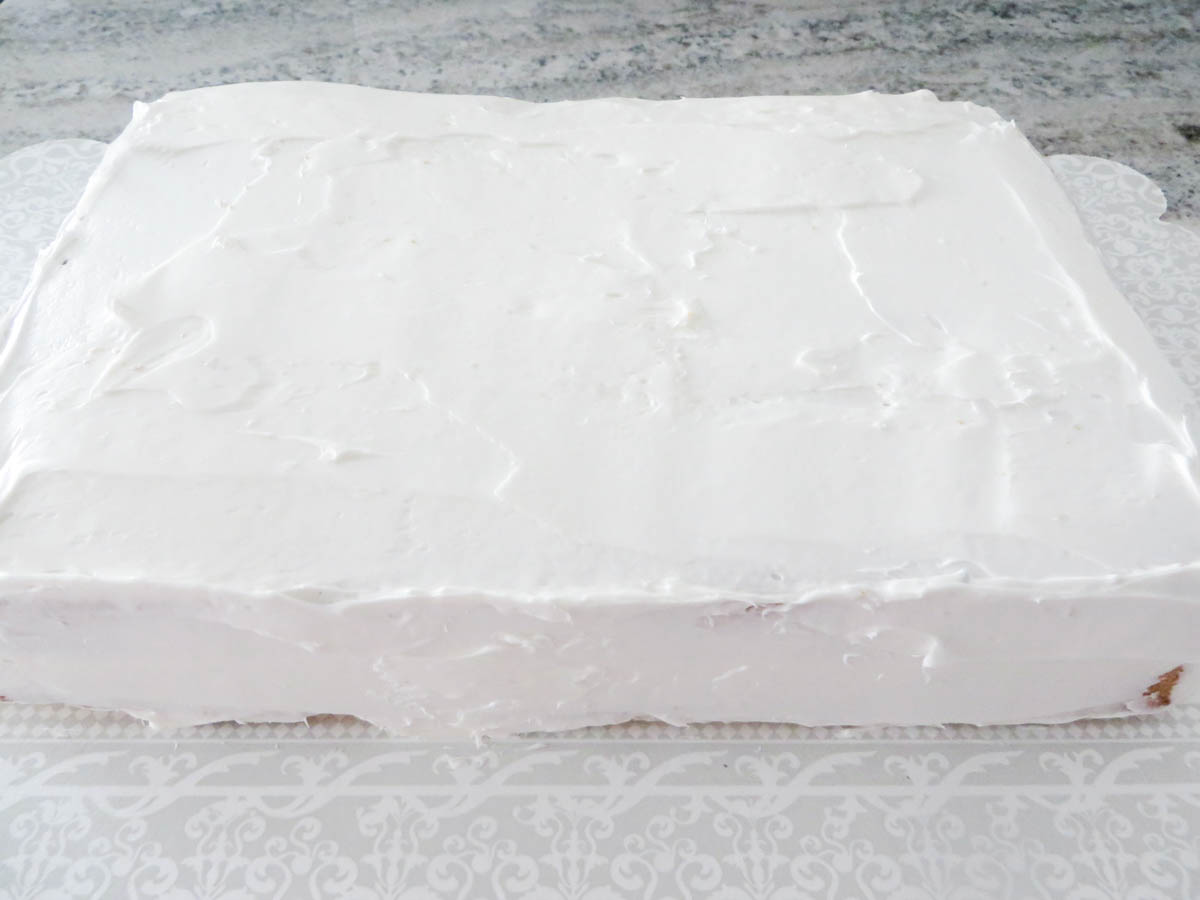
Step 7. Place one 9×13 cake, leveled side down, on a large platter. If you don’t have a platter big enough, you can use a cardboard cake board (which was what I did).
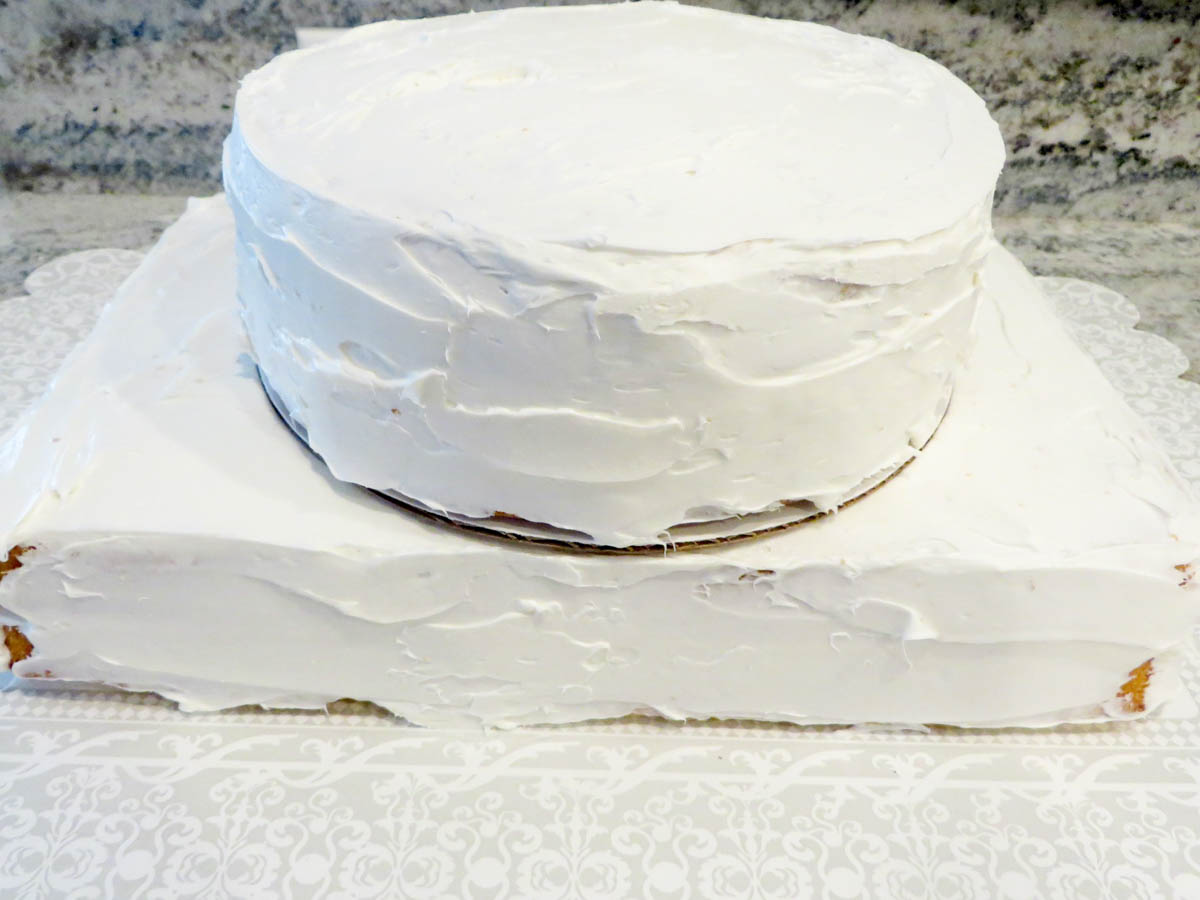
Step 8. Frost the top of the cake with white frosting and place the second 9×13 cake on top, leveled side down again. Now, frost the entire cake.
Tip: You can use any type of frosting or buttercream you prefer, but the decorations stand out the best with white icing.
Step 9. Level the round cakes. You may want to use a cardboard round (it makes serving much easier), but you don’t have to. Place the first round cake in the center, leveled side down, and then frost the top.
Step 10. Add the second round cake on top of it, also leveled side down. Now you are ready to frost. Don’t worry if it’s not perfect, because you can always go back later and add more frosting.
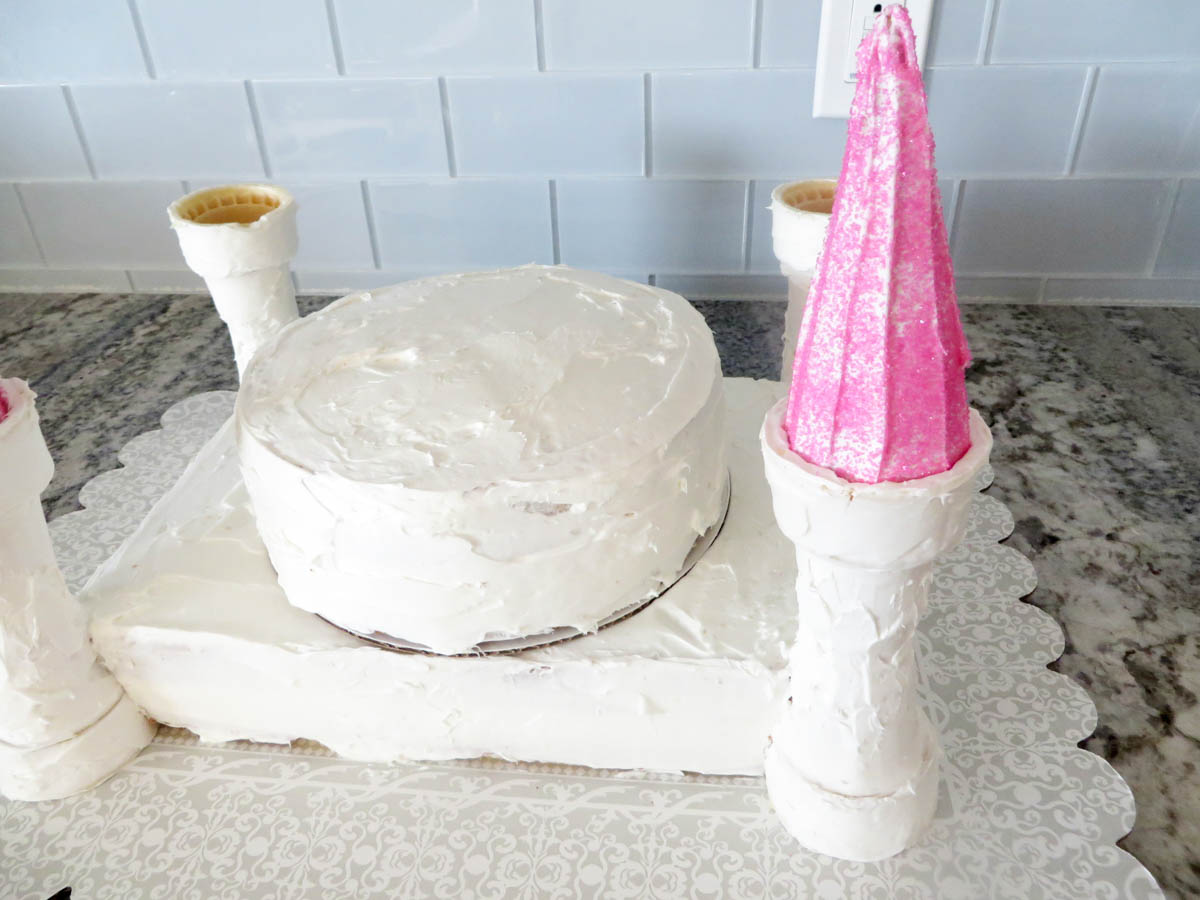
Step 11. Cut off a small part of each corner, just large enough to fit the cones.
Step 12. Since the bottom of the cone is wider, you’ll want to cut a little deeper into the bottom of the cake. Add some extra frosting to the corner of the cake, then attach the tower . You may have to make a few more small cuts to get it just right. If you have a little gap, don’t worry about it. You can use frosting to fill it in.
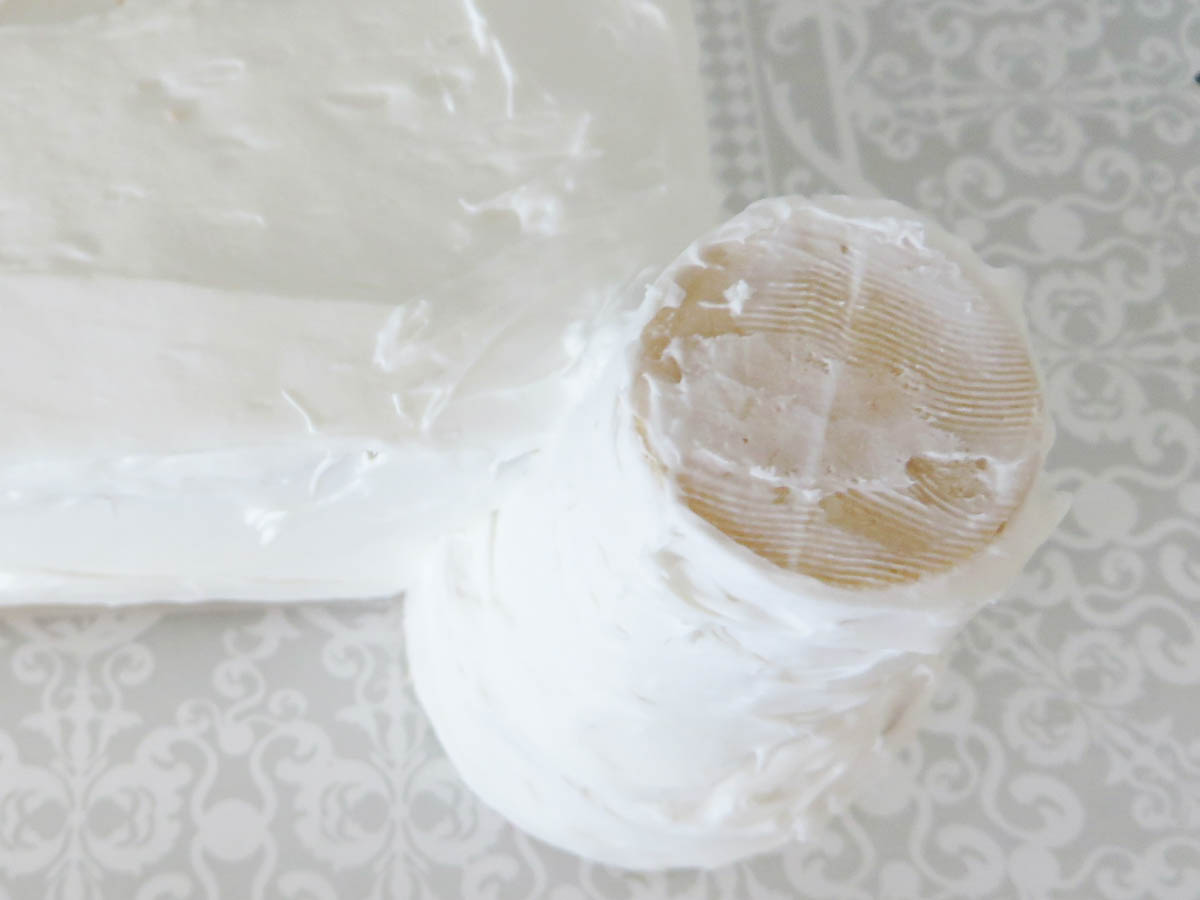
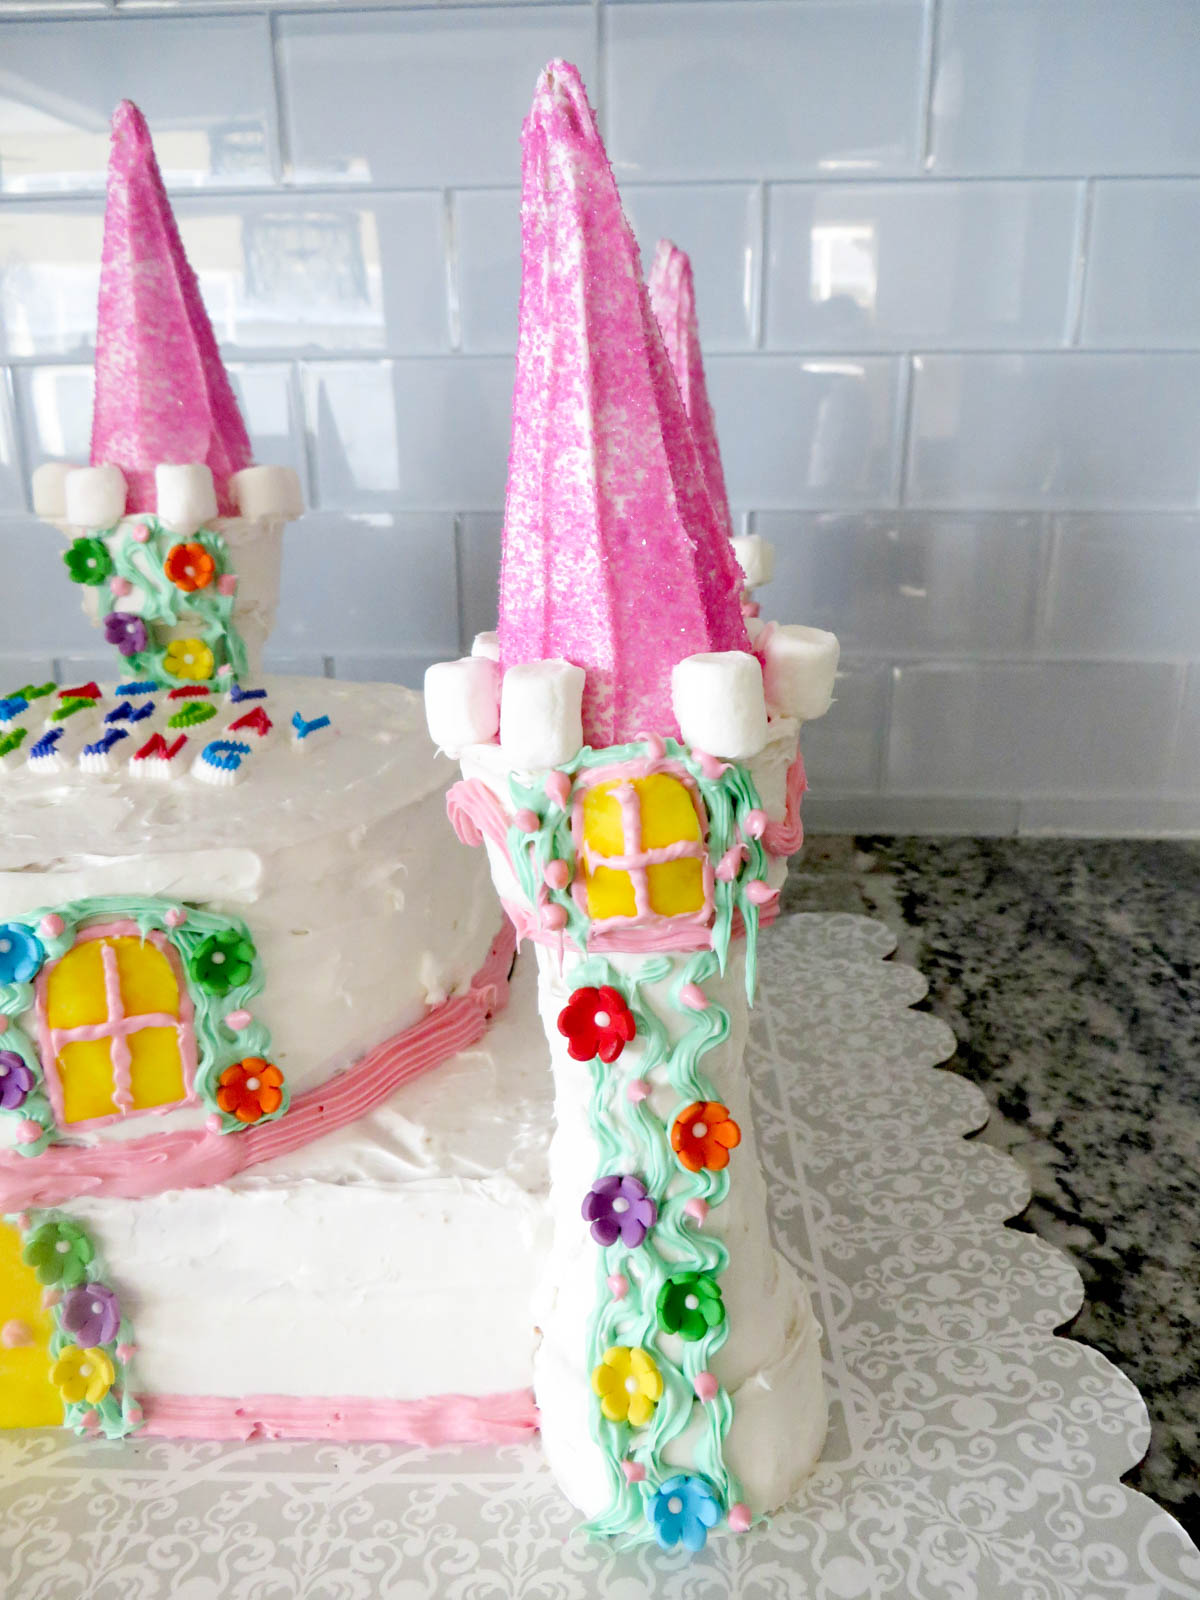
Step 13. Ice the flat top of the cone and place another one on top. Smooth out the frosting on the sides.
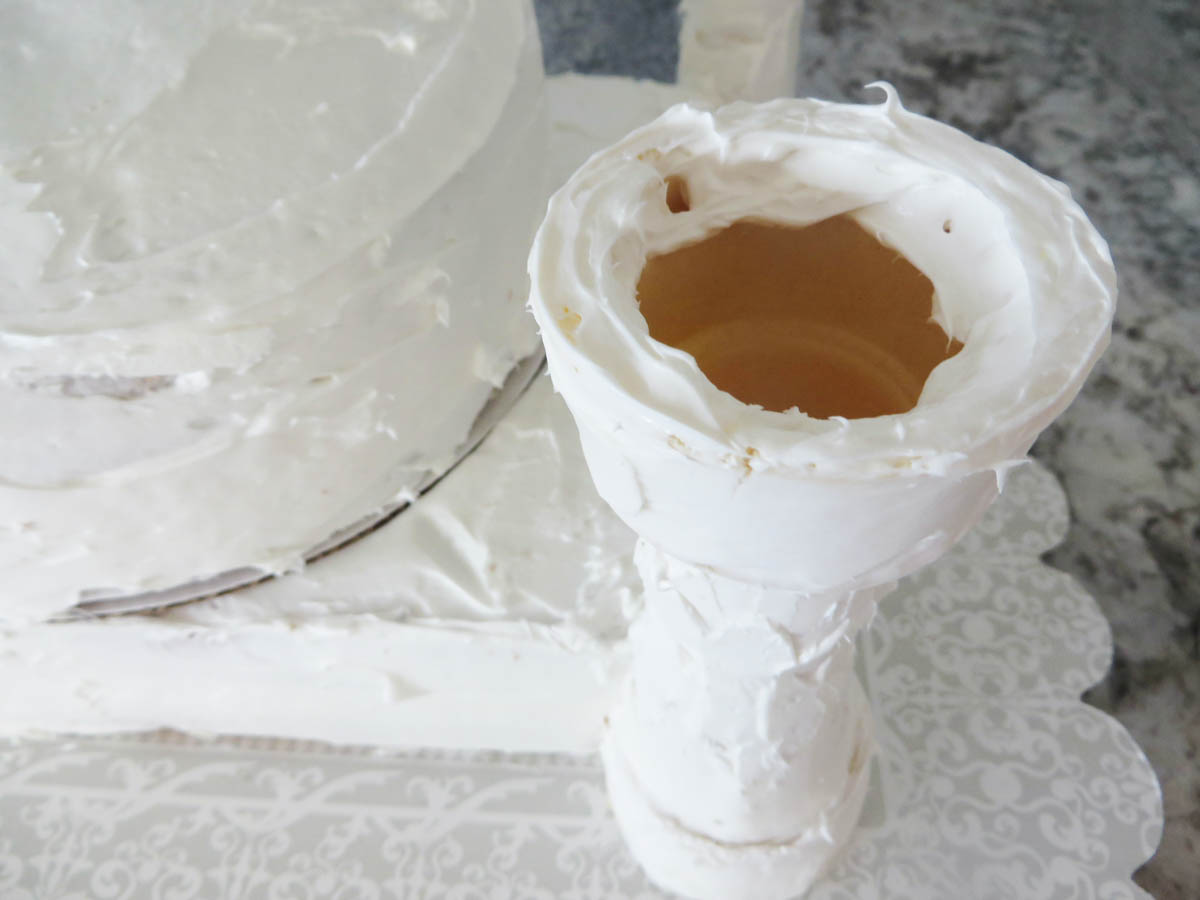
Step 14. Now ice the inside of the top cone and place the sugar cone upside down inside it.
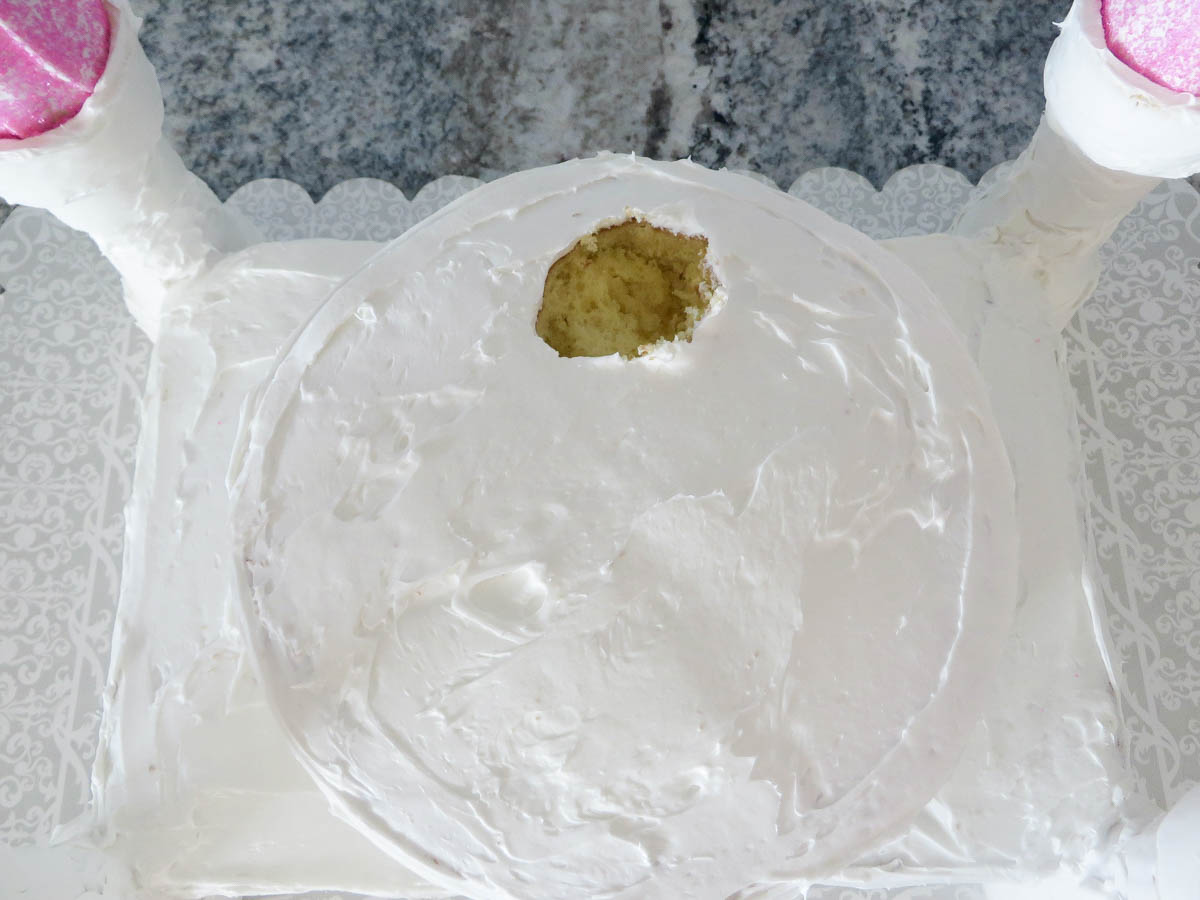
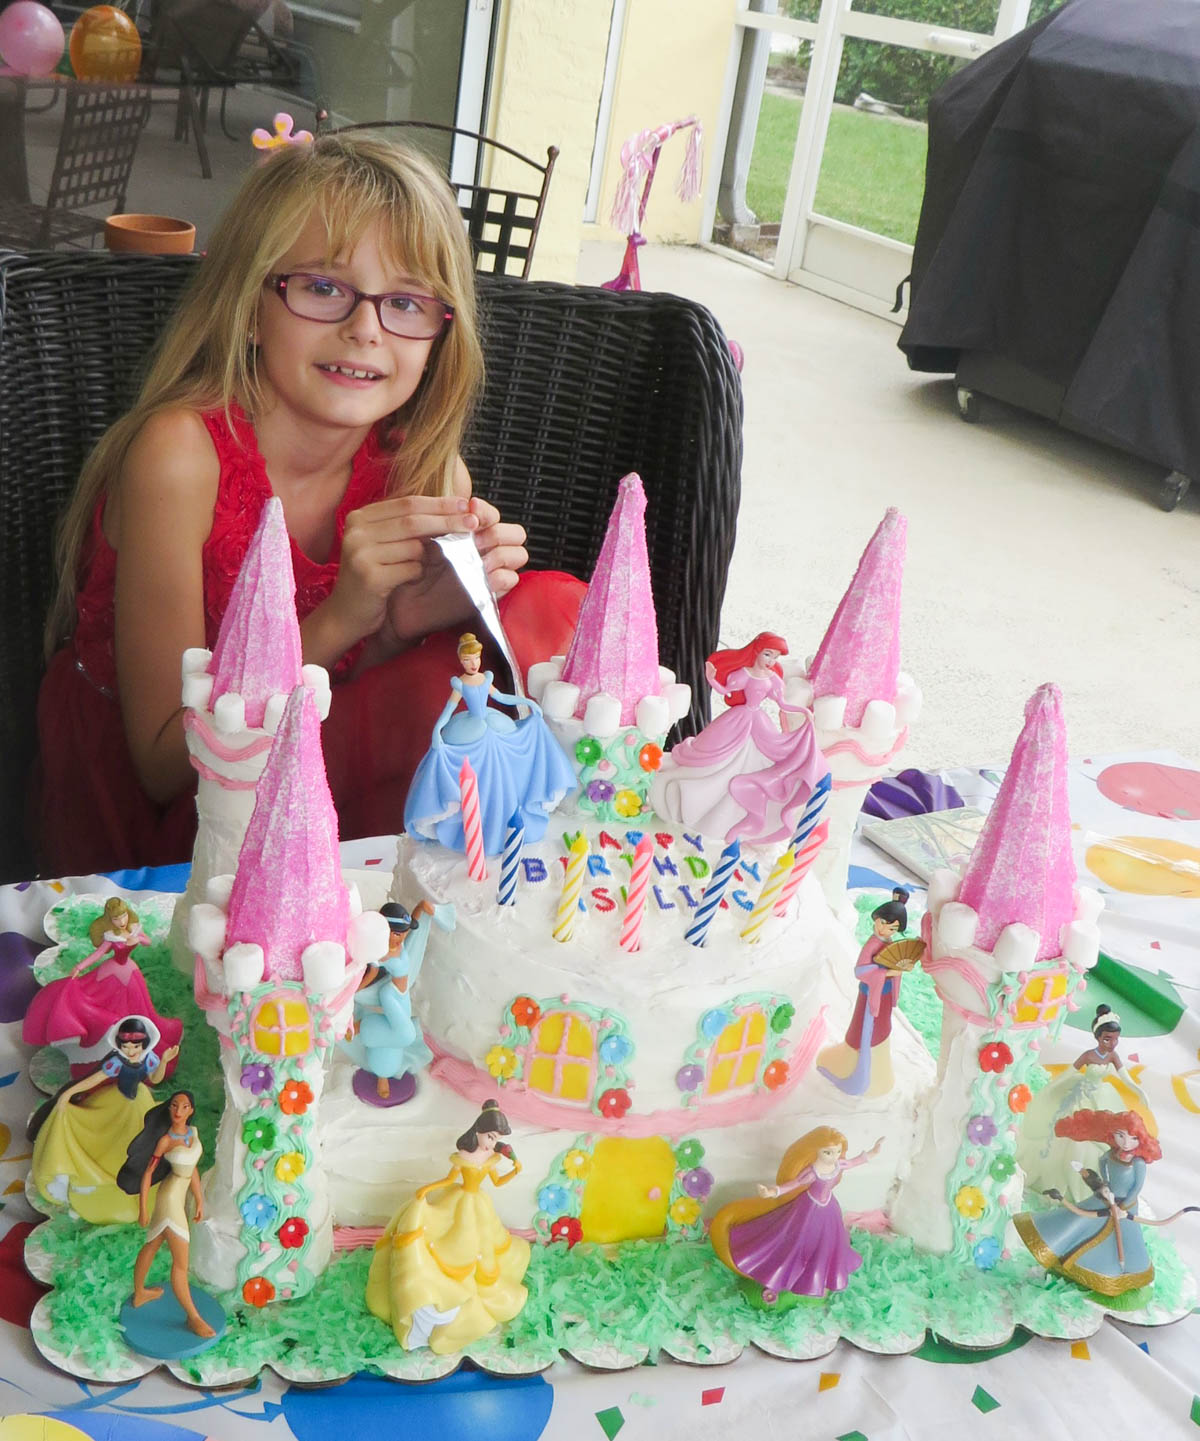
Step 15. Cut a hole in the top of the round cake to hold your last tower. It doesn’t matter if you don’t cut it to the exact size. Don’t forget to ice the inside of the regular cone to hold the pink sugar one in place. I cut my hole towards the back of the cake so I’d have room for a happy birthday message but you can put it in the middle if you’re not adding a message.
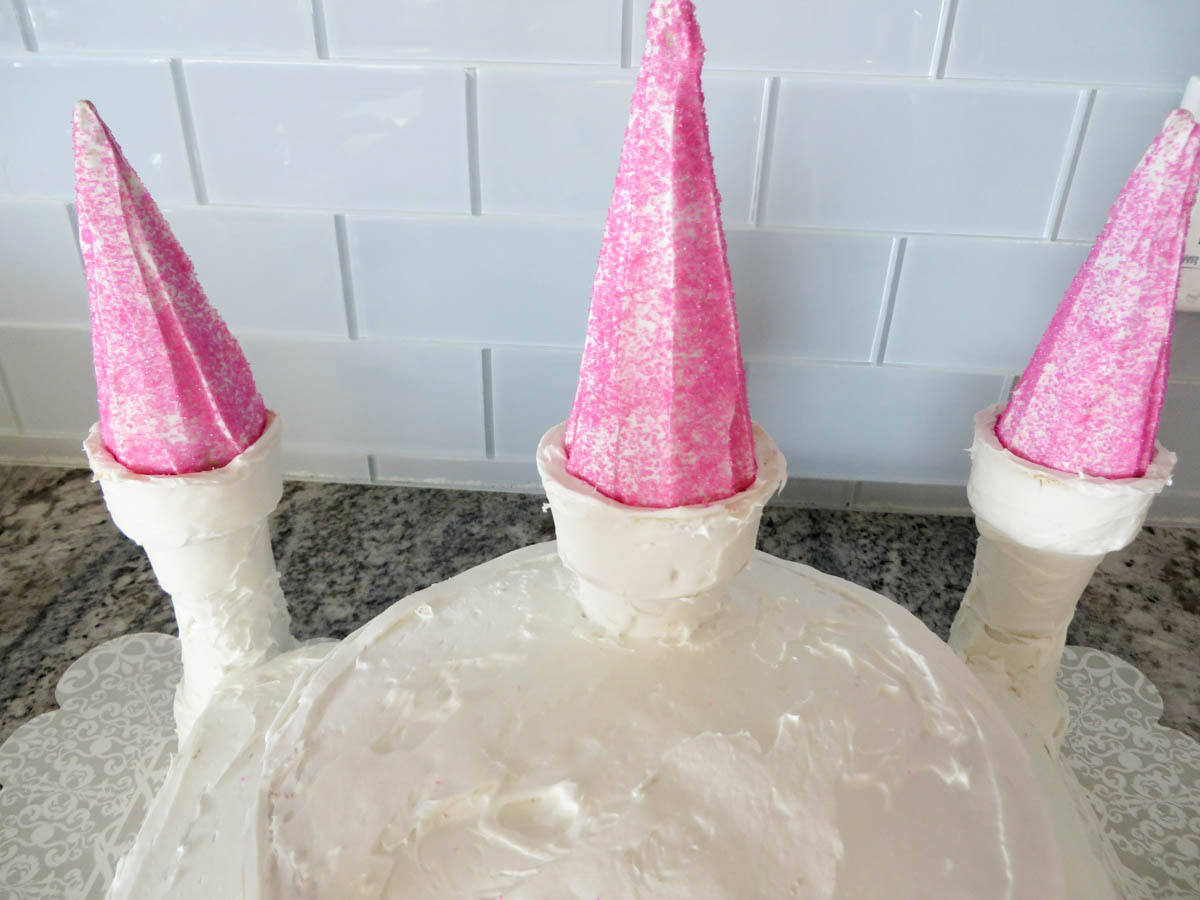
Step 16. Insert a regular frosted cone in the hole, then add the pink one.
Step 17. Now it’s time to have some fun decorating! Mix up some pink frosting and pipe it around the base of each of the cakes. You can also use it to decorate the towers. Add mini marshmallows to the turrets as well, then add your Happy Birthday message.

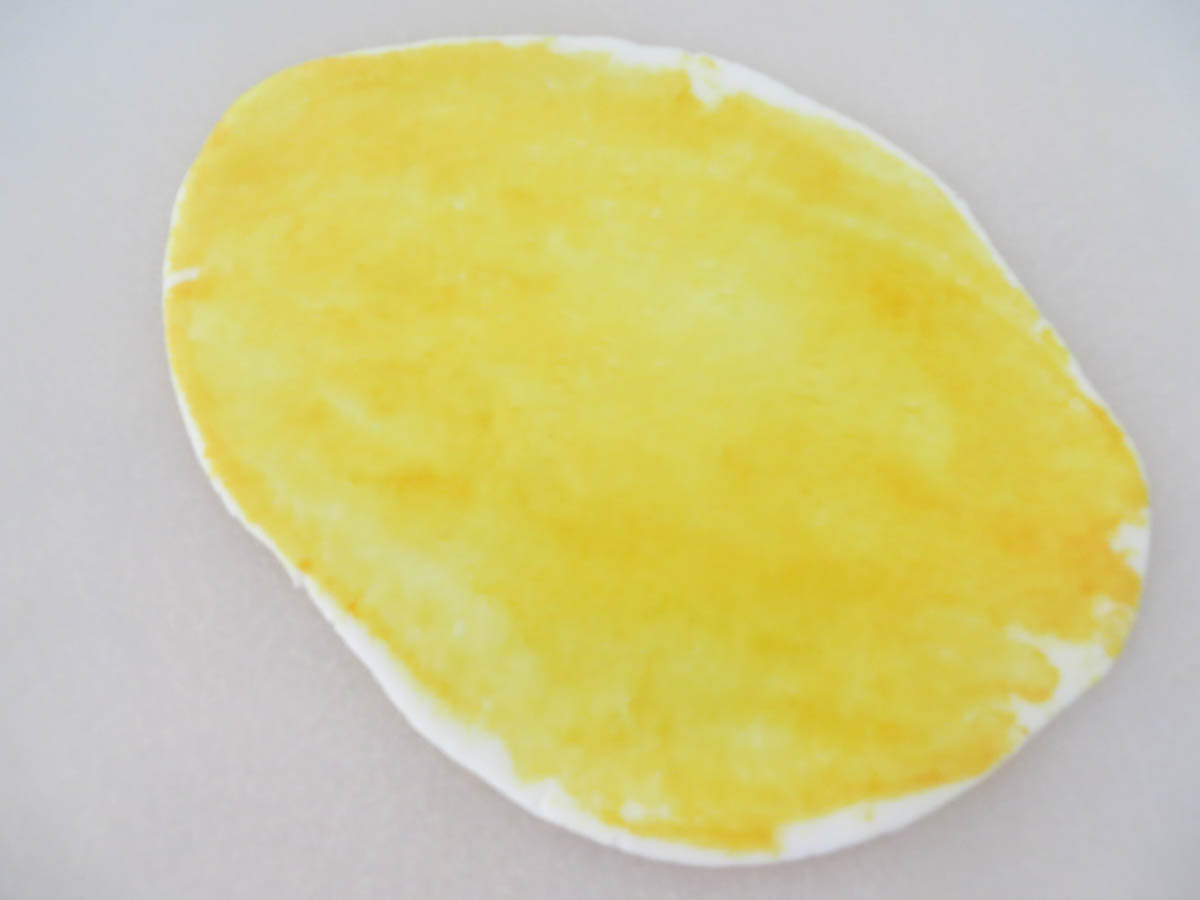
Step 18. Originally, I rolled out the fondant and brushed yellow food coloring over the top. If I were to make this again, I would mix the food coloring right into the fondant, then roll it out (but either option works).
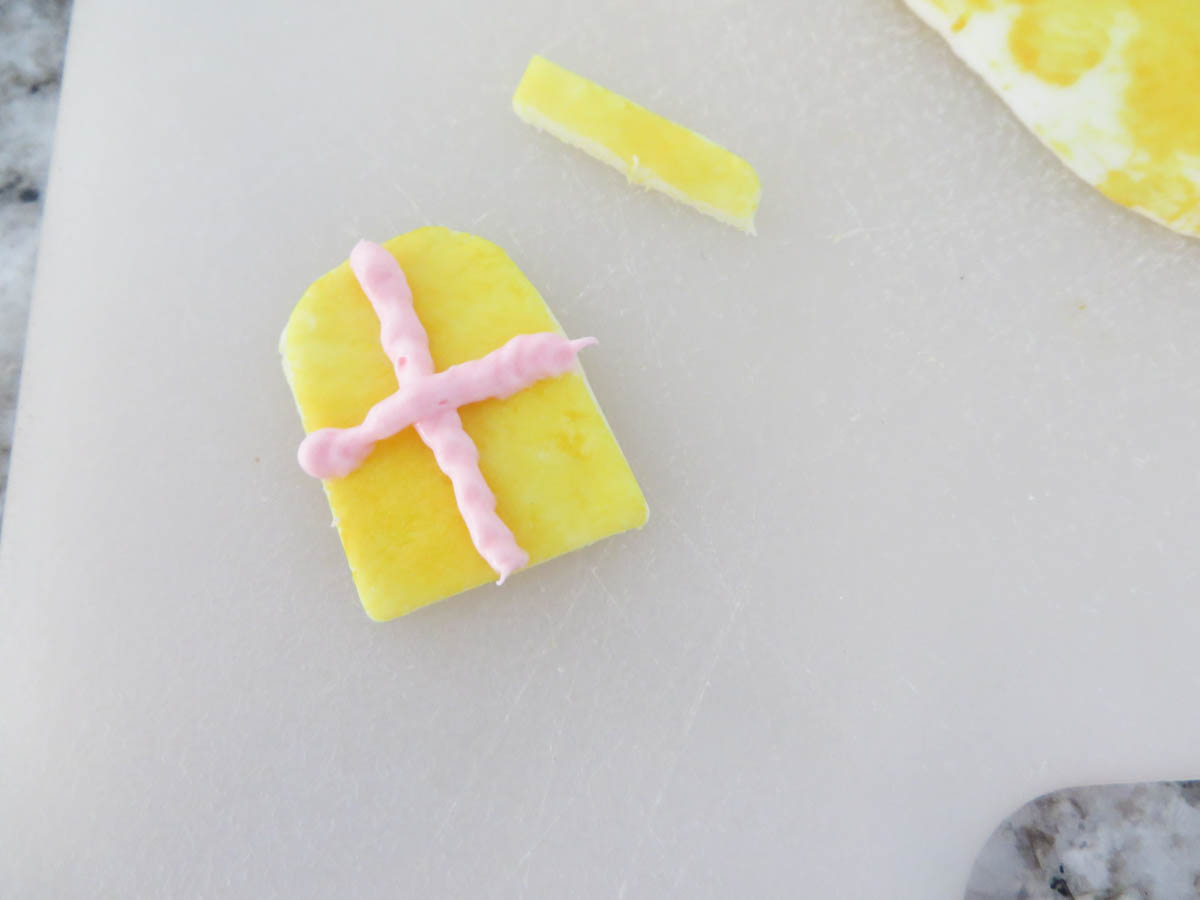
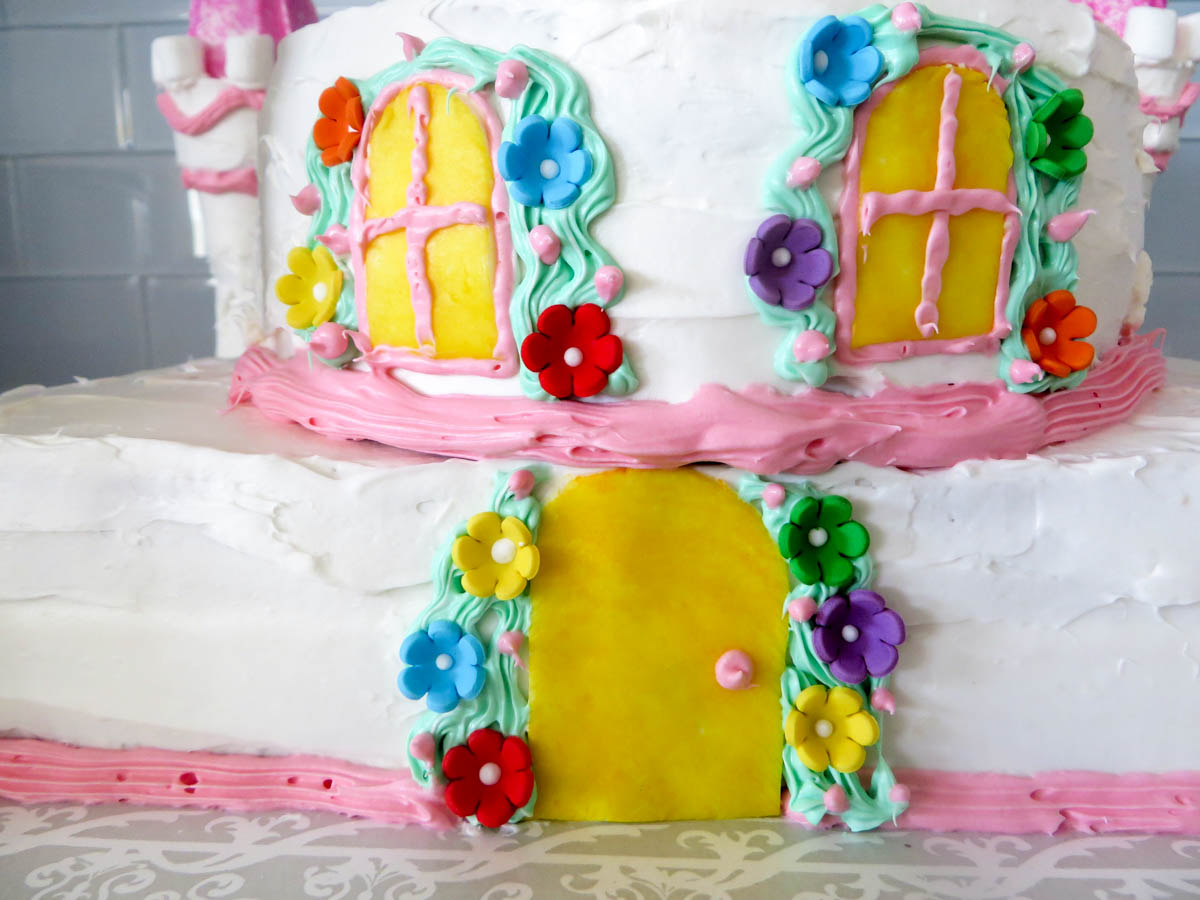
Step 19. Cut four windows and a door from the fondant. Use pink frosting to make the windowpanes and add a small dot of pink to the door to make the doorknob.
Step 20. Mix up some green frosting and add it to a piping bag. Pipe vines on the turrets and around the windows, then add candy flowers.
Step 21. Add vines and flowers around the front door.
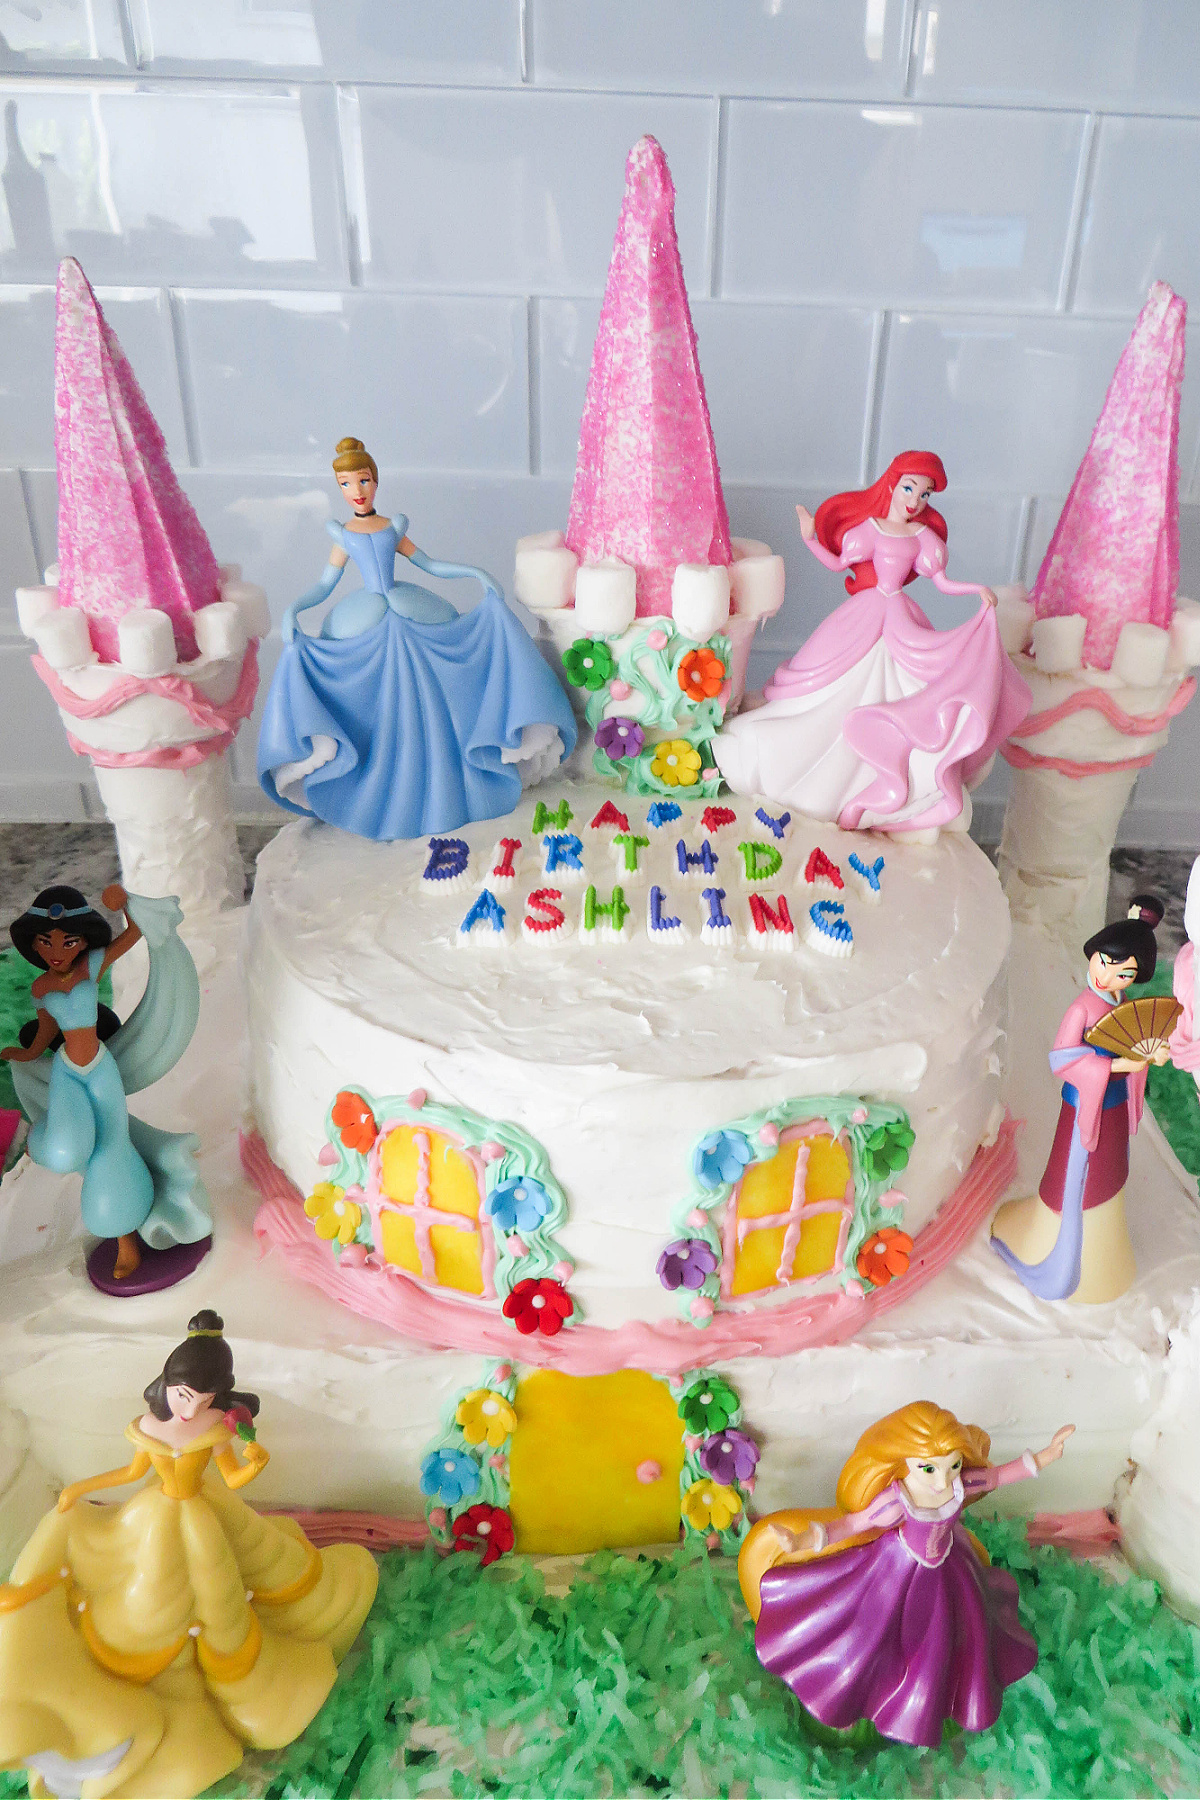
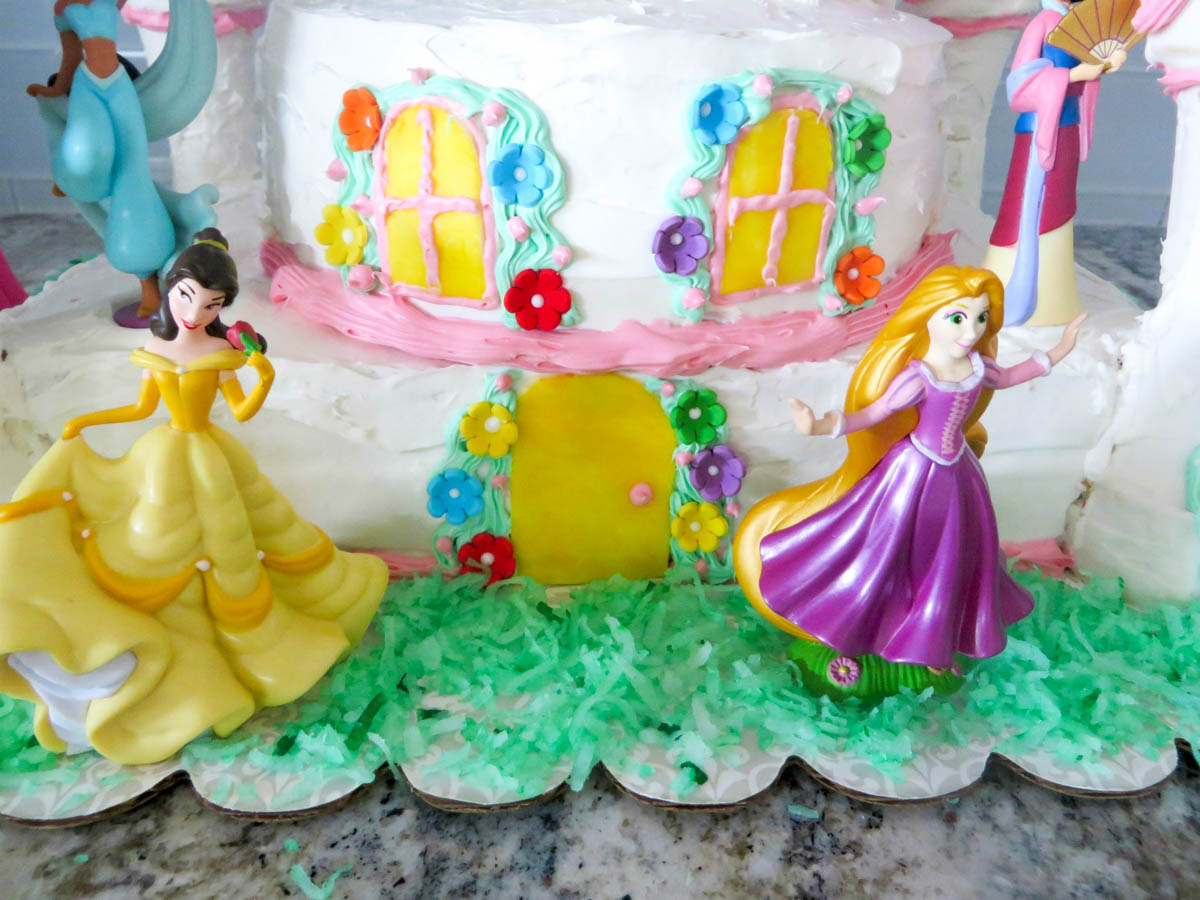
Step 22. To add the finishing touch, place shredded coconut in a freezer bag, along with a few drops of green food coloring. Seal the bag and shake until the coconut is evenly covered. Sprinkle the “grass” around the edges of the cake, add your princess figurines and enjoy!
Castle Cake Variations
- Cake flavors: You can make this with any cake flavors you like. Instead of classic vanilla, try chocolate cake, strawberry cake, or even a funfetti cake mix.
- Windows and doors: If you don’t have fondant, try using colorful candies or cookies to create unique shapes for the doors and windows.
- Towers: Instead of frosting them, try dipping the cone in melted white chocolate. Sprinkle them with edible glitter to add some extra sparkle.
- Themed cake decor: For a super fun twist, add decorations to match a theme. For example, you could make blue sugar sprinkles and add a toy carriage for a Cinderella cake. You could even add miniature snowflakes for a Frozen themed cake.
FAQs
Yes, in fact, I recommend it. While this cake isn’t difficult, it does take some time and you don’t want to still be decorating as your guests are arriving. I would just wait to add the figurines in the day you plan to serve it.
Start by decorating the cake on a sturdy base, like a cake board. Once you put it in the car, make sure you secure it on something that is non-slip, like a large box or even a bath towel. If possible, you can add some of the decorations once you get to the party.
Sure! Turn this pretty pink into other castle cake ideas. A medieval cake decorated with gray frosting and flags, shields, and swords is a fun idea. A candy themed cake, decorated with colorful lollipops, canes, and gumdrops, would be adorable too!
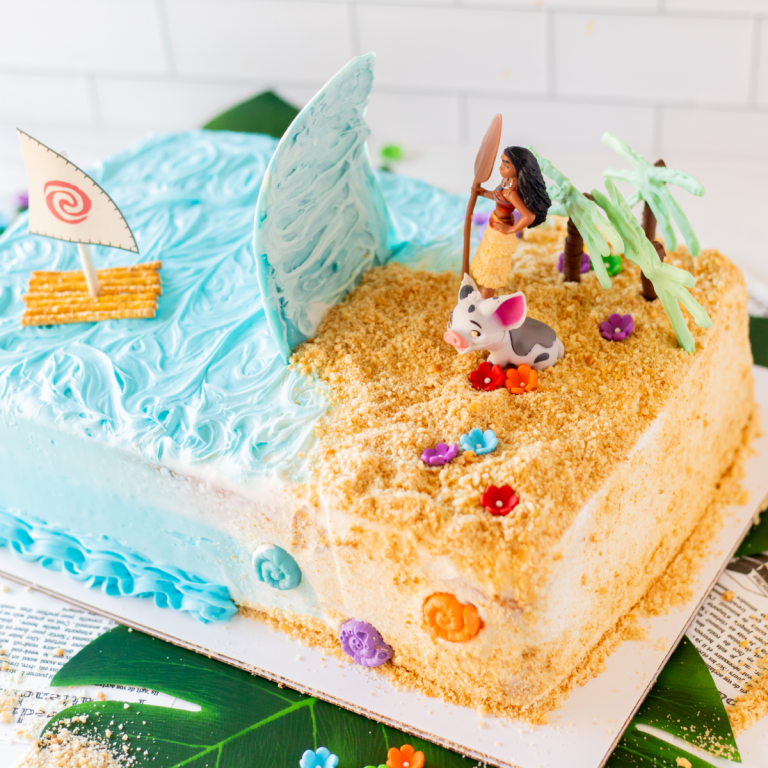
More Delicious Birthday Cakes And Cupcakes
- Harry Potter Birthday Cake
- Beauty And The Beast Cupcakes
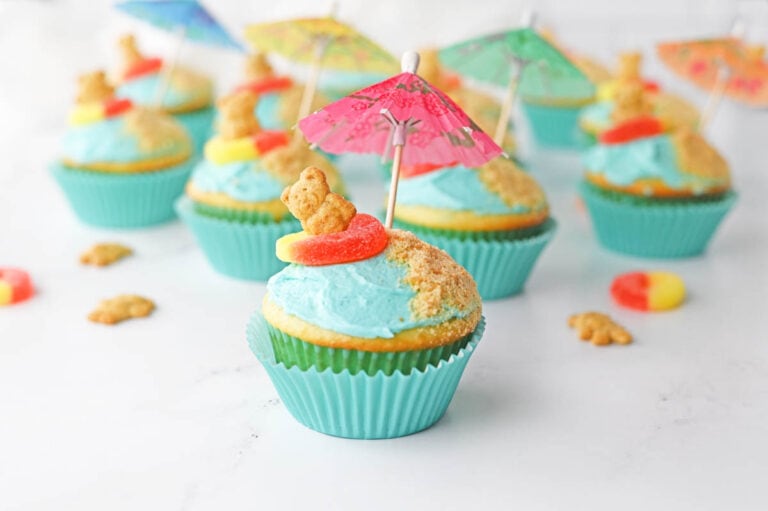
- Beach Cake
- Mermaid Cupcakes
- Unicorn Cupcakes

Princess Castle Cake
Equipment
- piping tips
Ingredients
- 3 boxes yellow cake mix and ingredients on box
- 4 containers white frosting *see notes
- 9 ice cream cones (flat bottom)
- 5 sugar cones
- pink sugar sprinkles
- pink food coloring
- yellow food coloring
- green food coloring
- 32 candy flowers
- 4 ounces white fondant *see notes
- 35 mini marshmallows
- 2 cups shredded coconut optional
Instructions
- Using boxed cake mixes, you will bake four cakes in all: two 8″ rounds and two 9×13 rectangular.3 boxes yellow cake mix
- To start the design, frost nine regular ice cream cones, but leave the bottom unfrosted.4 containers white frosting, 9 ice cream cones (flat bottom)
- Next, frost the five sugar cones.5 sugar cones
- Once the cones are frosted, sprinkle them with pink sugar sprinkles.pink sugar sprinkles
- Store cones in the refrigerator until you’re ready to assemble the cake.
- Before you put your cakes together, you’ll need to level them. I highly recommend an inexpensive cake leveler, just because it’s so much easier to use than a serrated knife. Don’t worry if the corners are a little uneven, because you’ll be cutting them off to add the towers anyway.
- Place one 9×13 cake, leveled side down, on a large platter. If you don’t have a platter big enough, you can use a cardboard cake board (which was what I did).
- Frost the top of the cake with white frosting and place the second 9×13 cake on top, leveled side down again. Now, frost the entire cake.4 containers white frosting
- Level the round cakes. You may want to use a cardboard round (it makes serving much easier), but you don’t have to. Place the first round cake in the center, leveled side down, and then frost the top.4 containers white frosting
- Add the second round cake on top of it, also leveled side down. Now you are ready to frost. Don’t worry if it’s not perfect, because you can always go back later and add more frosting.
- Cut off a small part of each corner, just large enough to fit the cones.
- Since the bottom of the cone is wider, you'll want to cut a little deeper into the bottom of the cake. Add some extra frosting to the corner of the cake, then push the tower into it. You may have to make a few more small cuts to get it just right. If you have a little gap, don't worry about it. You can use frosting to fill it in.
- Frost the flat top of the cone and place another one on top. Smooth out the frosting on the sides.
- Now frost the inside of the top cone and place the sugar cone upside down inside it.
- Cut a hole in the top of the round cake to hold your last tower. It doesn’t matter if you don’t cut it to the exact size. Don’t forget to ice the inside of the regular cone to hold the pink sugar cone in place. I cut my hole towards the back of the cake so I’d have room for a happy birthday message but you can put it in the middle if you’re not adding a message.
- Insert a frosted cone in the hole, then add the pink sugar cone.
- Now it’s time to have some fun decorating! Mix up some pink frosting and pipe it around the base of each of the cakes. You can also use it to decorate the turrets. Add mini marshmallows to the turrets as well, then add your Happy Birthday message.pink food coloring, 35 mini marshmallows
- Originally, I rolled out the fondant and brushed yellow food coloring over the top. If I were to make this again, I would mix the food coloring right into the fondant, then roll it out (but either option works).yellow food coloring, 4 ounces white fondant
- Cut four windows and a door from the fondant. Use pink frosting to make the windowpanes and add a small dot of pink to the door to make the doorknob.
- Mix up some green frosting and add it to a piping bag. Pipe vines on the turrets and around the windows, then add candy flowers.green food coloring
- Add vines and flowers around the front door.32 candy flowers
- To add the finishing touch, place shredded coconut in a freezer bag, along with a few drops of green food coloring. Seal the bag and shake until the coconut is evenly covered. Sprinkle the “grass” around the edges of the cake, add your princess figurines and enjoy!2 cups shredded coconut
Notes
- Some ingredient amounts, the frosting and fondant for example, are estimates. The first version of this tutorial didn’t include ingredient amounts (it was one of the first posts on the blog). I’ve since updated the post and am adding the ingredient amounts based on my best estimates. You may want to have a little extra frosting or fondant on hand, just in case you need it.
- You may want to bake your cakes the day before you plan to decorate it, since building this cake takes a good bit of time.
Nutrition
Did You Make This Recipe?
Share it with me on Instagram @funmoneymom and follow on Pinterest @funmoneymom for more!
Let’s be friends!
Did you love this post? Make sure to comment below and let me know your thoughts! And don’t forget to follow on your favorite social network below!

About Lisa O’Driscoll
Lisa O’Driscoll is a lifestyle and parenting expert, cookbook author, and the creative force behind Fun Money Mom, a popular blog she’s run since 2014. She’s the author of the children’s cookbook Roll It, Slice It, Mash It, Dice It, designed to get kids excited about cooking. With multiple TV appearances under her belt, she loves sharing her expertise on family-friendly recipes, creative DIYs, and party planning and is always on a mission to inspire and entertain!


This is SO cute. I’m pinning it. I don’t have girls, but who cares. I’ll make it for myself one day!
You’re never too old to be a princess!!!
xoxo
Lisa
This is SO CUTE! I know a couple little girls who would completely fall in love with this! And I completely agree – icing does fix everything 🙂 Thanks for sharing with the Wednesday Showcase!
Thanks so much for hosting!
xoxo
Lisa
And she got to keep all the cool princesses — she will remember this beautiful cake her whole life!
Thanks…I hope so 🙂
xoxo
Lisa
This is SO awesome! My girls would pass out from excitement at the sight of this. 🙂 Great job!
Thanks so much! My youngest one is already asking for one for her February birthday.
xoxo
Lisa
What a cool cake. Your daughter must have had a fantastic birthday.
She did! She actually told me mine was better than the Publix cake…quite a compliment from an 8 year old!
xoxo
Lisa
I imagine if I made this cake my daughter would never forget it! So cool! Pinned.
Visiting from the Shine Blog Hop.
Thanks so much!!!
xoxo
Lisa
Really beautiful cake – Love it 🙂
Thanks so much Sarah! It was a lot of fun to make!
xoxo
Lisa
Oh my gosh, so funny and so fabulous! Love the cake, it turned out gorgeously. I hope she had an amazing birthday!
That is one fancy cake, perfect for a 4 year old! I know my daughter thinks everything I make is extra special (she’s 4 too). I am taking advantage of that for as long as I can because I know when she gets older she will think everything I make is awful just because I made it 🙂
Same here…I’m not looking forward to those days so I’m going to enjoy this for as long as I can!
xoxo
Lisa
This is such a cute idea!
Thanks for joining Cooking and Crafting with J & J!
Thanks so much! Have a wonderful weekend!
xoxo
Lisa
I just love this cake!! What an amazing piece of art! Thank you so much for sharing at my craft party on Thursday! Hope to see your newest posts this week, which starts at 7pm EST.
http://www.diy-crush.com/blog/category/link-party/
Hi Lisa. How lovely to have you join us at Thriving on Thursdays. My daughter, who just turned 11 this week, would’ve loved this cake a couple years ago. She was very much into princesses and castles. Thanks so much for sharing. I’m featuring this at tomorrow’s party. Hope to see you again!
Anne @ Domesblissity
Thank you so much for the feature!!! I can’t wait to link up at your party again this week! Thanks for hosting!
xoxo
Lisa
I have two granddaughters that, of course, love the Disney princesses. They would be thrilled with this cake!
This is AWESOME! Love it! Tweeted and am going to pin so I can remember how to do this as a castle for my sons bday this summer with dragon figures and knights. 🙂 Then make another one for my daughters bday the next month! COOL!
I’m so glad you liked it! It really was fun to make and you’ll win the “mom of the year” award if you make this for your son and your daughter too! xoxo
Thank you for this delicious recipe on #RecipeSharingParty share ! I hope to see you next week . Pinned and Yummed . Please visit #OverTheMoon on Sunday or #ThursdayFavoriteThings for more sharing fun! Do not forget your link # Be ‘ s seen on a comment , so I can be sure to visit and you get a chance !
Lisa, this cake is so wonderful! Any little girl would be delighted and more ♥♥♥
Sinea ♥
Thanks Sinea!!!
My 5 year old just asked for this for her 6th birthday! Thanks for a great idea!!
Your so welcome! She’s going to love it!
This looks fantastic. Love the little ideas of the cones. Great tip x
Thanks! I had SO much fun making this and now my youngest wants one for her birthday. I can’t wait to make it again 🙂
It is adorable! Nice work!!
Thanks so much!
How much did all of that end up costing you once you were done. My niece is turning 2 and everyone is on a strict budget, but we want to do something special for our little princess of the family.
Hi Kristie,
It depends on how much you already have on hand. Initially, I didn’t have any cake pans, leveler, etc. so I had to buy all those. When all was said and done, it probably cost close to what the store bought cake would have cost. However, if you have all that, it’s pretty inexpensive. You’d just be buying the cake mixes, icing, cones and sprinkles. You can do it on a budget by making your own mini flowers with icing and leaving out the coconut “grass”. You can also leave off the fondant windows and just outline your windows in icing. 🙂