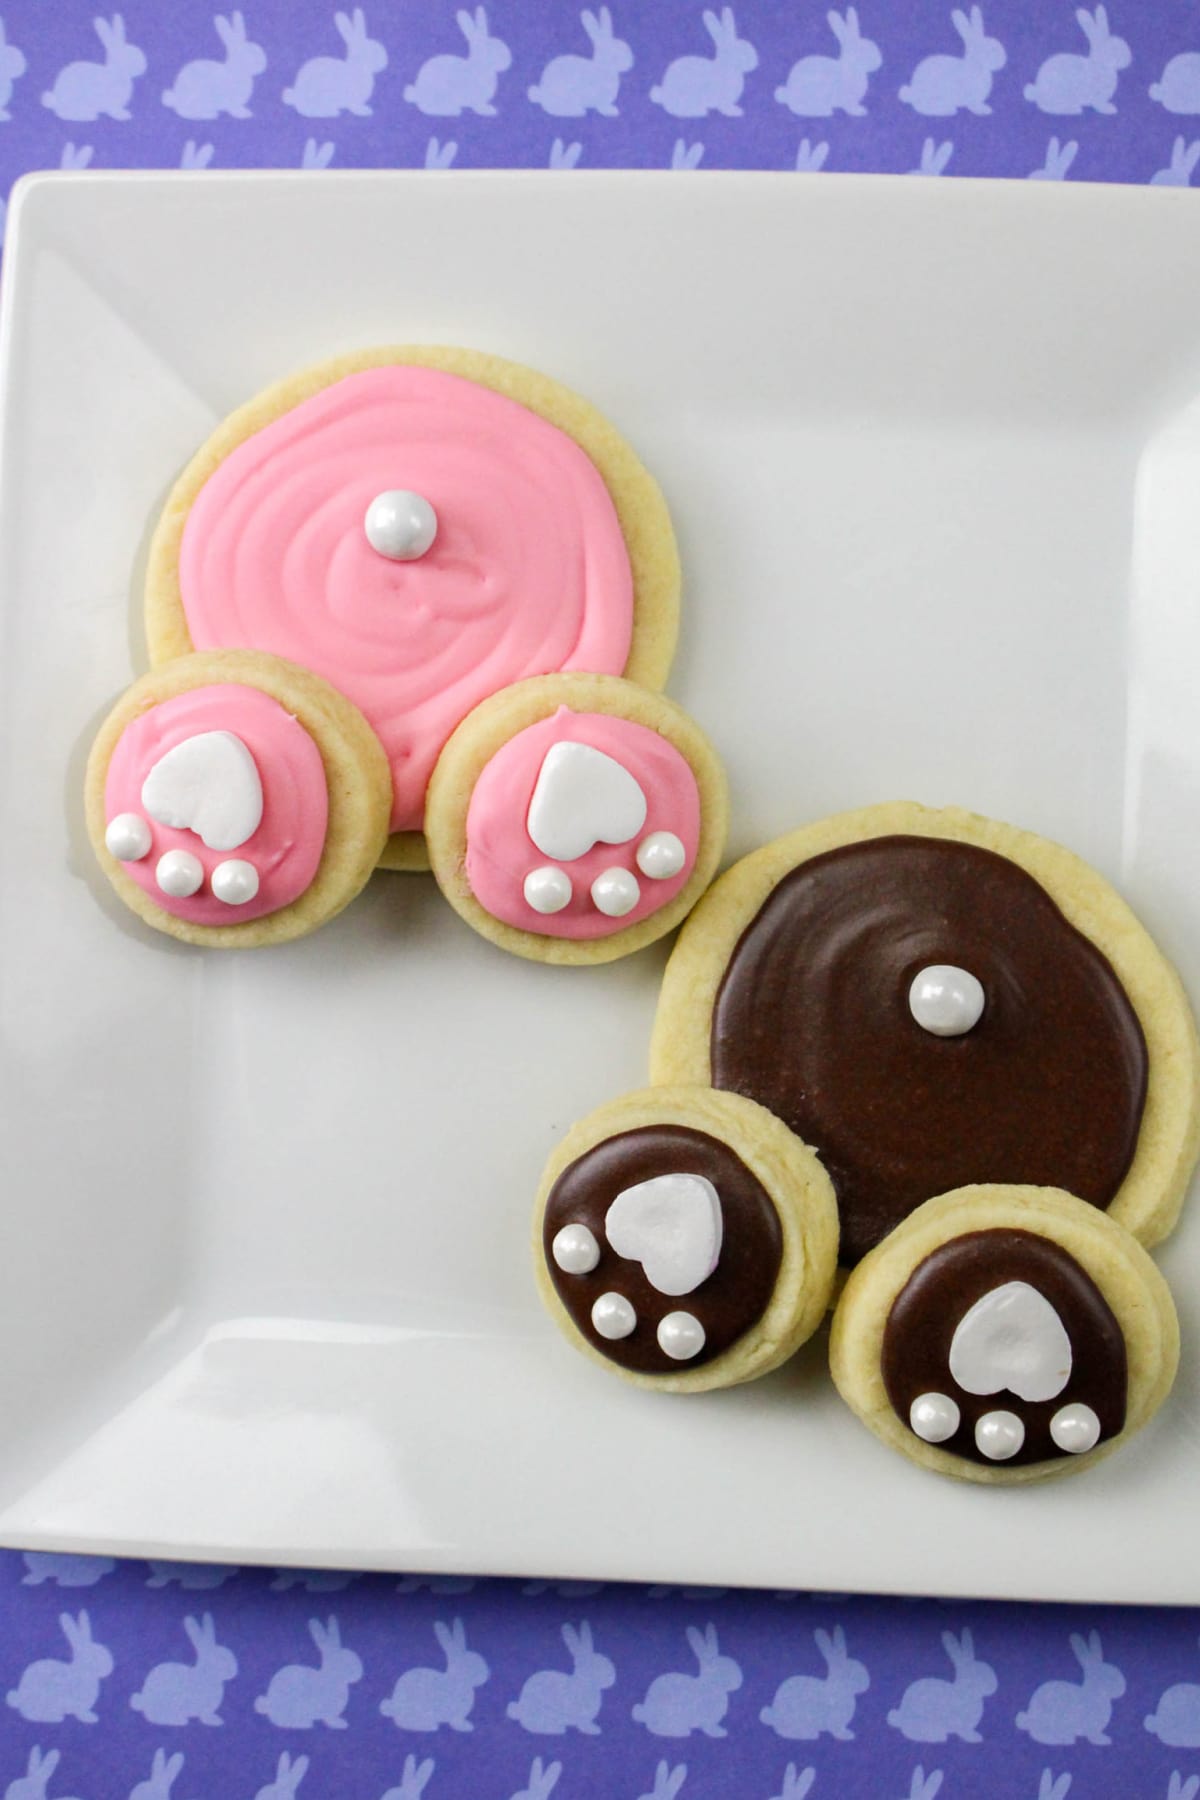
Bunny Butt Cookies
This post may contain affiliate links. As an Amazon Associate, I earn from qualifying purchases.
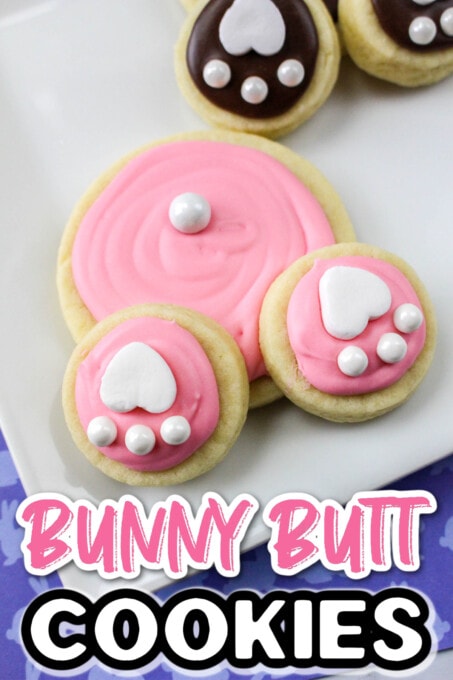
These Easter Bunny Butt Cookies are the perfect sweet treat for your Easter celebrations. Soft, buttery sugar cookie dough, colored icing, and candy are used to create the most adorable little bunny butts. They’re fun for kids and a delicious treat for the whole family.
When you think of Easter, you probably think of baskets overflowing with candy – jelly beans, marshmallow peeps, and all things pastel and sugary. Although not a candy, these cute bunny butt cookies are a great fit for the sweet theme of the season.
With royal icing, conversation hearts, and candy pearls, providing the finishing touches, the kids will have a blast helping decorate delicious sugar cookies to resemble cute little bunny butts and bunny paws. Festive and fun to make, these easy bunny cookies are the perfect addition to your kids’ Easter basket!
If you love this recipe, you’ll want to try my Bunny Butt Cupcakes, Bunny Butt Donuts or this fun Bunny Butt Dessert Dip!
Why We Love This Recipe
It’s Kid-Friendly: Children love the fun shape of these cute bunny butt cookies and kids of all ages can help with this recipe. Older kids can help cut and ice the cookies, and everyone can help with the best part – the decorating!
It’s a Great Gift: Spread some Easter joy among your friends and neighbors or your child’s teacher by sharing these adorable Easter cookies. These sweet treats are sure to bring a smile to anyone’s face.
It’s Delicious: Is there anyone who doesn’t love frosted sugar cookies? They’re soft and buttery with a hint of vanilla flavor, and the royal icing provides the perfect amount of sweetness.
What’s Needed to Make Bunny Butt Frosted Cookies
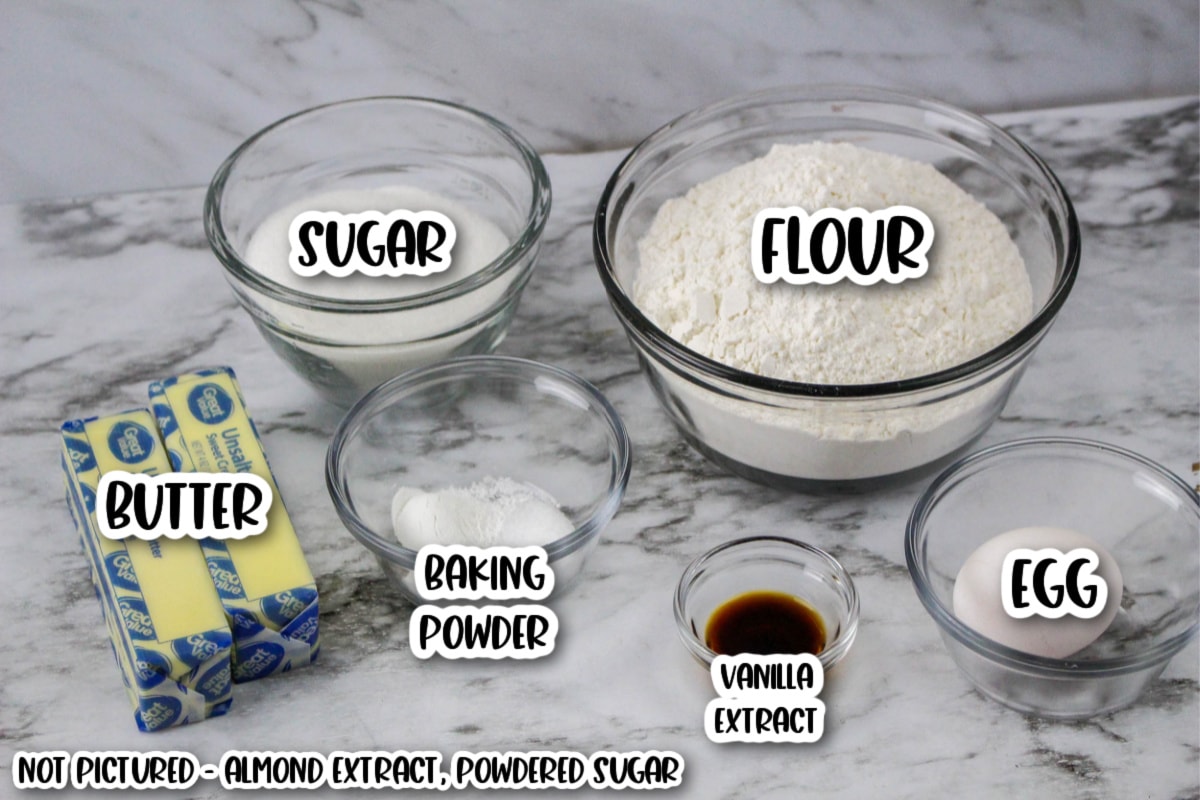
For the Cookies:
- All-purpose flour
- Baking powder
- Butter, softened
- Sugar
- Egg
- Almond extract
- Vanilla extract
- Salt
- Powdered sugar or flour, for rolling
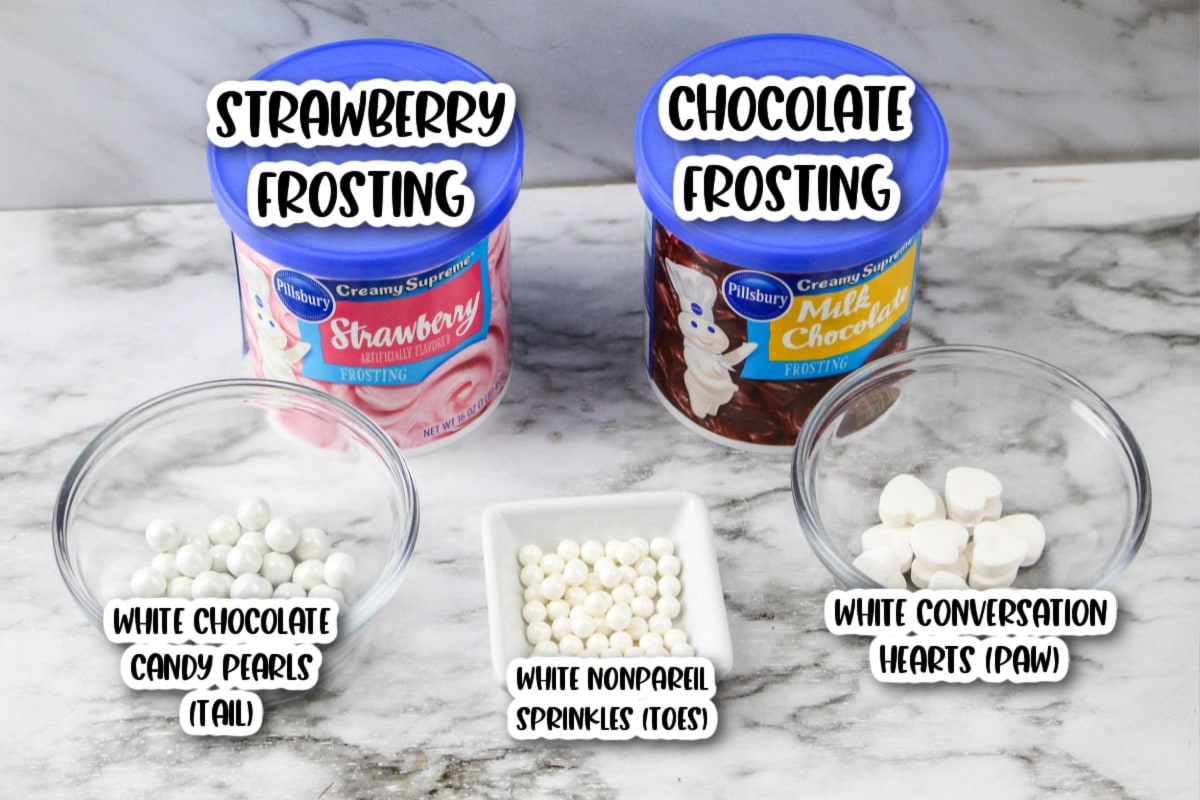
For Decorating:
- Frosting – We used store bought frosting, but you can make your own royal icing
- White conversation hearts – You’ll need these to make the paws (turn the side of the hearts with the writing towards the cookie)
- White nonpareil sprinkles – These are for the toes
- White candy coated chocolate pearls – This is for your bunny tail (you could also use mini marshmallows if you don’t have candy pearls.
How To Make Bunny Butt Cookies
Making The Sugar Cookies
Step 1: Preheat the oven to 350 degrees, then line an ungreased cookie sheet with parchment paper.
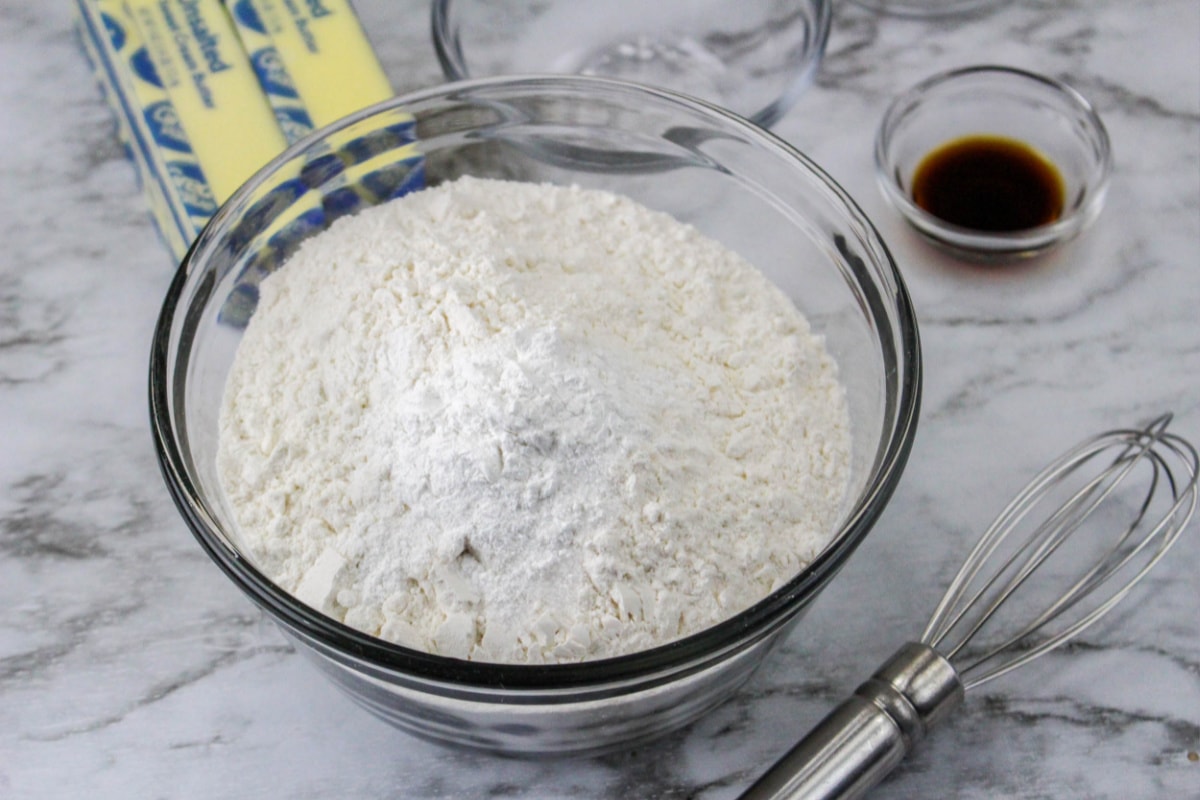
Step 2: Using a whisk, combine the dry ingredients (flour, baking powder, and salt) in a large bowl. Set the flour mixture aside.
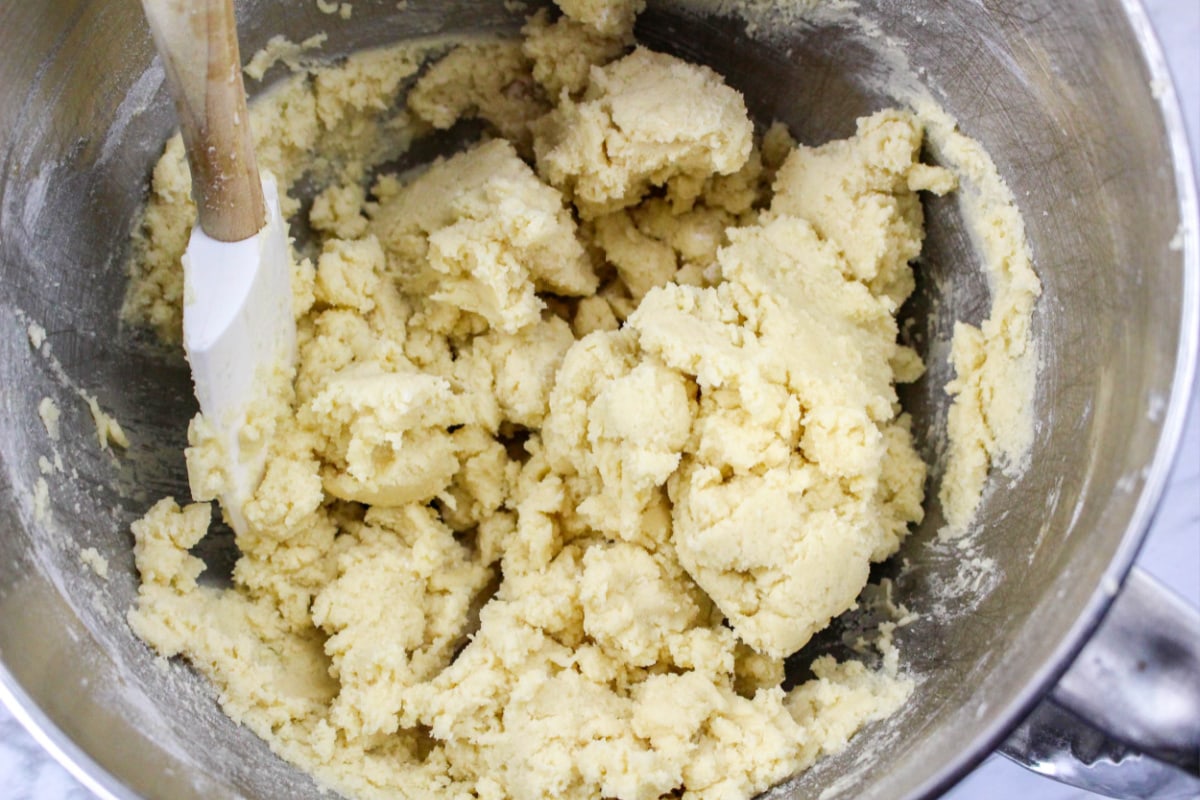
Step 3: With a hand electric mixer or with the paddle attachment on your standing mixer, blend the butter and sugar until creamy and light. Add the almond extract, vanilla extract, and egg, and continue to blend well.
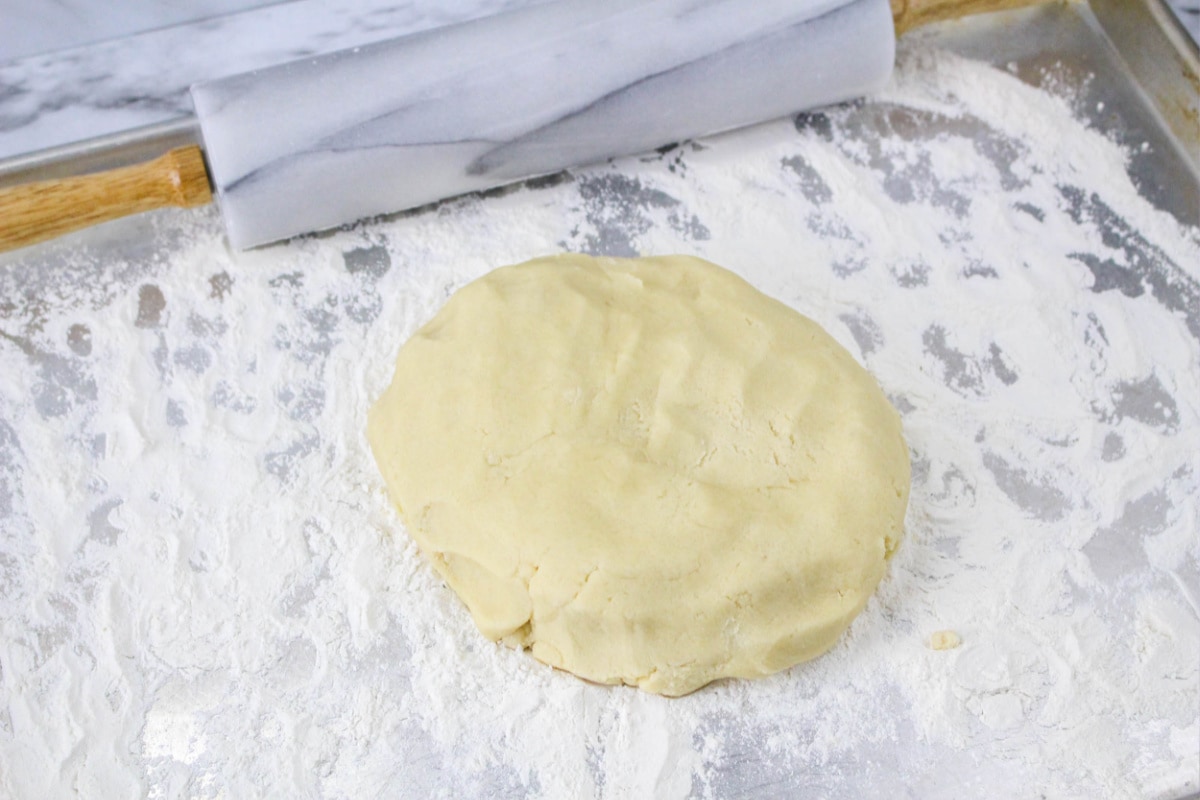
Step 4: Slowly add the flour mixture and mix until combined. The dough will be a little crumbly.
Step 5: Place the dough onto a rolling surface sprinkled with flour or powdered sugar. Press it into a ball and then roll dough with a rolling pin until it’s about a quarter inch thick.
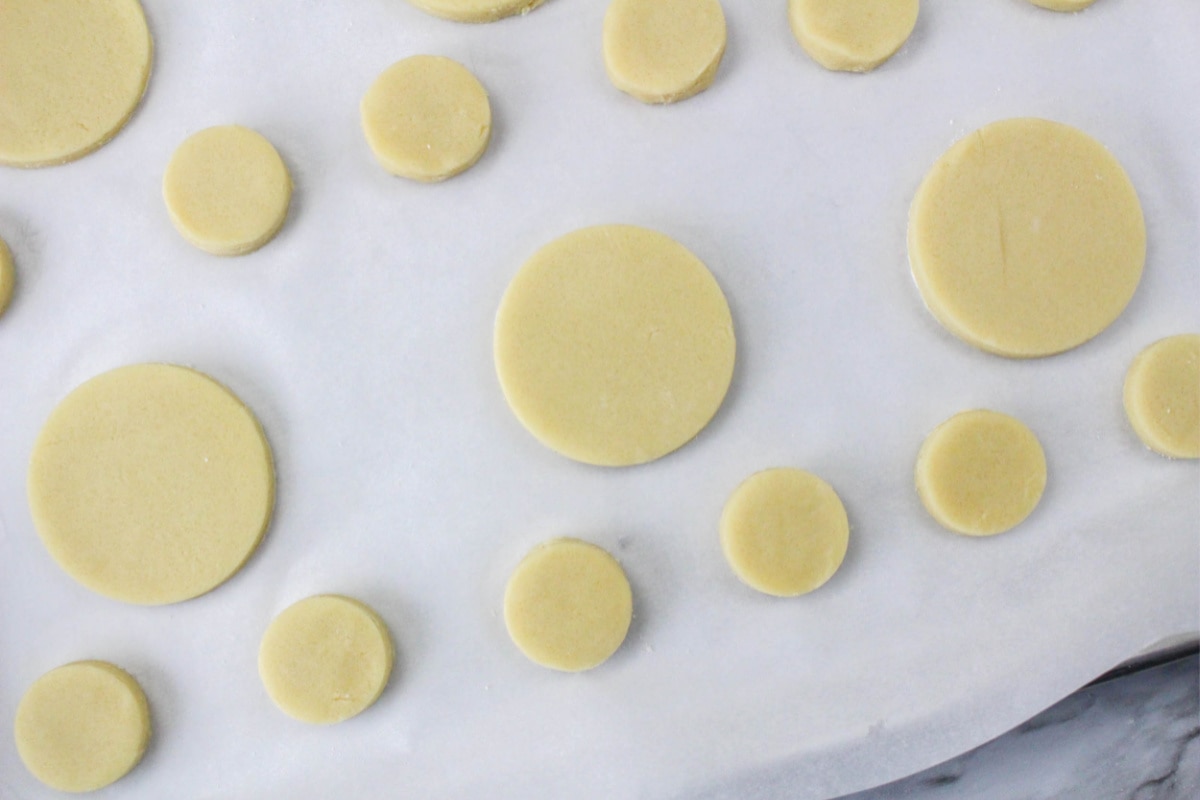
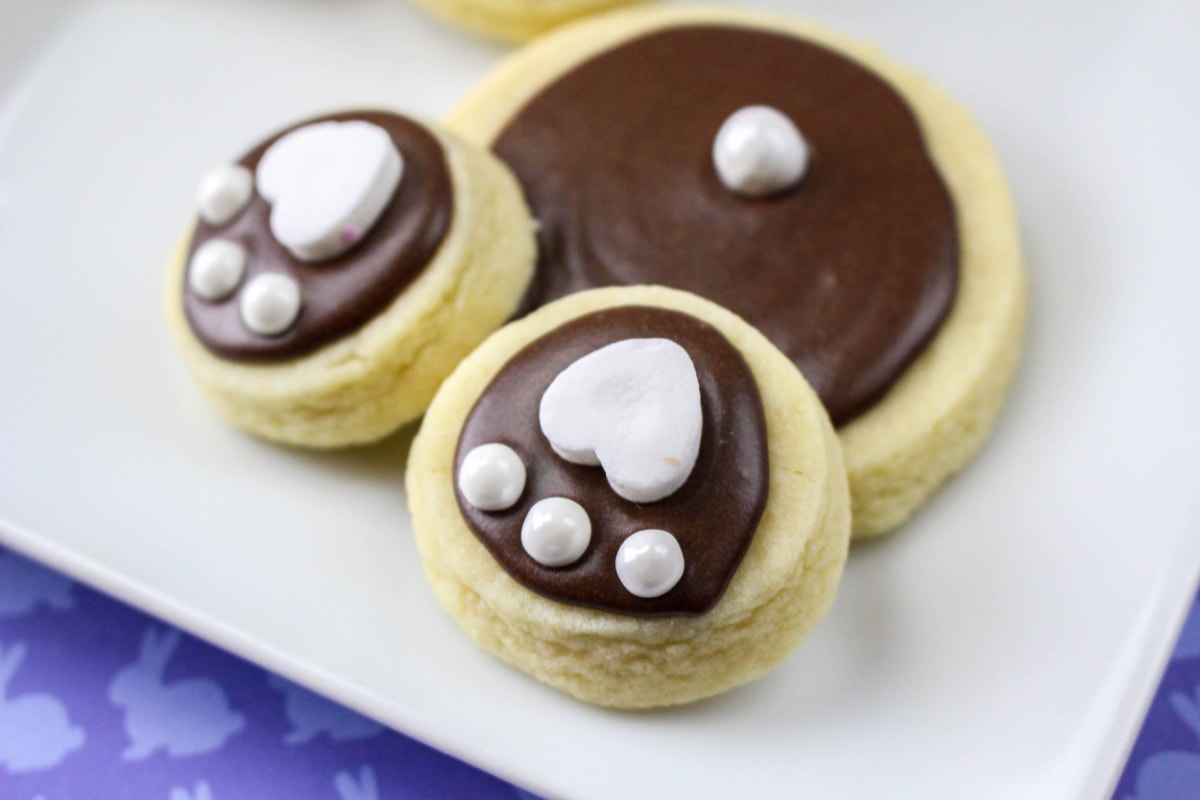
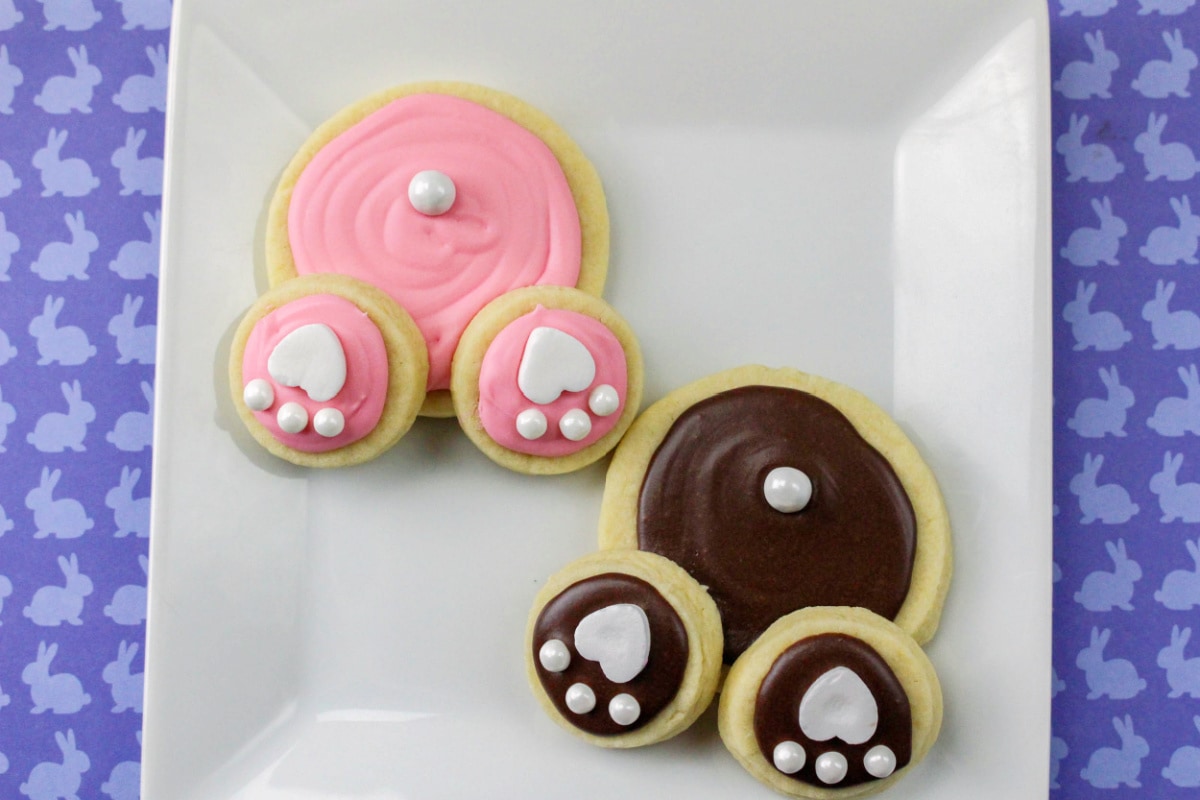
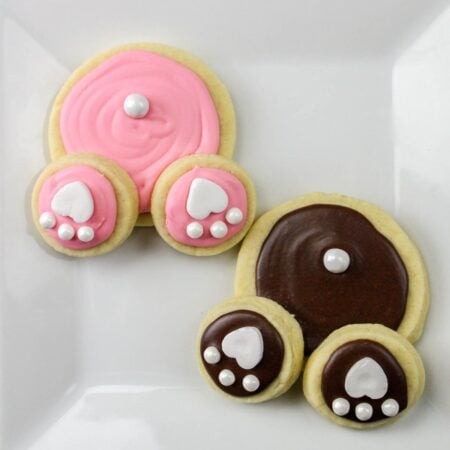
Step 6: Using circle cookie cutters, make one large circle and two small circles for each cookie. These will be used to make the bunny butt and the two little feet.
Step 7: Carefully lift the cookie slices and place them on the baking sheet. (Using a flat spatula for this last step is a great way to ensure that the cookies maintain their shape.)
Step 8: Bake cookies for 7 to 9 minutes, making sure that they do not brown. Allow cookies to cool for at least 20 minutes on the baking sheet before carefully moving them to a wire rack or other cooling surface.
To Decorate the Cookies
Step 1: You could use royal icing but you can also make your own your own version using store bought icing. Just remove the lid and aluminum seal, then place in the microwave for 30 seconds to 1 minute (microwaving longer will result in a thinner icing). We also added a few drops of food coloring for a more vibrant color.
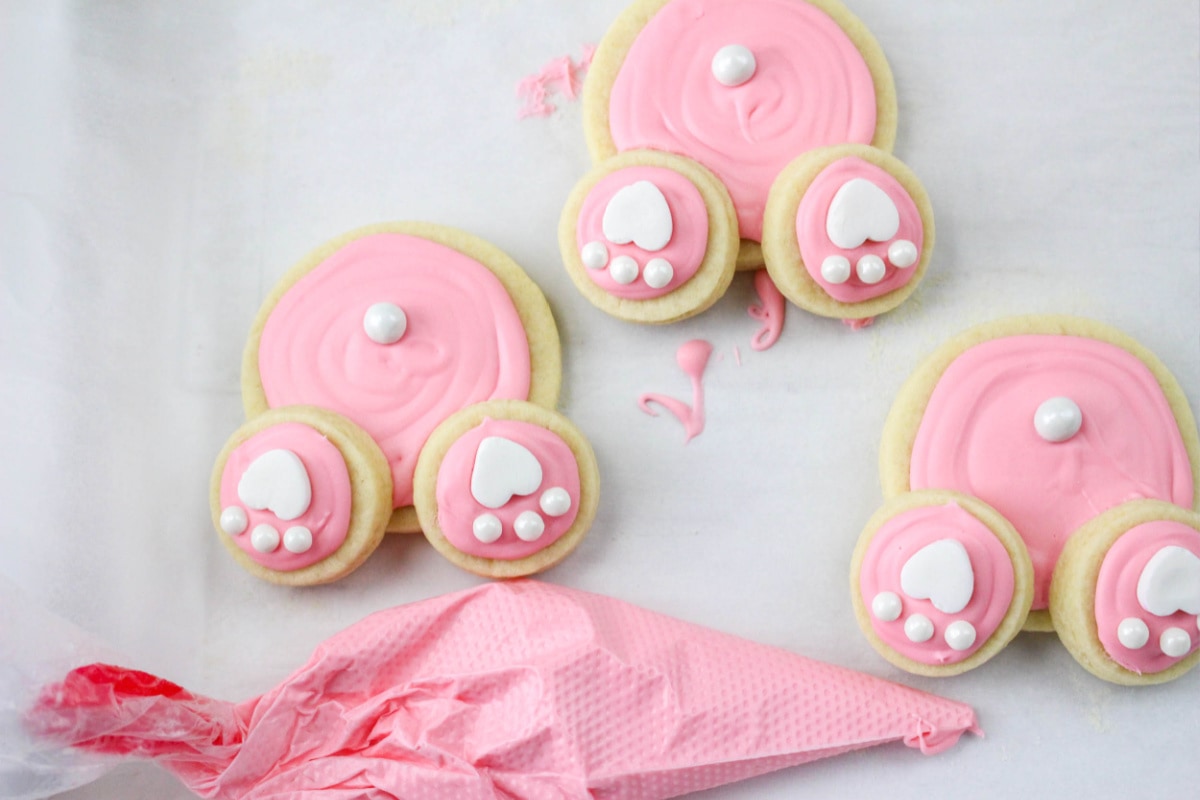
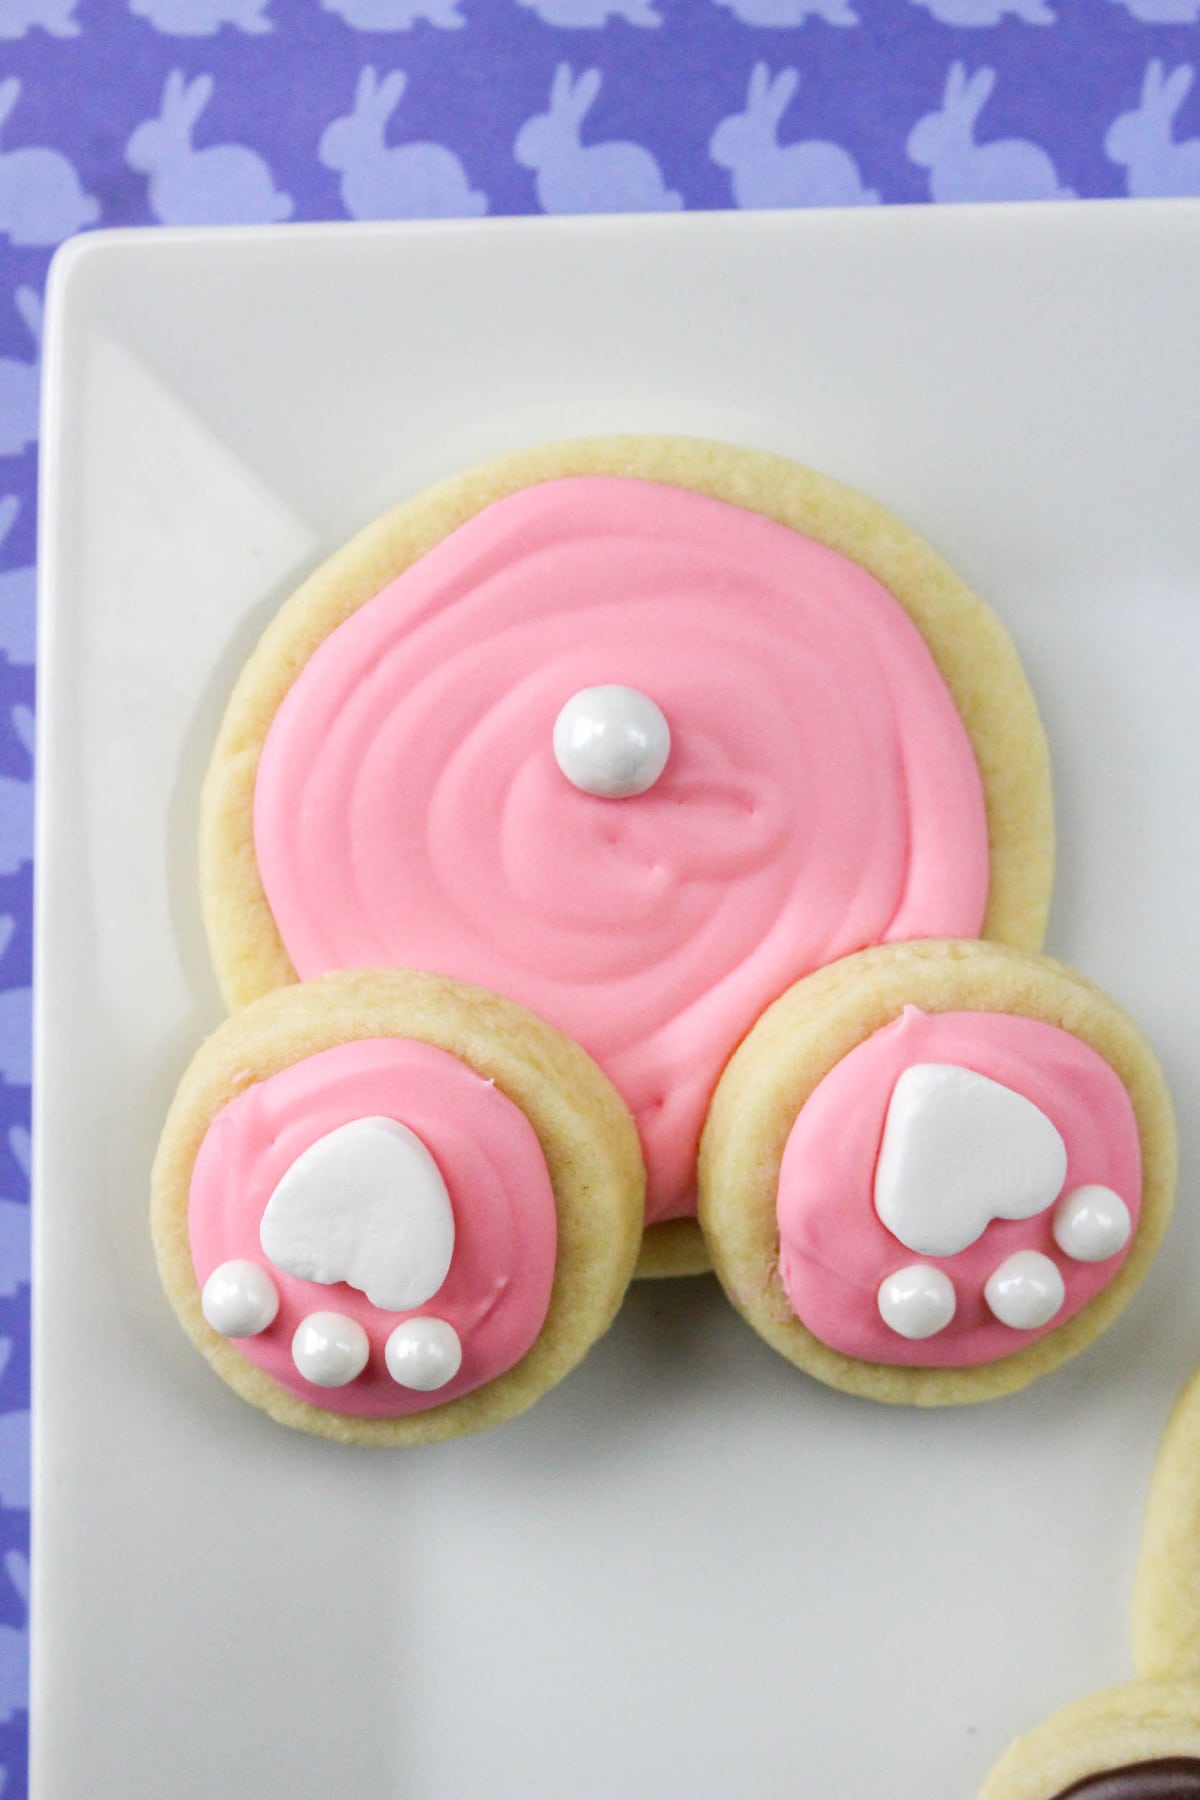
Step 2: While the icing is still wet, place bunny feet (the two smaller cookies) on the larger cookie. Press the decorations into the cookies.
Step 3: Use a conversation heart and three nonpareil sprinkles on each small cookie to form the bunny paws.
Step 4: Add a candy pearl into the center of each cookie to make the bunny tail.
Tips & Tricks for the Most Adorable Bunny Butt Cookies
- Be careful not to overmix the sugar cookie dough. This will leave you with cookies that are too dense.
- To firm up your cookie dough and make it easier to work with, you can wrap it in plastic wrap and place it in the refrigerator to chill for at least an hour after mixing.
- When stacking your finished cookies for storage, place parchment paper or wax paper in between layers to protect the decorations.
- You can use this recipe with different shapes of cookie cutters to make other Easter or Spring-themed cookies. Bunny ear or duck-shaped cookie cutters would be cute too. You can also try using oval shapes decorated with different icing colors and candy sprinkles to make fun Easter egg cookies.
First, you should cool the cookies completely, making sure the icing has set. Then, store leftovers at room temperature in an airtight container with wax or parchment paper in between layers. They’ll keep for about three days.
Can these be frozen?
Sure – if you’re making a batch of dough for later use, you can freeze it and then let it thaw overnight. Flatten the dough slightly for freezing (this helps it thaw faster). Wrap in plastic wrap or foil, then place in a large freezer bag.
Once baked, you can freeze the cookies plain or decorated, as long as they’ve cooled completely. If the cookies are already iced, be sure the icing has set before freezing.
Store your bunny’s butt cookies in an airtight container or freezer bag with parchment or wax paper in between cookie layers. The finished cookies or dough will keep in the freezer for up to three months.
Want More Easter Recipes?
- Easy Easter Dip
- Carrot Patch Easter Cupcakes
- 25 Best Easter Desserts
- Rice Krispie Easter Eggs
- Chocolate Bowls for Easter Candy
- Awesome Easter Cakes
Bunny Butt Cookies
Ingredients
- 3 cups all purpose flour
- 2 teaspoons baking powder
- 1/2 teaspoon salt
- 1 cup 2 sticks butter, softened
- 1 cup sugar
- 1 egg
- 1/2 teaspoon almond extract
- 1 teaspoon vanilla extract
- Powdered sugar or flour for rolling
- 32 ounces Frosting (I used strawberry and chocolate) 2 containers
- 24 white conversation hearts
- 84 white candy coated chocolate pearls
- white frosting optional – to use in place of white conversation hearts
Instructions
To Bake The Cookies
- Preheat the oven to 350 degrees, then line an ungreased cookie sheet with parchment paper.
- Using a whisk, combine the dry ingredients (flour, baking powder, and salt) in a large bowl. Set the flour mixture aside.3 cups all purpose flour, 2 teaspoons baking powder, 1/2 teaspoon salt
- With a hand electric mixer or with the paddle attachment on your standing mixer, blend the butter and sugar until creamy and light. Add the egg, almond extract and vanilla extract. Continue to blend well.1 cup 2 sticks butter, softened, 1 cup sugar, 1 egg, 1/2 teaspoon almond extract, 1 teaspoon vanilla extract
- Slowly add the flour mixture and mix until combined. The dough will be a little crumbly.
- Place the dough onto a rolling surface sprinkled with flour or powdered sugar. Press it into a ball and then roll dough with a rolling pin until it’s about a quarter inch thick.Powdered sugar or flour for rolling
- Using circle cookie cutters, make one large circle and two small circles for each cookie. These will be used to make the bunny butt and the two little feet.
- Carefully lift the cookie slices and place them on the baking sheet. (Using a flat spatula for this last step is a great way to ensure that the cookies maintain their shape.)
- Bake cookies for 7 to 9 minutes, making sure that they do not brown. Allow cookies to cool for at least 20 minutes on the baking sheet before carefully moving them to a wire rack or other cooling surface.
To Decorate The Cookies
- Remove the lid and aluminum seal from the frosting, then place in the microwave for 30 seconds to 1 minute (essentially you're making your own royal icing). Microwaving longer will result in a thinner icing. You can also add a few drops of food coloring for a more vibrant color. Once you've got your icing just the right color(s), add to a piping/icing bag and decorate the cookies.32 ounces Frosting (I used strawberry and chocolate)
- While the icing is still wet, place bunny feet (the two smaller cookies) on the larger cookie. Press the decorations into the cookies (the wet icing will help the feet stay in place).
- Use a conversation heart and three nonpareil sprinkles on each small cookie to form the bunny paws. Be sure to turn the conversation heart so that the writing is on the side sticking into the icing. (NOTE: If you can't find conversation hearts, you can make little hearts with white frosting instead)24 white conversation hearts, white frosting
- Add a candy pearl into the center of each cookie to make the bunny tail.84 white candy coated chocolate pearls
Notes
- Be careful not to overmix the sugar cookie dough. This will leave you with cookies that are too dense.
- Want to firm up the cookie dough to make it easier to work with? Wrap it in plastic wrap and place it in the refrigerator to chill for at least an hour after mixing.
Nutrition
Did You Make This Recipe?
Share it with me on Instagram @funmoneymom and follow on Pinterest @funmoneymom for more!
Let’s be friends!
Did you love this post? Make sure to comment below and let me know your thoughts! And don’t forget to follow on your favorite social network below!

About Lisa O’Driscoll
Lisa O’Driscoll is a lifestyle and parenting expert, cookbook author, and the creative force behind Fun Money Mom, a popular blog she’s run since 2014. She’s the author of the children’s cookbook Roll It, Slice It, Mash It, Dice It, designed to get kids excited about cooking. With multiple TV appearances under her belt, she loves sharing her expertise on family-friendly recipes, creative DIYs, and party planning and is always on a mission to inspire and entertain!