Pirate Cupcakes
This post may contain affiliate links. As an Amazon Associate, I earn from qualifying purchases.
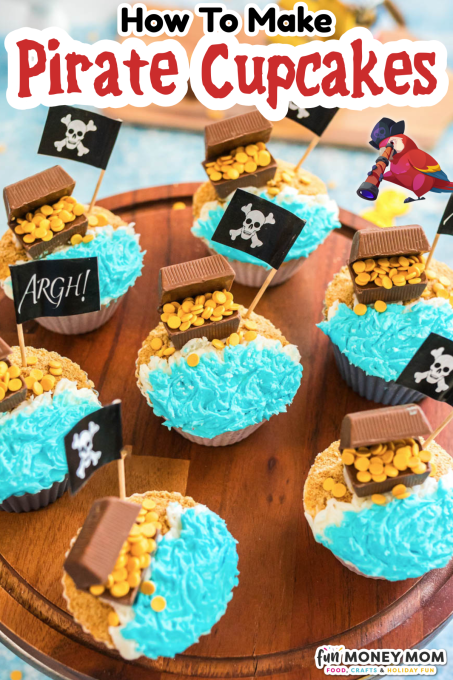
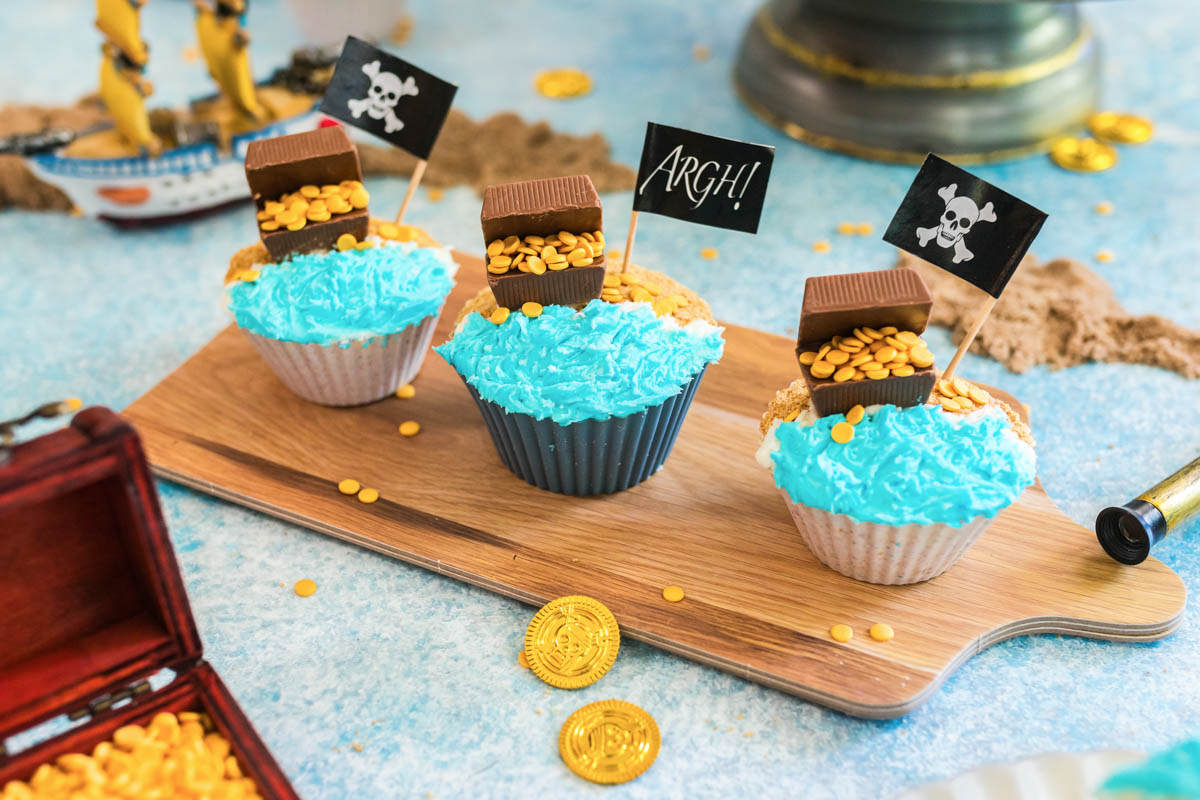
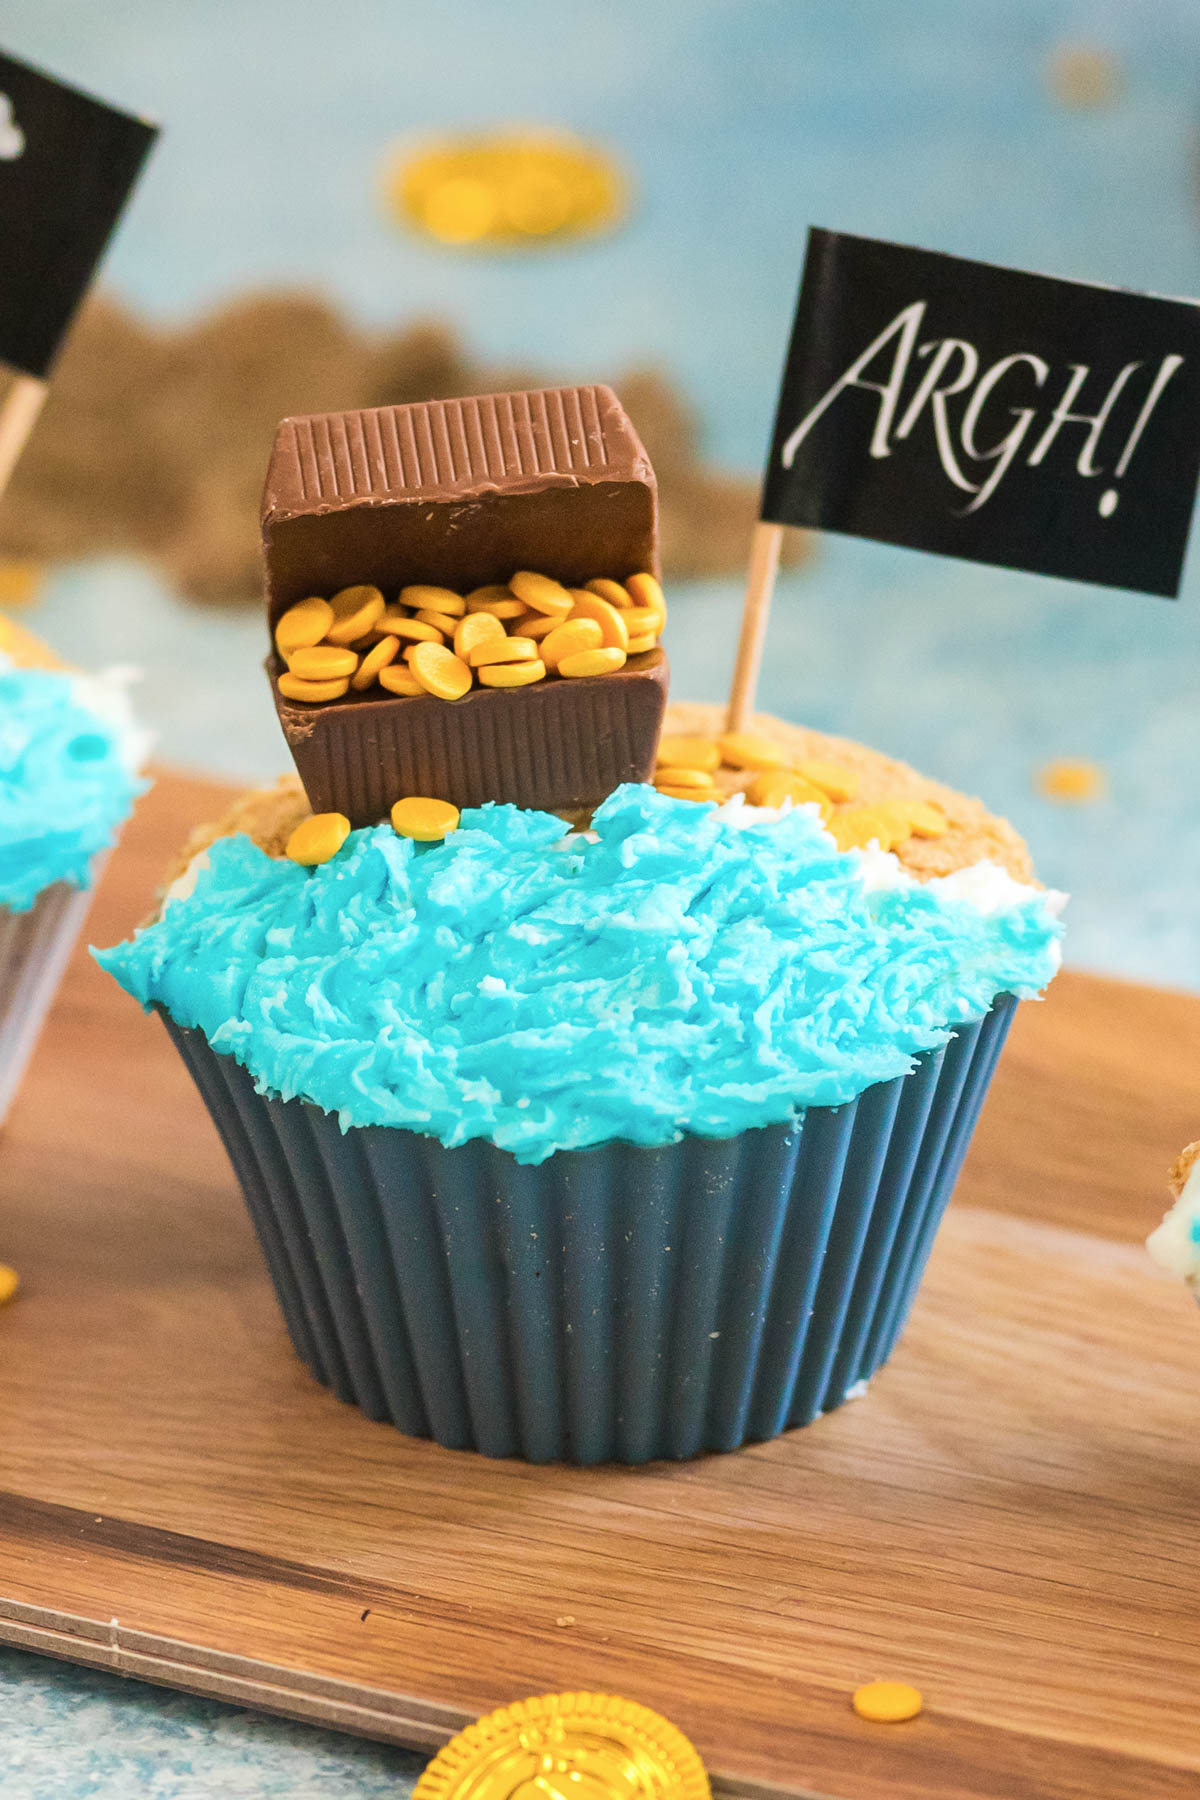
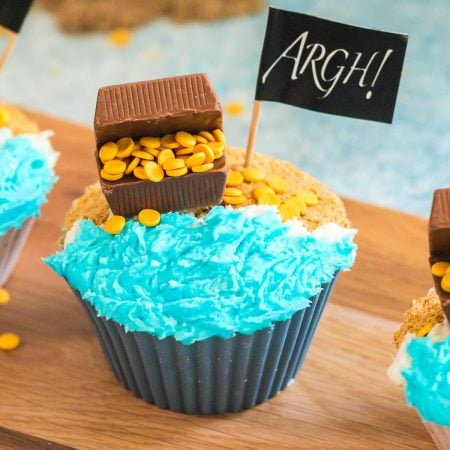
These adorable Pirate Cupcakes bring sandy beaches, blue frosting waves, and a chocolate treasure chest straight to your dessert table. Moist and fluffy cupcakes topped with sweet, creamy frosting create the perfect little treat for the pirate fans in your life.
Pirate Cupcakes Recipe
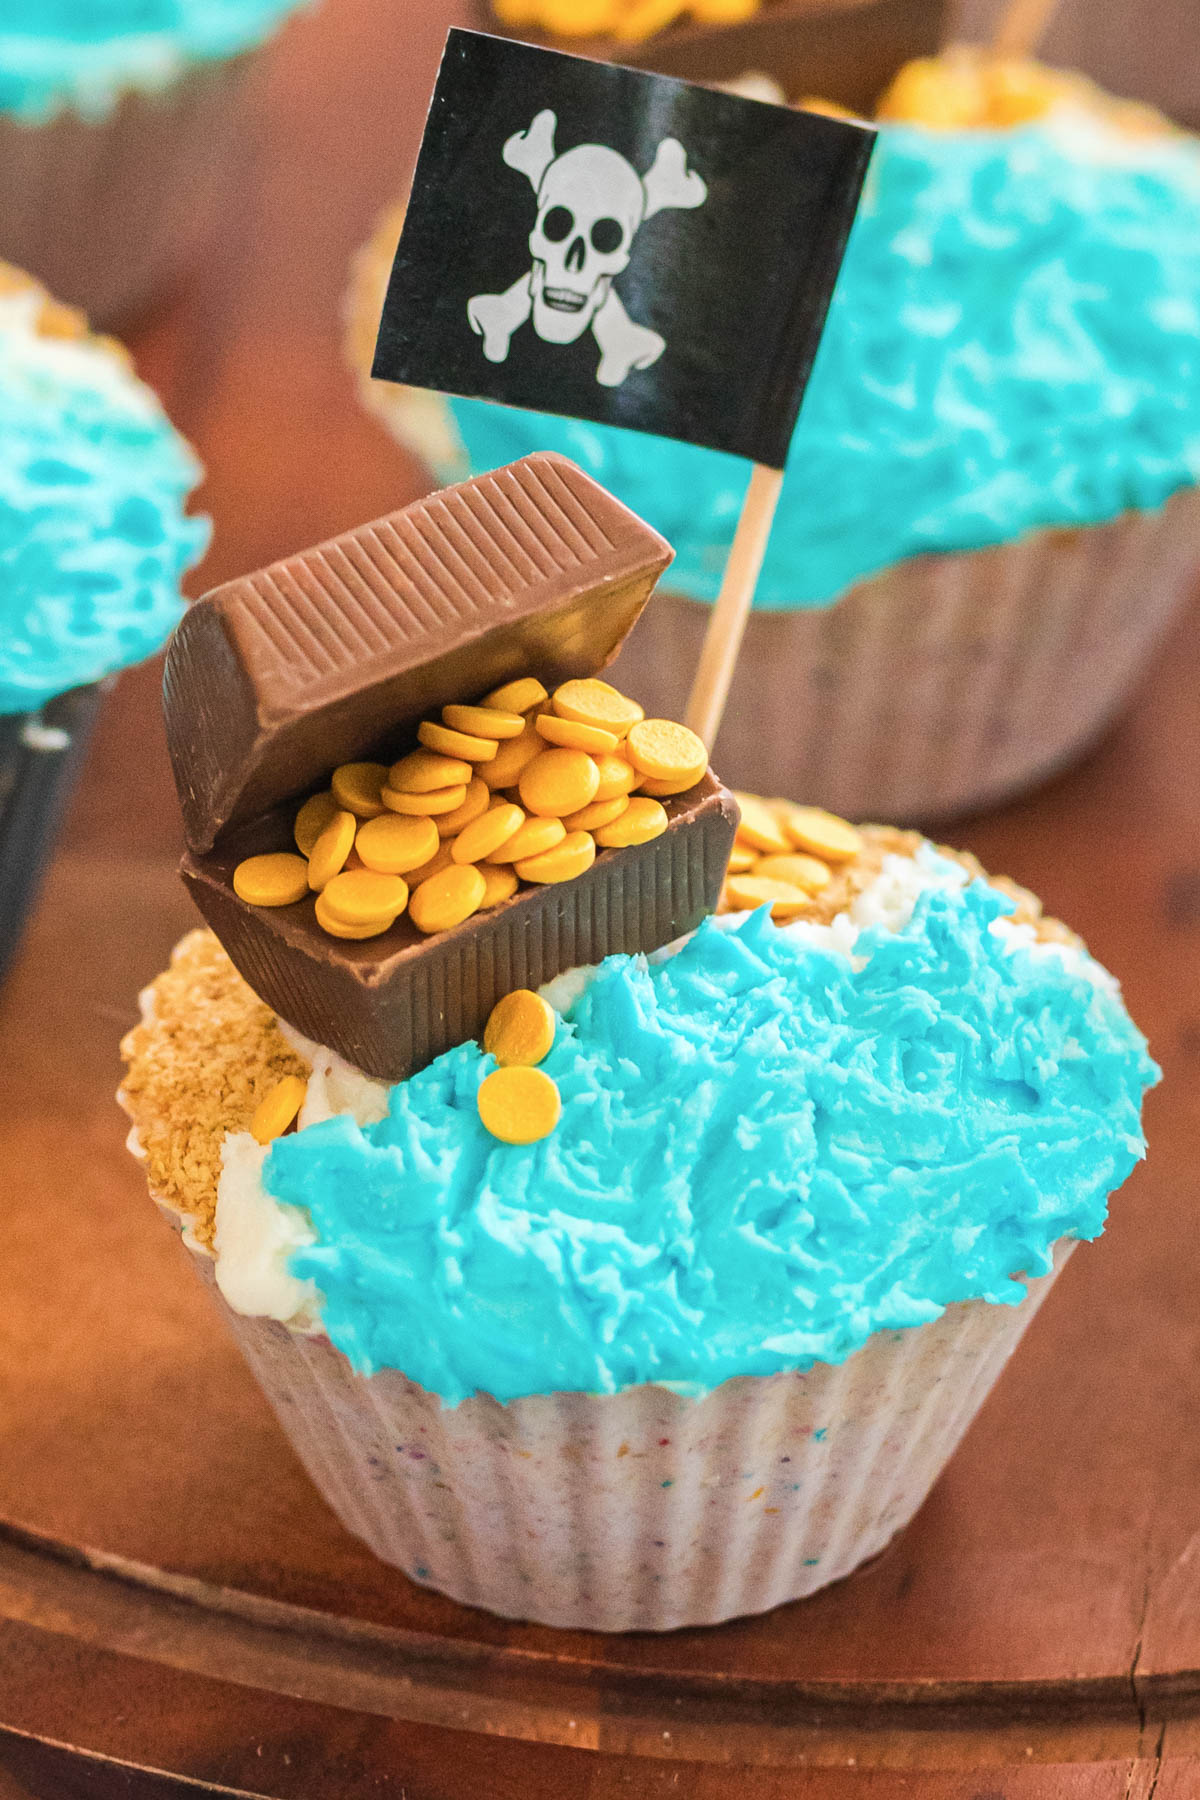
Pirates aren’t only found on the high seas, especially when these Pirate Cupcakes show up at a birthday party. Each cupcake is a tiny treasure scene with sandy beaches, blue waves, and chocolate chests filled with gold. They’re playful, colorful, and such a fun way to add a little pirate magic to any celebration.
I especially love how easy they are for anyone to make, even if cake decorating isn’t your thing (though my Pirate Cake is pretty easy too). You just swirl a little frosting, stack chocolate nuggets with gold sprinkles, and add simple touches to the tops of each cupcake.
I’ve made these for several themed parties and people always ask where I bought them because they’re just that cute!
If you’re looking for something to serve with these, be sure to check out my no churn Mermaid Ice Cream. I also love changing up the colors in this Galaxy Ice Cream to match different themes. Just use various shades of blue, top with gold coin sprinkles and you’ve got pirate ice cream.
Why We Love This Recipe
- Impressive, but easy decorations: The decorating looks detailed but uses very basic ingredients and no fondant.
- Delicious flavors: Each cupcake has layers of goodness from homemade frosting, crumbs, chocolate candy, and the fluffy cupcake base.
- Versatile recipe: You can make this recipe with store bought cupcakes or homemade cupcakes, depending on how much time you have.
- Perfect pirate theme: The decorations and pirate flag cupcake toppers make them an ideal sweet treat for a themed birthday party
Ingredients
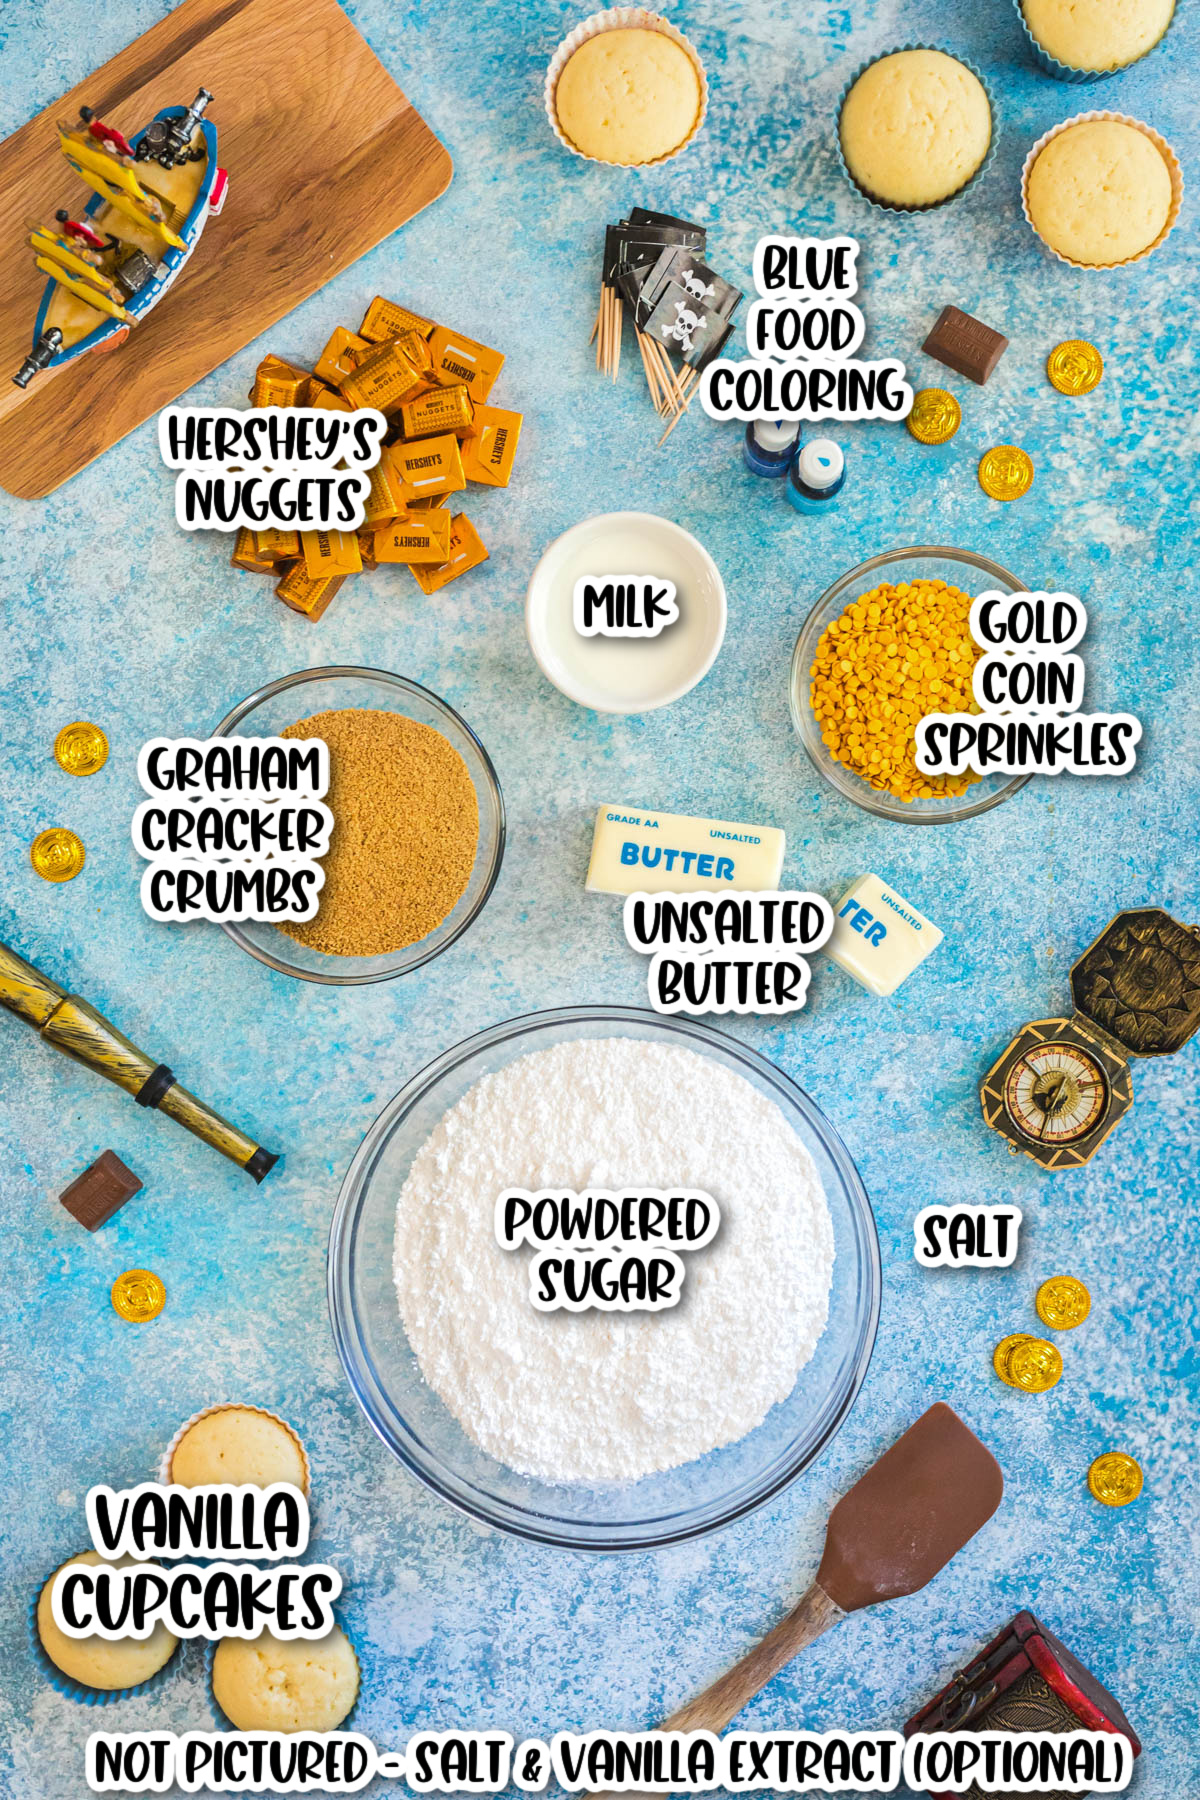
- Vanilla cupcakes: Either homemade or store-bought, they are your blank canvas.
- Unsalted butter: Softened butter gives the frosting a smooth and spreadable texture.
- Powdered sugar: Adds sweetness and structure so the frosting holds its shape.
- Milk: Helps loosen the frosting just enough for piping and spreading.
- Graham cracker crumbs: Finely ground crumbs create the sandy beach effect.
- Salt: A small pinch balances the sweetness of the frosting.
- Vanilla extract: Optional but adds warmth and depth to the frosting.
- Blue food coloring: Creates the ocean water look for the pirate cupcake theme.
- Gold sprinkles: These become edible treasure coins inside the chests.
- Hershey’s Nuggets: Used to form the chocolate treasure chests.
Find the full printable recipe with measurements and directions in the recipe card below.
How To Make Easy Pirate Cupcakes
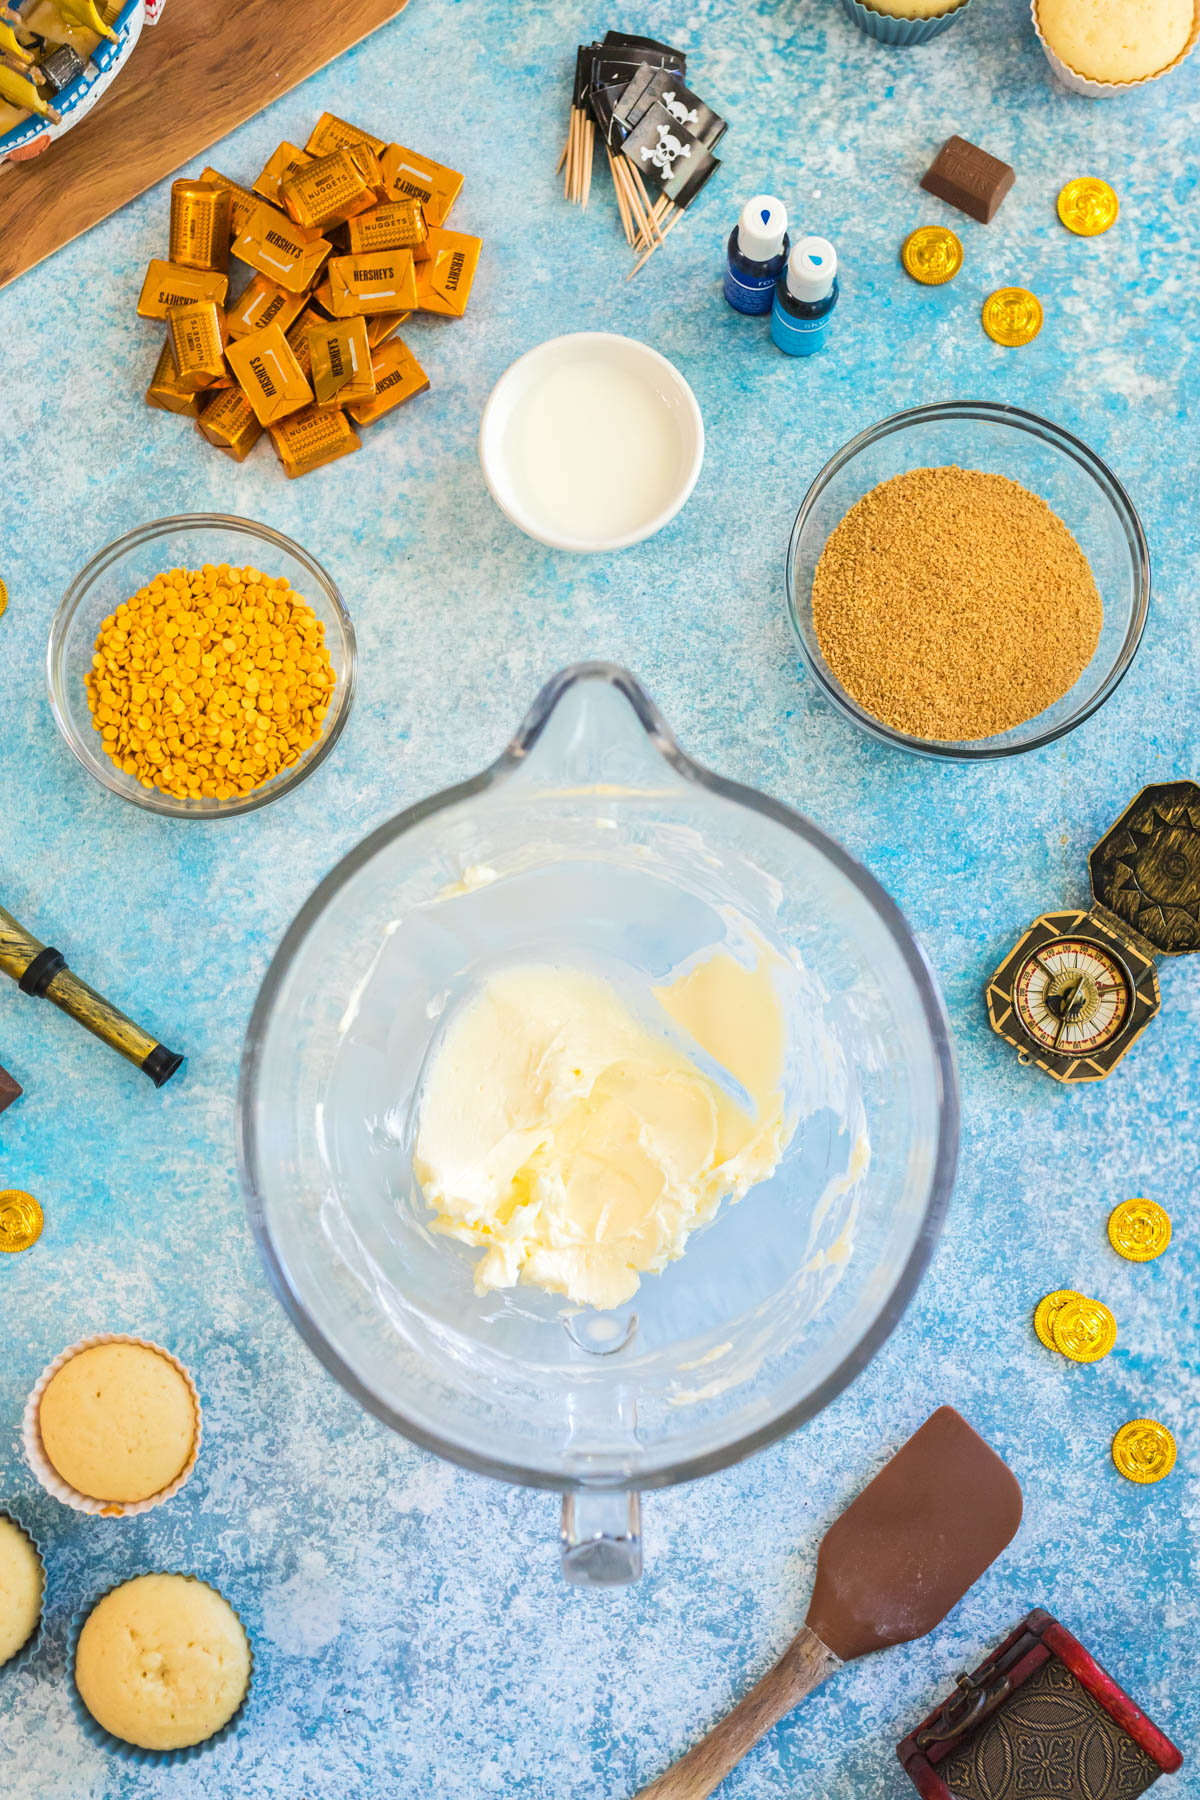
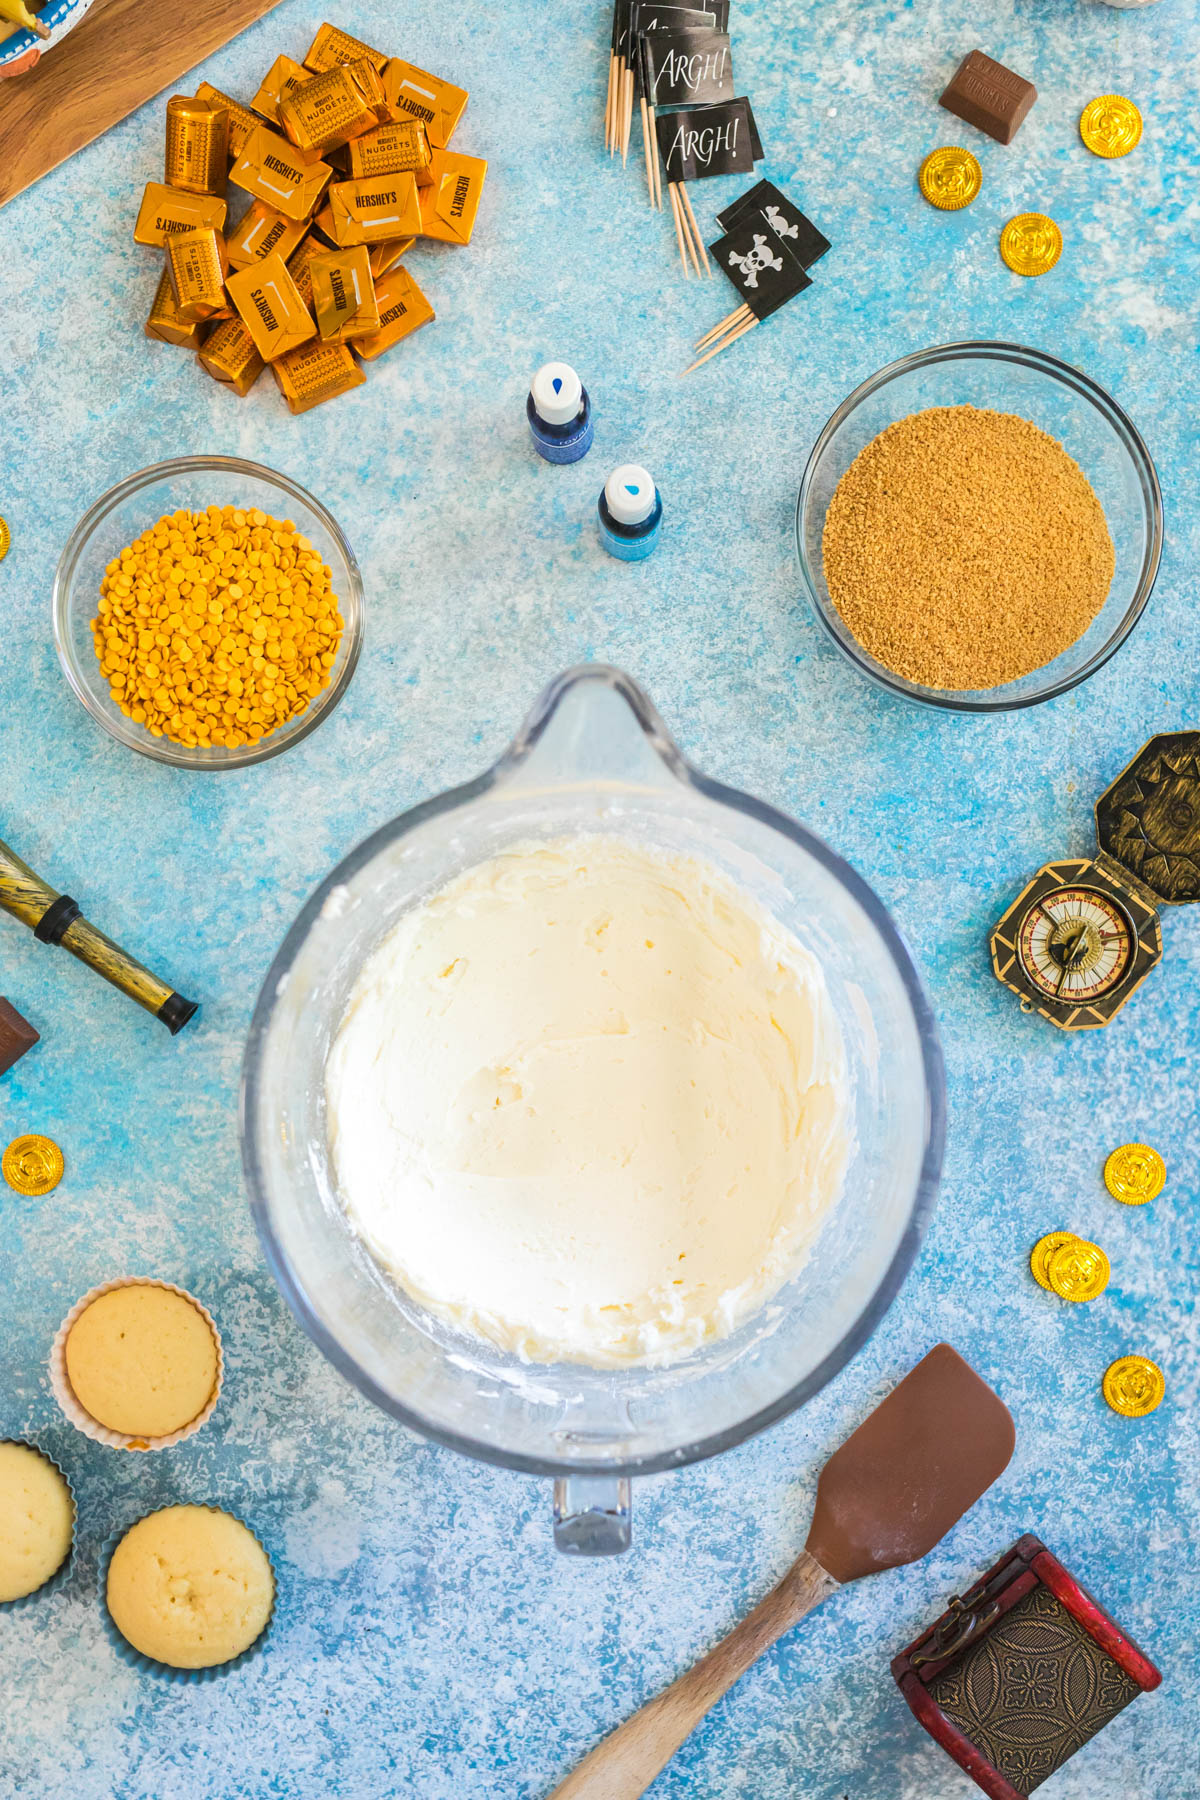
Step 1. In the bowl of a stand mixer, cream the butter and salt on medium speed until smooth.
Step 2. Slowly add the powdered sugar one cup at a time, mixing until fully combined.
Step 3. Add the milk, vanilla extract and a pinch of salt, then mix until the frosting is smooth and fluffy.
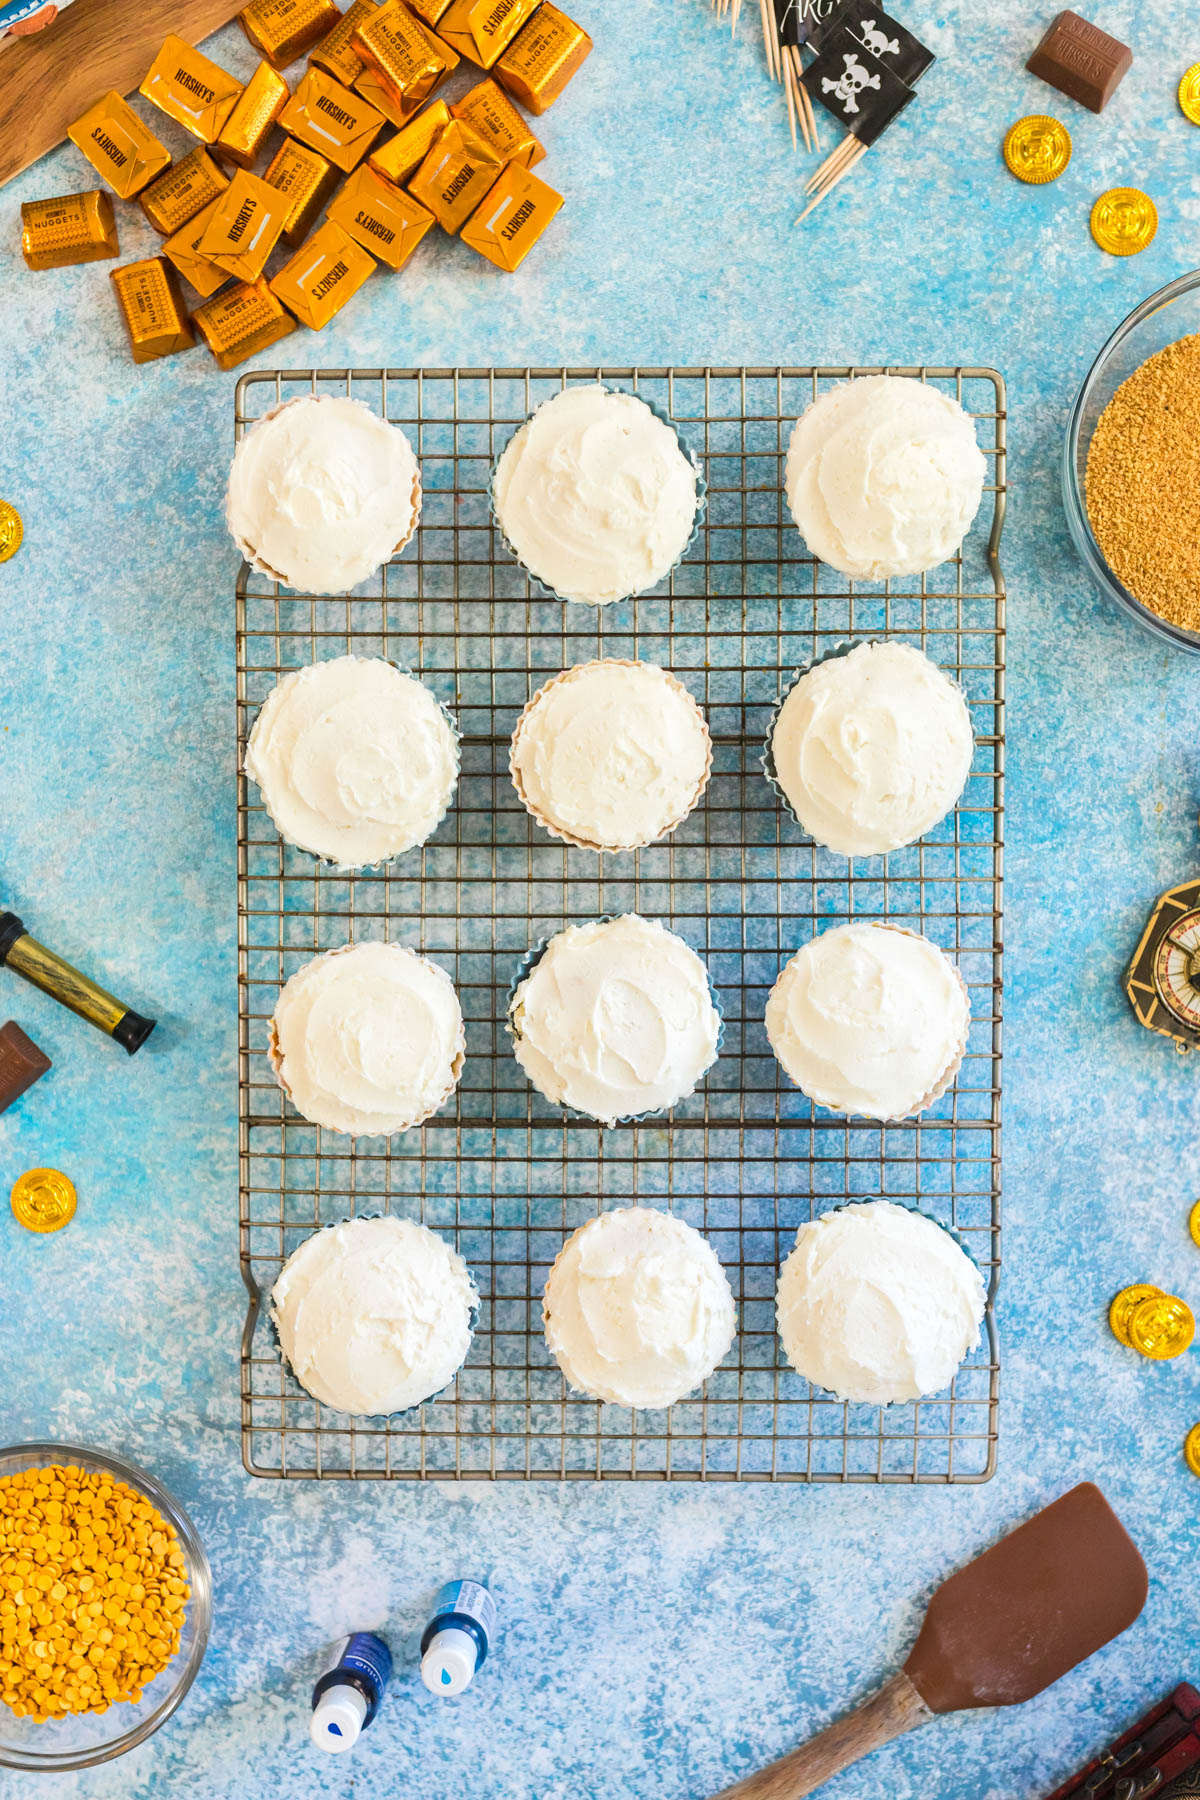
Step 4. Use about half of the frosting to loosely frost the top of each cupcake. It does not need to look perfect at this point.
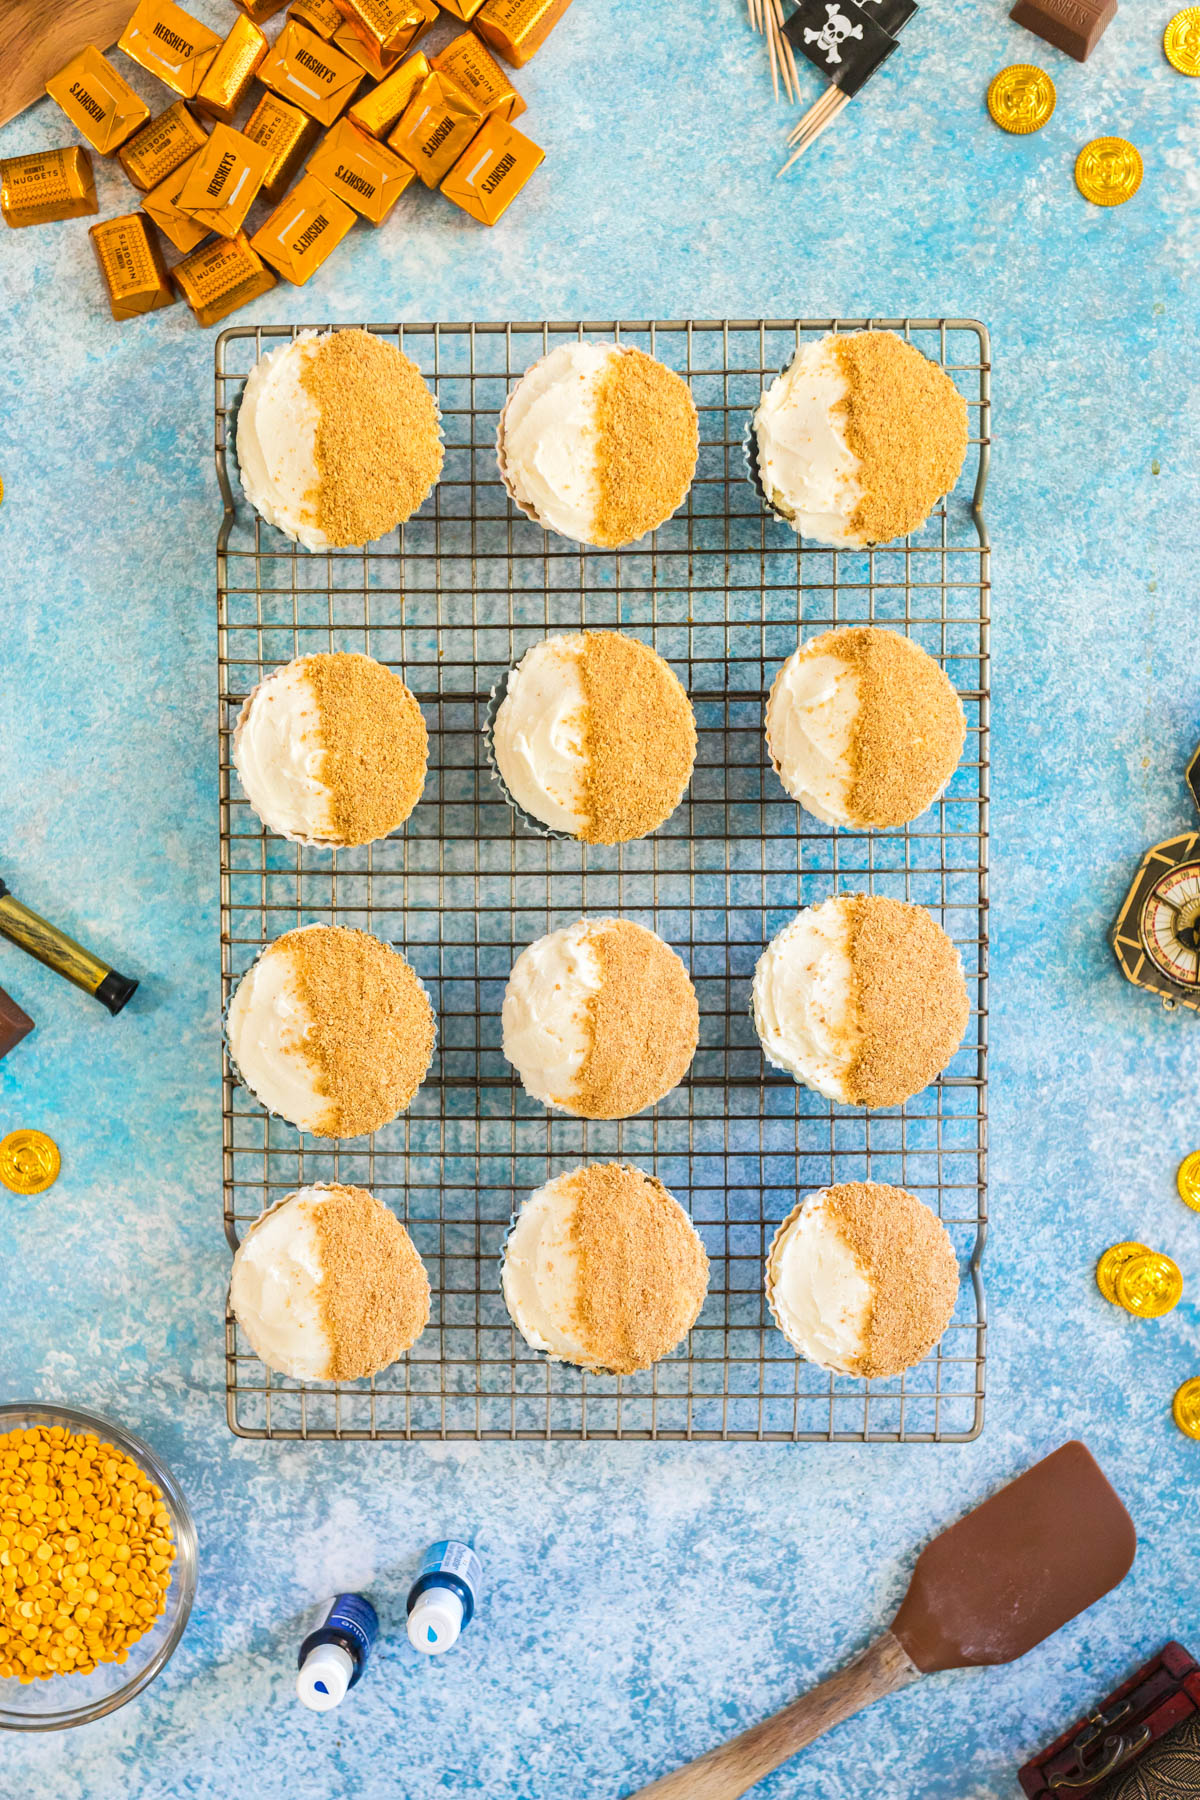
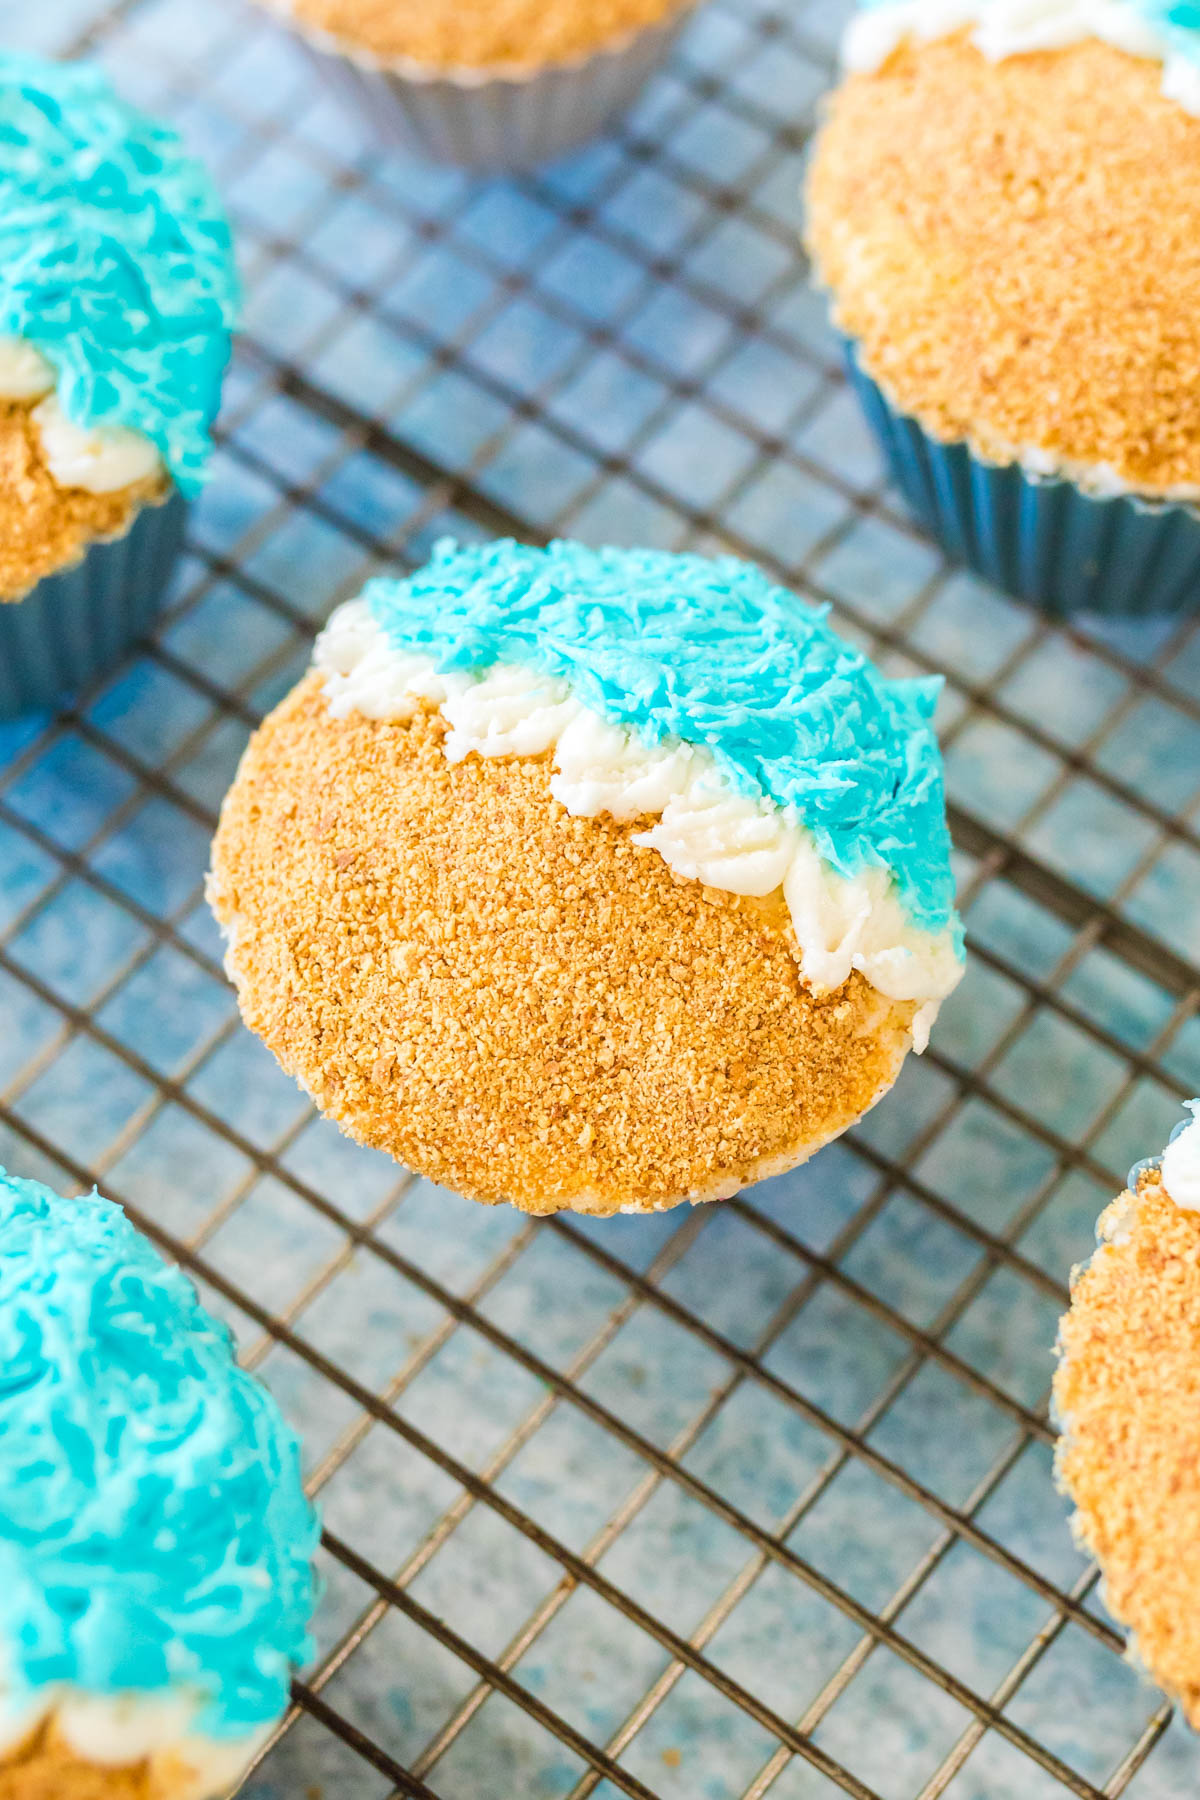
Step 5. Dip half of each cupcake into the graham cracker crumbs to form the sandy beach.
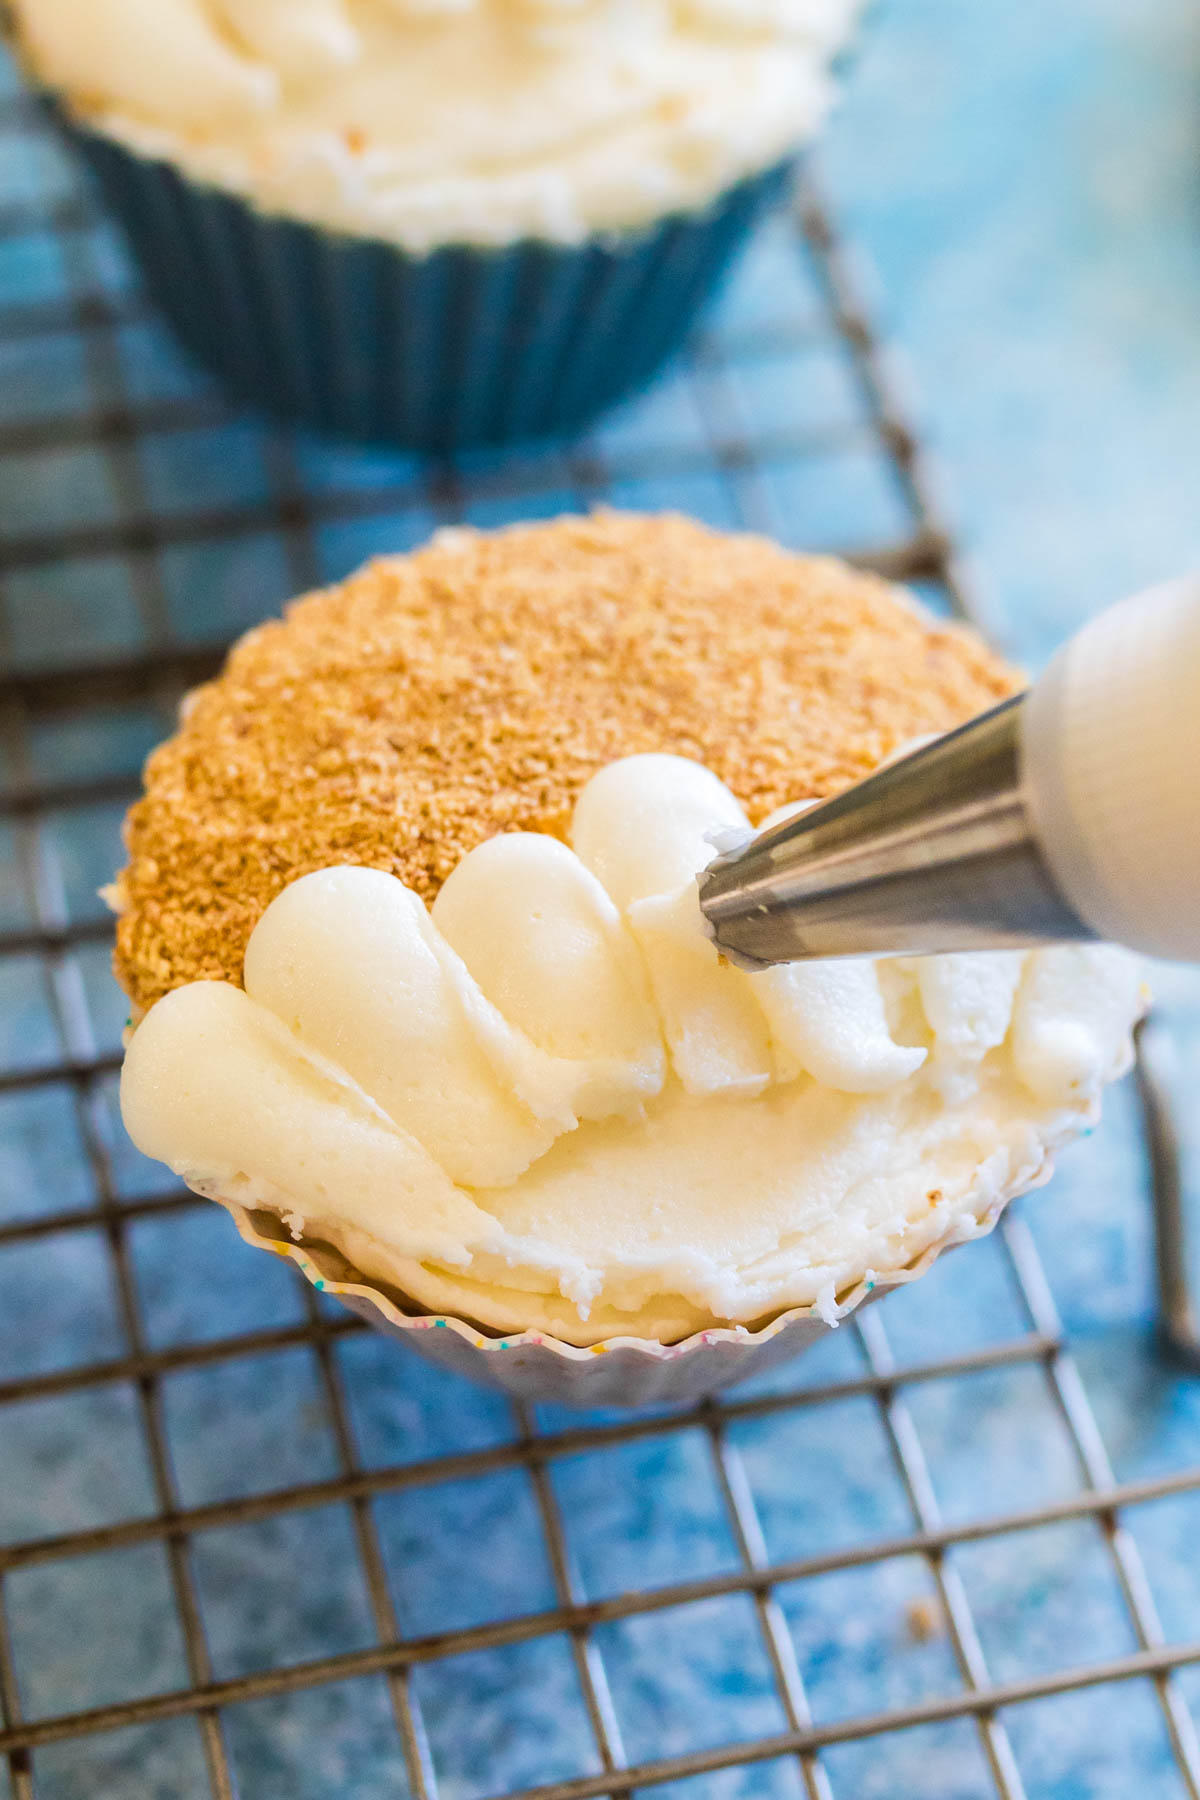
Step 6. Transfer about 1/3 cup of frosting into a piping bag with a small open tip.
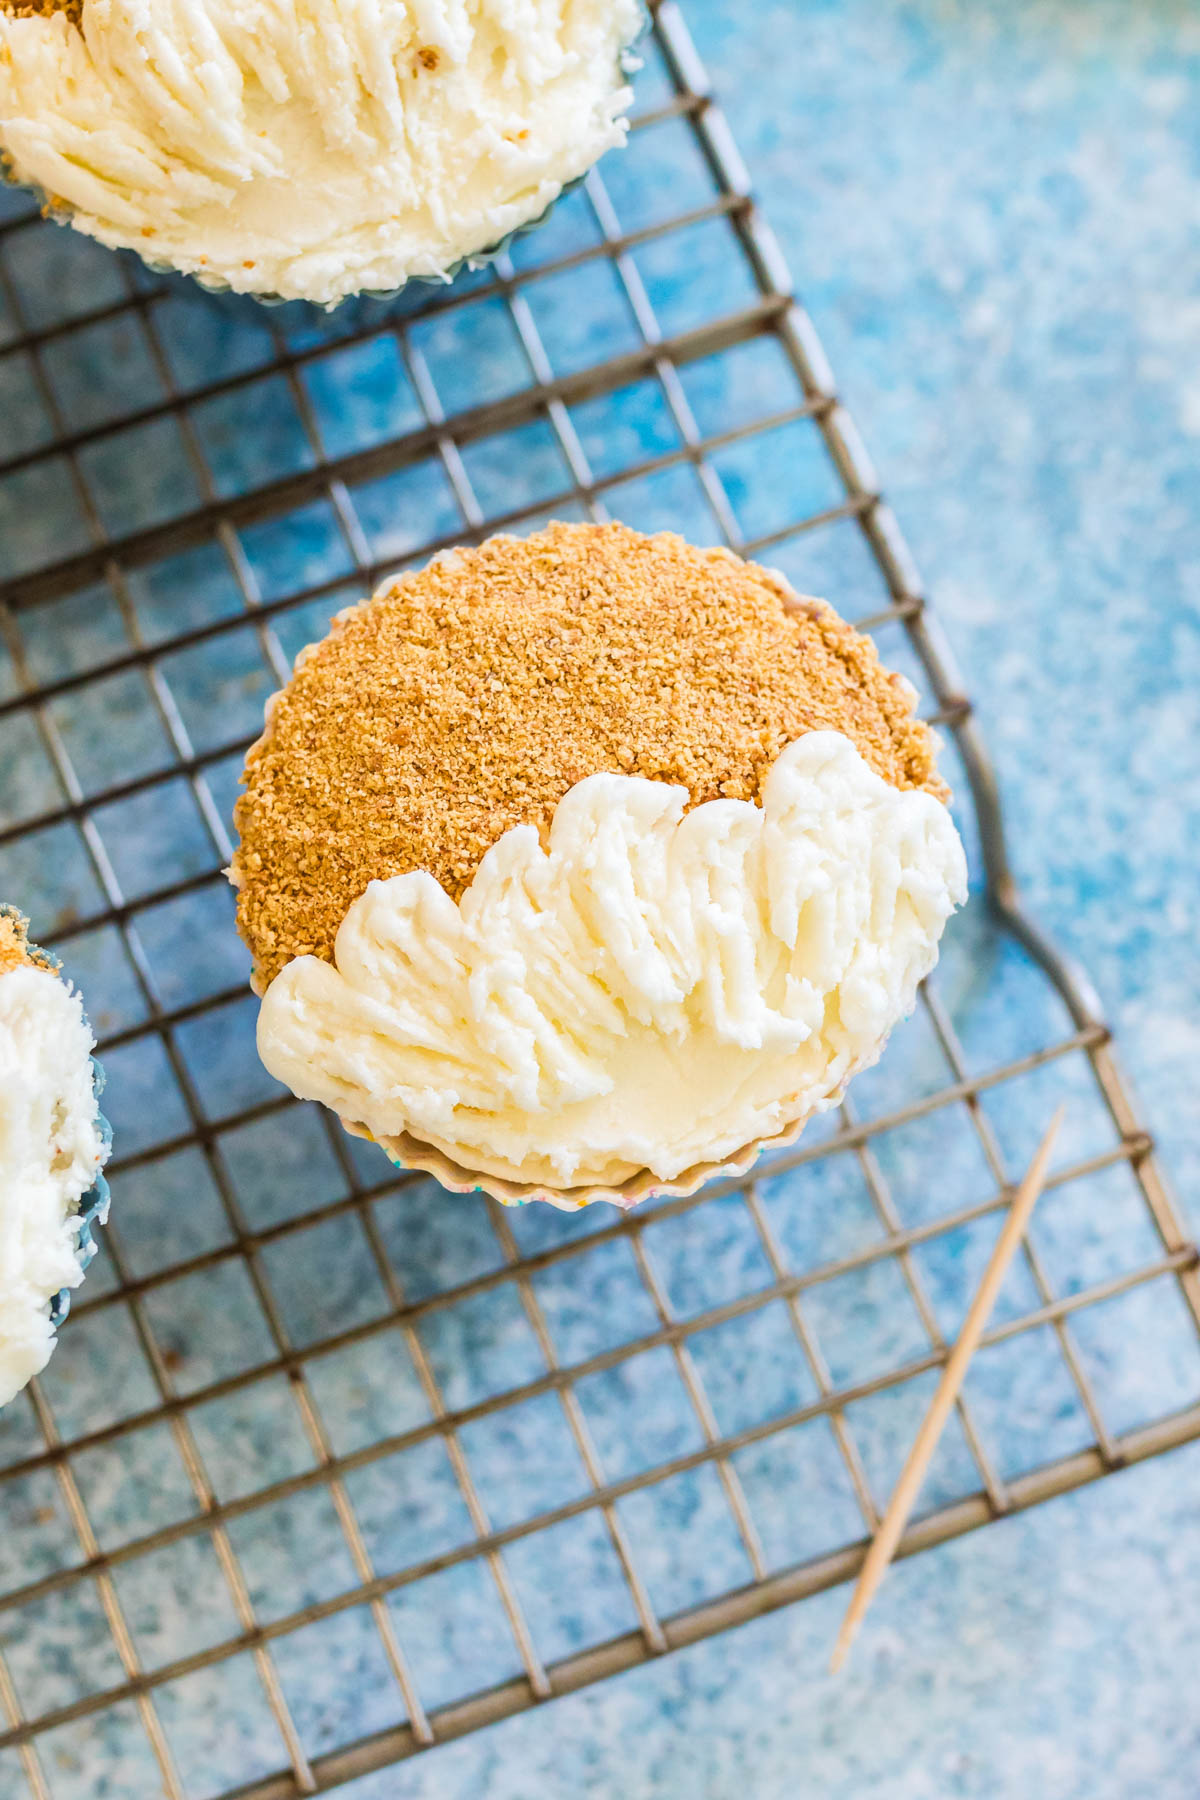
Step 7. Pipe small dollops along the edge of the sand and gently drag them downward. Swirl lightly with a toothpick to create the crashing waves.
Step 8. Add blue food coloring to the remaining frosting and mix until evenly colored. Then, frost the plain side of each cupcake with the blue frosting, stopping at the piped edge.
Step 9. Swirl the blue frosting gently with a toothpick to mimic water movement.
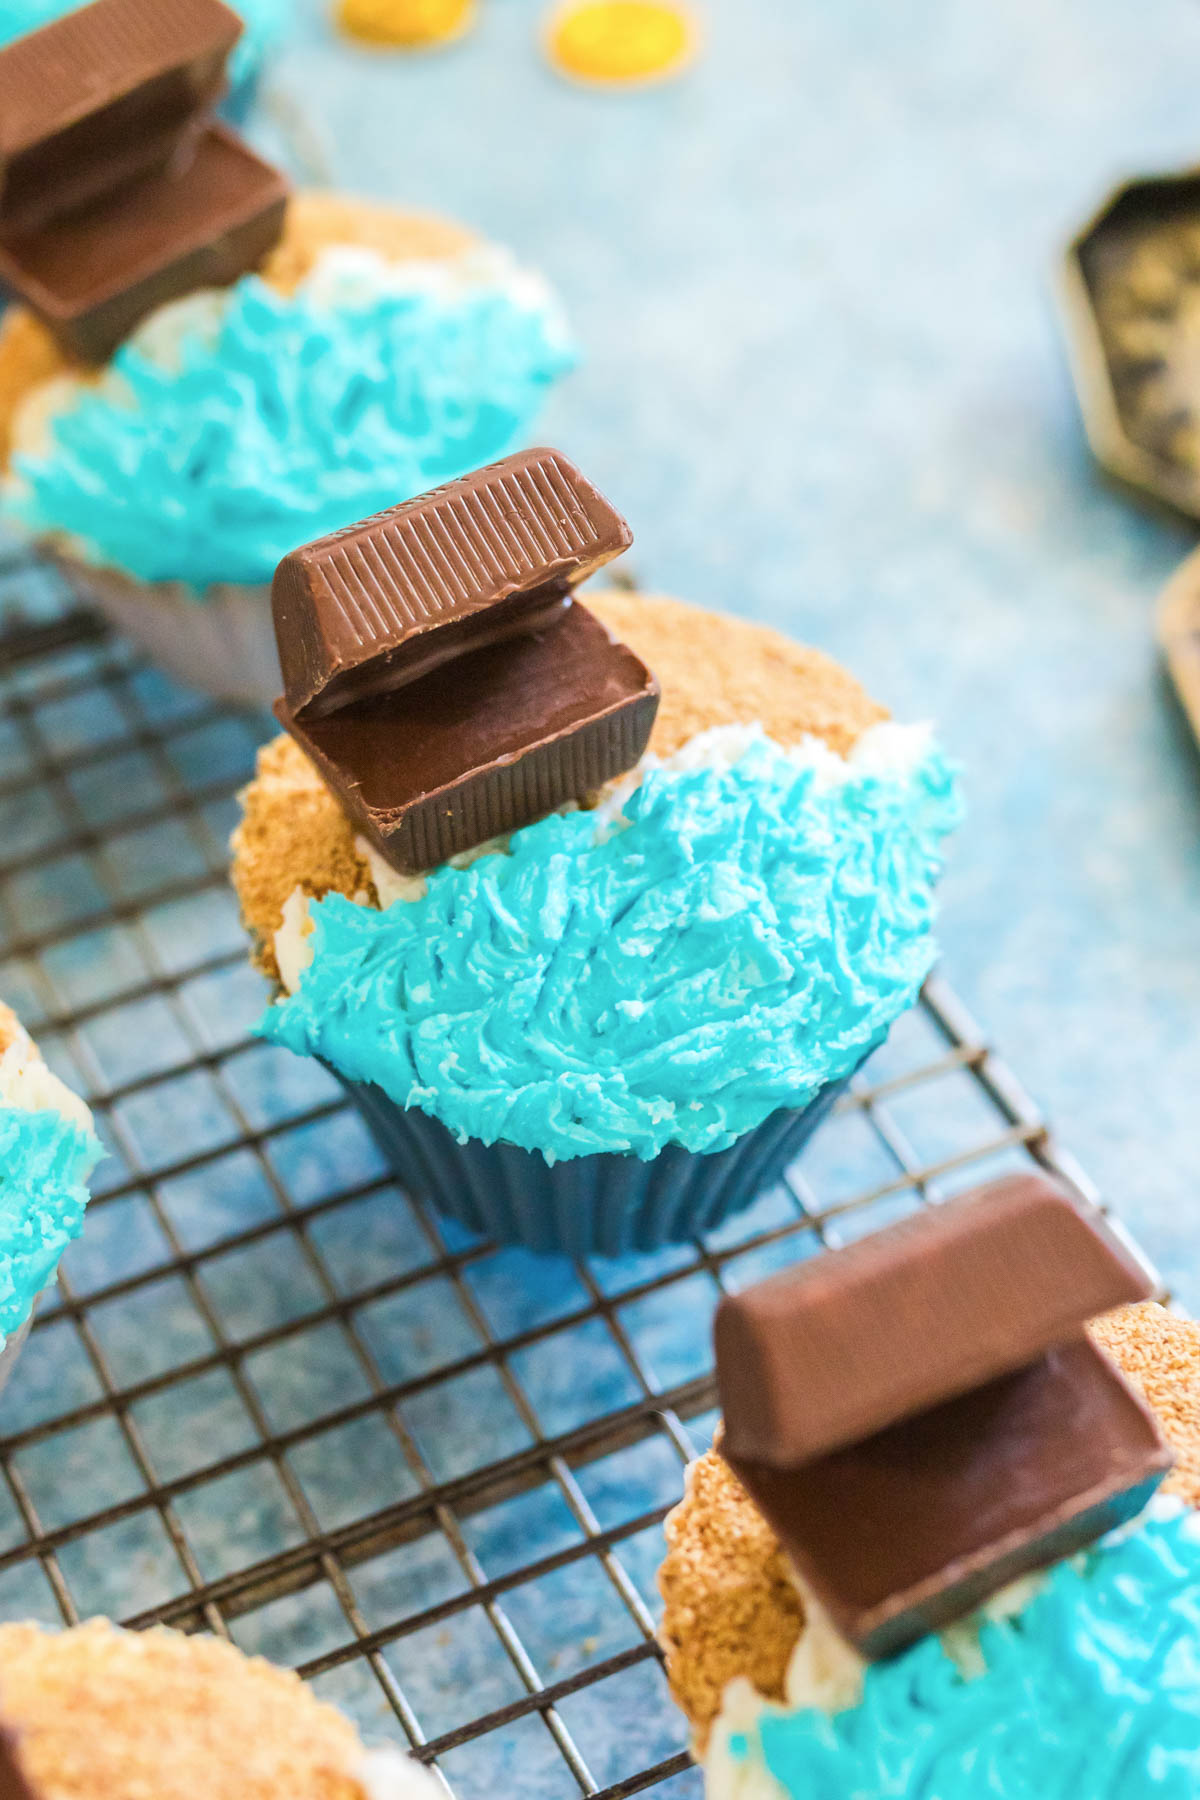
Step 10. Unwrap all Hershey’s nuggets. Place two nuggets in a microwave-safe dish and melt until smooth.
Step 11. Smear melted chocolate along the long edge of one nugget, then attach a second nugget to form an open treasure chest. You can use foil if needed to hold the nuggets in place while the chocolate sets.
Step 12. Repeat until all treasure chests are assembled, then place one chocolate treasure chest into the graham cracker sand of each cupcake.
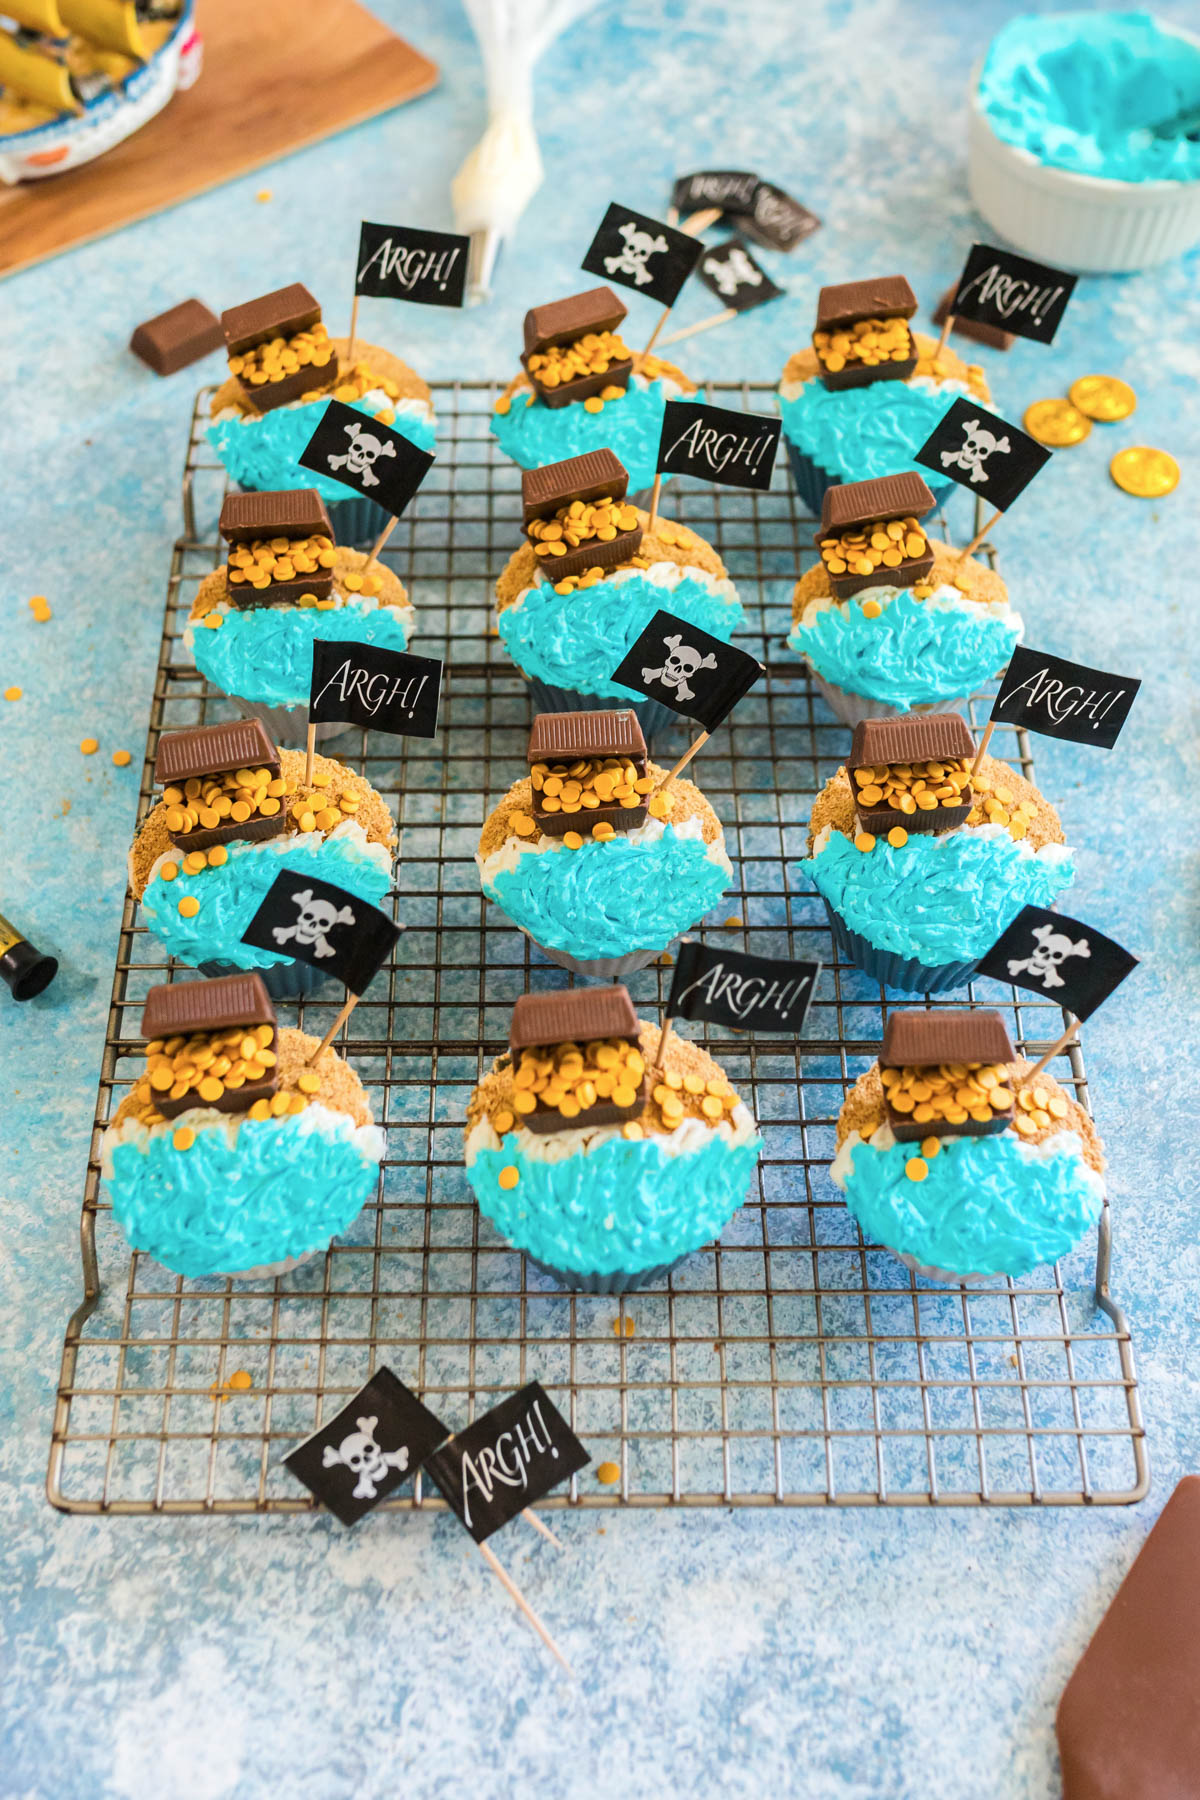
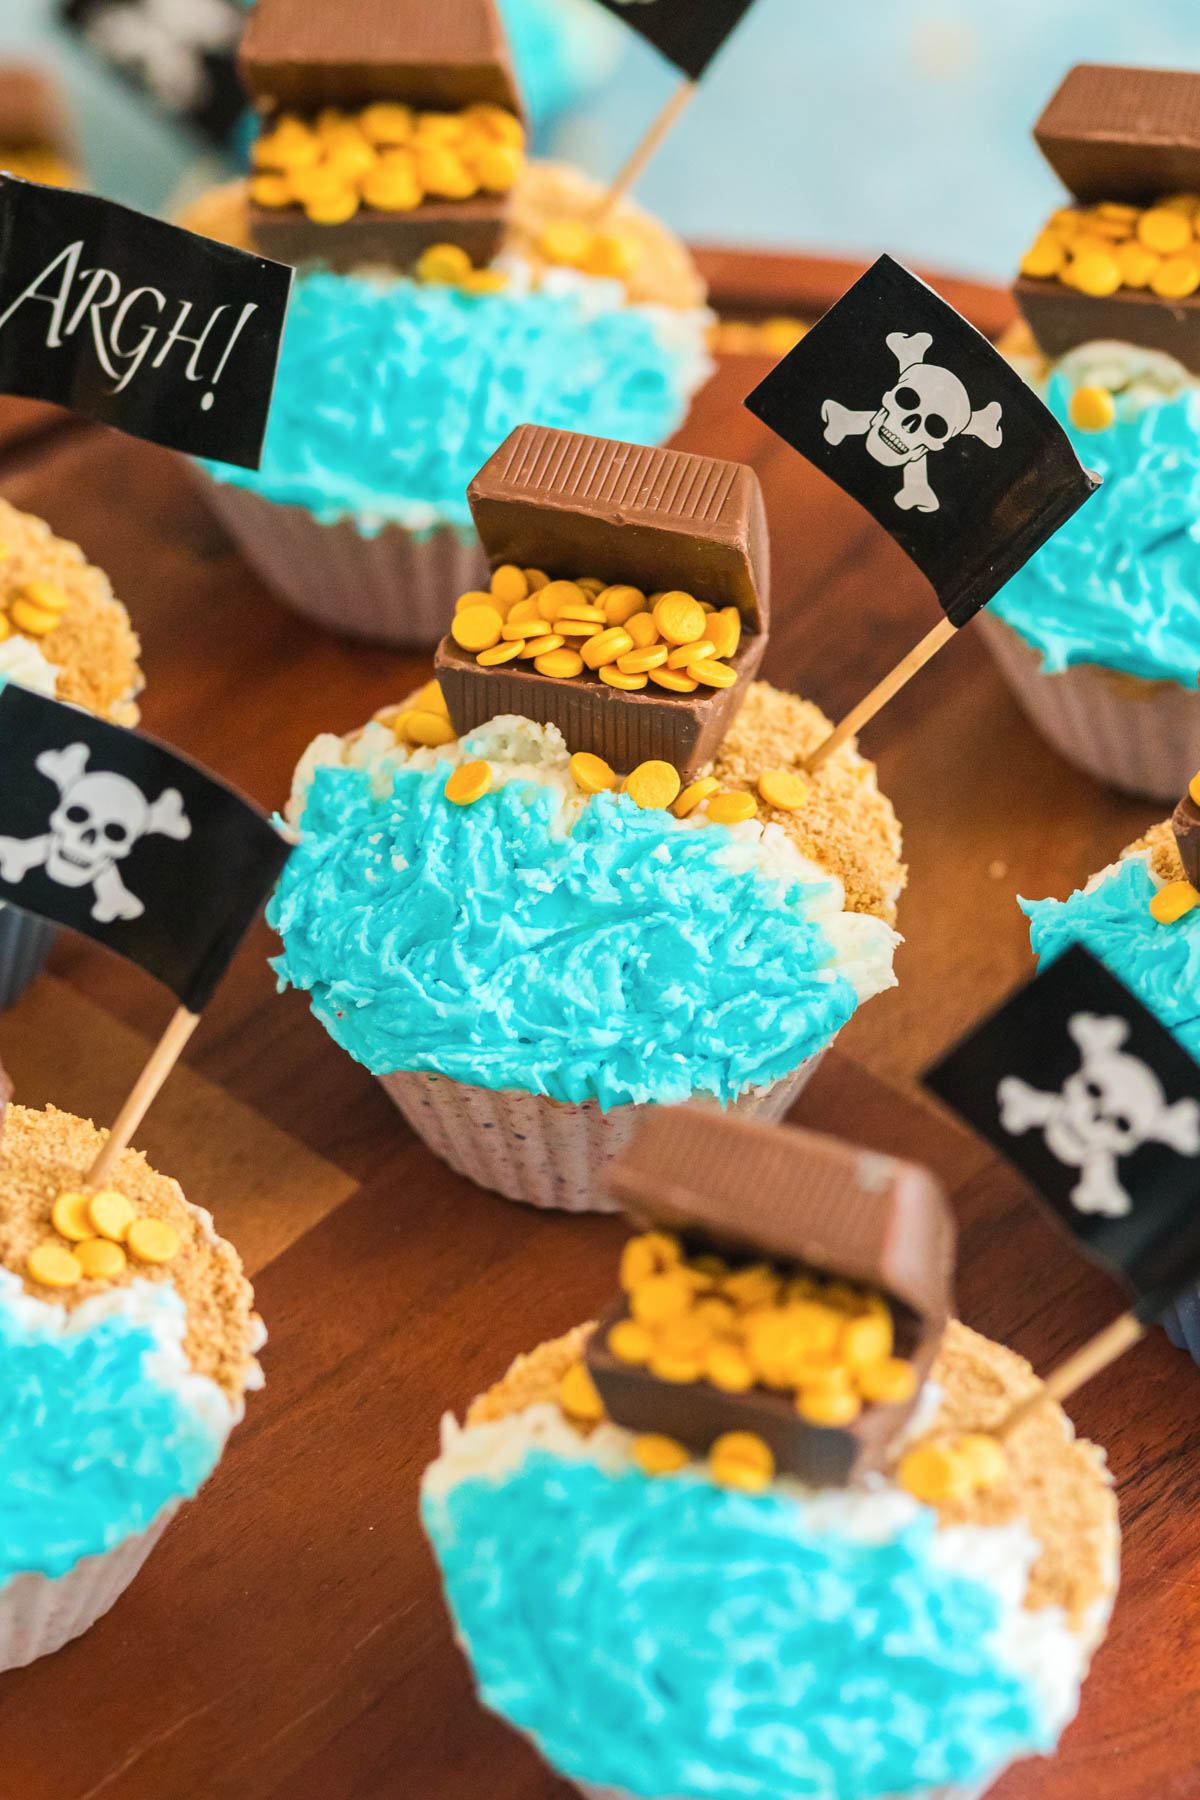
Step 13. Spoon gold sprinkles into each open chest to create the treasure. This is optional, but you can place a little melted chocolate inside the treasure chest to hold the gold coins in place.
Step 14. Finish by placing a pirate flag pick next to the chest.

How To Store Your Frosted Cupcakes
- Fridge: Store frosted Pirate Cupcakes in an airtight container for up to 3 days. Let them sit at room temperature for about 20 minutes before serving.
- Freezer: Remove the pirate flag and chocolate treasure chest first. Freeze the frosted cupcakes in a freezer-safe container for up to one month. Thaw overnight in the fridge, then add the decorations back before serving.

Tips And Tricks
- I like to crush the graham crackers until they’re almost powdery so the beach looks smooth instead of chunky.
- If using homemade cupcakes, let them cool completely before decorating so the frosting doesn’t melt.
- Wait to add the pirate flags until you are ready to serve so they stay upright. This also makes the cupcakes easier to store.
- If your frosting feels a little too soft for clean swirls, just pop it in the fridge for 10 minutes before decorating or add about 1/2 cup more of your confectioner’s sugar.
- If the frosting is too thick, just add a tiny splash of milk and mix again until it softens.
Variations And Add-ins
- Cupcakes: Swap vanilla cupcakes for chocolate cupcakes if you prefer.
- Treasures: Add edible candy pearls or chocolate chips mixed into the sand for extra treasure.
- Sand: Use crushed vanilla cookies instead of graham crackers for a lighter sand color. You can also mix a little brown sugar with the cookie crumbs for a more realistic sandy texture.
- Extract: Add a drop of coconut extract to the frosting for a tropical flavor.
- Fish: Add a few gummy fish or gummy sharks swimming in the waves.
FAQs
Yes, you can bake the cupcakes a day ahead and decorate them the next day.
You can, but homemade frosting holds the waves better.
Yes, any small candy or sprinkle that looks like treasure will work.
Absolutely! Placing treasure, sprinkles, and flags is perfect for kids.

More Fun Cupcake Recipes
- Sunflower Cupcakes
- Beach Cupcakes
- Mermaid Cupcakes
- Campfire Cupcakes
- Ice Cream Cone Cupcakes
- Mickey Mouse Cupcakes
- Harry Potter Butterbeer Cupcakes
- Beauty And The Beast Cupcakes
- 32 Best Cupcake Recipes for Any Occasion
Pirate Cupcakes
Equipment
Ingredients
- 12 baked vanilla cupcakes
- 1 ½ sticks unsalted butter ¾ cup
- 4-5 cups powdered sugar
- 2 tbsp milk
- ½ cup graham cracker crumbs Very finely ground
- Pinch of salt
- 1 tsp vanilla extract optional
- Blue food coloring
- Gold sprinkles
- 24 Hershey’s nuggets
Instructions
- In the bowl of a stand mixer, cream the butter and salt on medium speed until smooth.1 ½ sticks unsalted butter
- Slowly add the powdered sugar one cup at a time, mixing until fully combined.4-5 cups powdered sugar
- Add the milk and vanilla extract, and a pinch of salt then mix until the frosting is smooth and fluffy.2 tbsp milk, Pinch of salt, 1 tsp vanilla extract
- Use about half of the frosting to loosely frost the top of each cupcake. It does not need to look perfect at this point.12 baked vanilla cupcakes
- Dip half of each cupcake into the graham cracker crumbs to form the sandy beach.½ cup graham cracker crumbs
- Transfer about 1/3 cup of frosting into a piping bag with a small open tip.
- Pipe small dollops along the edge of the sand and gently drag them downward. Swirl lightly with a toothpick to create the crashing waves.
- Add blue food coloring to the remaining frosting and mix until evenly colored. Then, frost the plain side of each cupcake with the blue frosting, stopping at the piped edge.Blue food coloring
- Swirl the blue frosting gently with a toothpick to mimic water movement.
- Unwrap all Hershey’s nuggets. Place two nuggets in a microwave-safe dish and melt until smooth.24 Hershey’s nuggets
- Smear melted chocolate along the long edge of one nugget, then attach a second nugget to form an open treasure chest. You can use foil if needed to hold the nuggets in place while the chocolate sets.
- Repeat until all treasure chests are assembled, then place one chocolate treasure chest into the graham cracker sand of each cupcake.
- Spoon gold sprinkles into each open chest to create the treasure. This is optional, but you can place a little melted chocolate inside the treasure chest to hold the gold coins in place.Gold sprinkles
- Finish by placing a pirate flag pick next to the chest.
Notes
- Store frosted Pirate Cupcakes in an airtight container for up to 3 days. Let them sit at room temperature for about 20 minutes before serving.
- Remove the pirate flag and chocolate treasure chest, then freeze the frosted cupcakes in a freezer-safe container for up to 1 month. Thaw overnight in the fridge, then add the decorations back before serving.
- I like to crush the graham crackers until they’re almost powdery so the beach looks smooth instead of chunky.
- Be sure to let cupcakes cool completely before decorating. Otherwise the frosting may melt.
- Wait to add the pirate flags until you are ready to serve so they stay upright. This also makes the cupcakes easier to store.
- If your frosting feels a little too soft for clean swirls, just pop it in the fridge for 10 minutes before decorating or add about 1/2 cup more of your confectioner’s sugar.
- If the frosting is too thick, just add a tiny splash of milk and mix again until it softens.
Nutrition
Did You Make This Recipe?
Share it with me on Instagram @funmoneymom and follow on Pinterest @funmoneymom for more!
Let’s be friends!
Did you love this post? Make sure to comment below and let me know your thoughts! And don’t forget to follow on your favorite social network below!

About Lisa O’Driscoll
Lisa O’Driscoll is a lifestyle and parenting expert, cookbook author, and the creative force behind Fun Money Mom, a popular blog she’s run since 2014. She’s the author of the children’s cookbook Roll It, Slice It, Mash It, Dice It, designed to get kids excited about cooking. With multiple TV appearances under her belt, she loves sharing her expertise on family-friendly recipes, creative DIYs, and party planning and is always on a mission to inspire and entertain!